22 Sep 2021 Versioning NiFi Flows and Automating Their Deployment with NiFi Registry and NiFi Toolkit
When it comes to the efficient development of data flows, one can argue there should be a way to store different versions of the flows in some central repository and the possibility to deploy those versions in multiple environments, just as we would do with any piece of code for any other software.
In the context of Cloudera Data Flow, we can do so thanks to Cloudera Flow Management, powered by Apache NiFi and NiFi Registry, and NiFi Toolkit, which we can use to deploy flow versions across NiFi instances from different environments integrated with NiFi Registry.
In this article, we will demonstrate how to do this, showing you how to version your NiFi flows using NiFi Registry and how to automate their deployment by combining shell scripts and NiFi Toolkit commands.
1. Introduction
Apache NiFi is a robust and scalable solution to automate data movement and transformation across various systems. NiFi Registry, a subproject of Apache NiFi, is a service which enables the sharing of NiFi resources across different environments. Resources, in this case, are data flows with all their properties, relationships and processor configurations, but versioned and stored in Buckets – containers holding all the different versions and changes made to the flow. In other words, it enables data flow versioning in Git style. Just like versioning the code; we can commit local changes, revert them, and pull and push versions of the flows. It also offers the possibility to store versioned flows to external persistence storage, like a database.
Generally speaking, there are two possible scenarios when you would use NiFi Registry in your organisation. The first is to have one central service shared across different environments, and the second is to have one NiFi Registry service per environment.
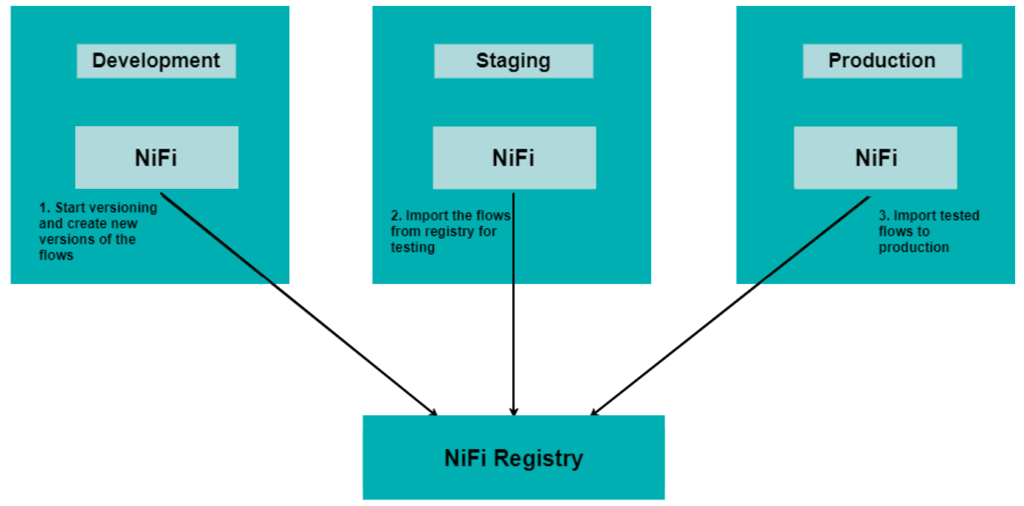
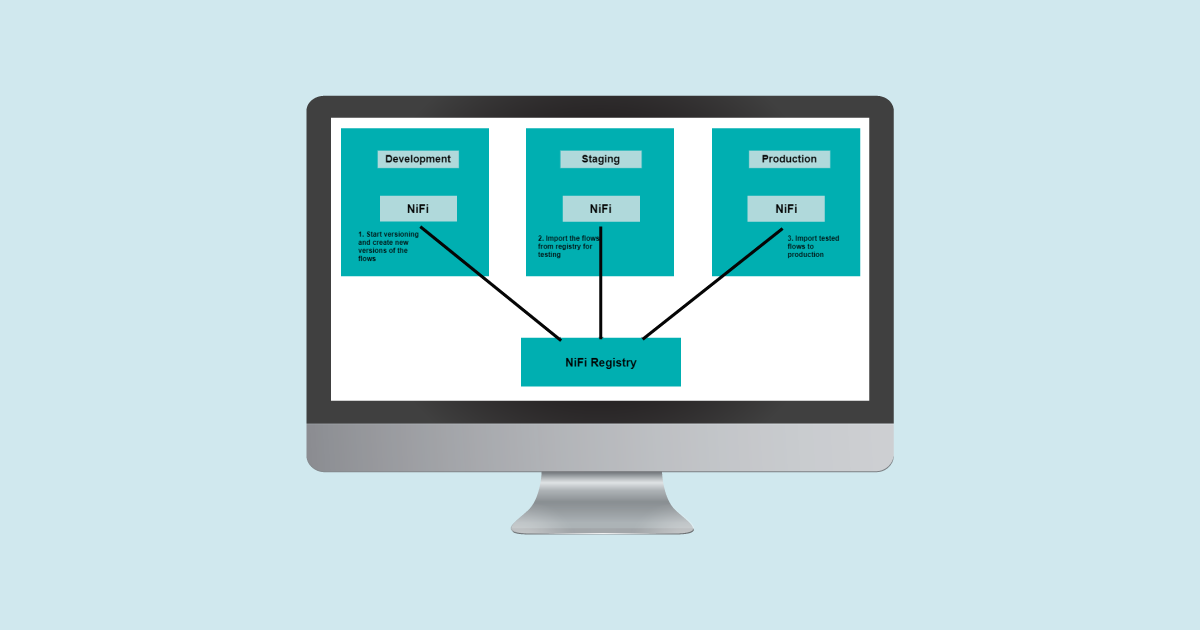
In the picture below we can see a representation of the first scenario: one NiFi Registry is used as the central instance and flows can be shared across different environments during or after their development. This is a common situation, in which we can create the flows in Development, push them to NiFi Registry in the form of multiple versions, pull them to the Staging area to conduct some tests after reaching some milestones, and eventually push them to Production once we are satisfied with the flow behaviour.
Figure 1: NiFi Registry deployment scenario 1
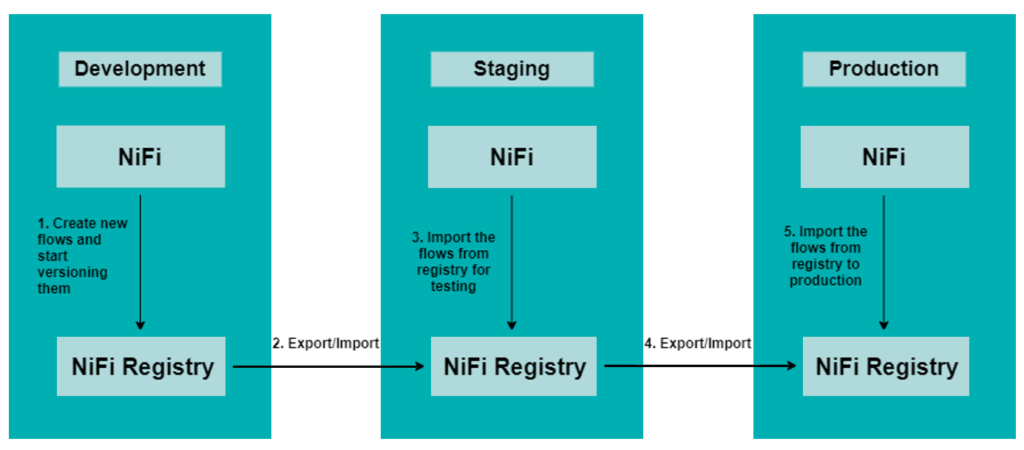
In the second scenario, depicted below, we have one NiFi Registry per environment: in this case, we can develop the desired flow in one environment, and when the flow is ready for the next logical environment, we can export it from one NiFi Registry instance and import it to the next one.
This requires more steps in comparison with the first deployment scenario, but sometimes companies have very restricted and isolated environments which cannot communicate with each other for security reasons. In such a case, this is a good option to have versioned flows and to control their development life cycle.
Figure 2: NiFi Registry deployment scenario 2
The flow migration between different NiFi Registry instances requires NiFi Toolkit commands. NiFi Toolkit is very popular among data flow administrators and NiFi cluster administrators, because it provides an easy way to operate the cluster and the data flows. It is a set of tools which enables the automation of tasks such as flow deployment, process groups control and cluster node operations. It also provides a command line interface (CLI) to conduct these operations interactively (you can check out more details about it at this link).
NiFi Toolkit can also be used to migrate the flows between NiFi instances in the same security areas with connectivity between them, as in scenario 1 described above. In this article, we will use NiFi Toolkit to migrate the flows using one common NiFi Registry integrated with two NiFi instances.
2. Demo Environment
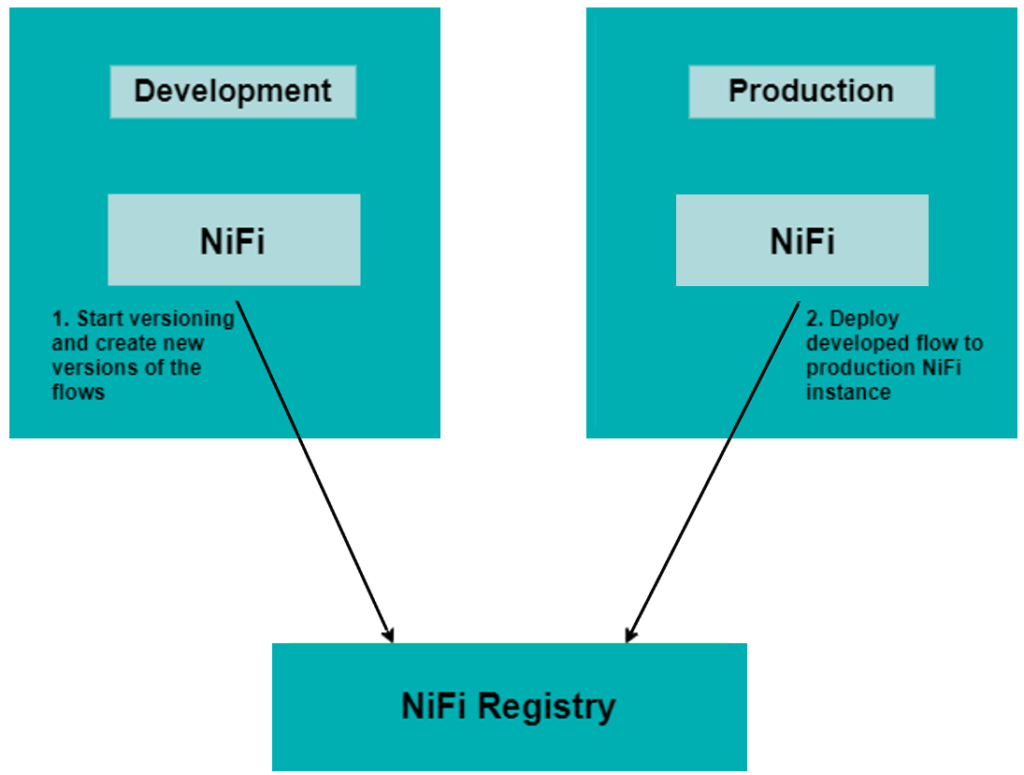
For this demonstration, we are reproducing a simplified version of the first scenario described above, using two NiFi instances running on the same machine and integrated with one NiFi Registry service, all running on Linux Ubuntu server 20.04 LTS.
Figure 3: Demo environment architecture
One NiFi instance runs on port 8080 and is used as the Development environment (see this link for details on how to install and run NiFi on your local machine is described). In this environment, we created a simple data flow which transforms CSV data to JSON format data.
Figure 4: Development NiFi instance
Another NiFi instance is used as the Production environment, running on port 8081. This instance is the final target instance to which we will be pushing all the flows that have the desired behaviour and tested logic. In our scenario, to make it simpler, we do not have a staging area for testing, but the deployment procedure that will be shown in this article is the same.
Figure 5: Production NiFi instance
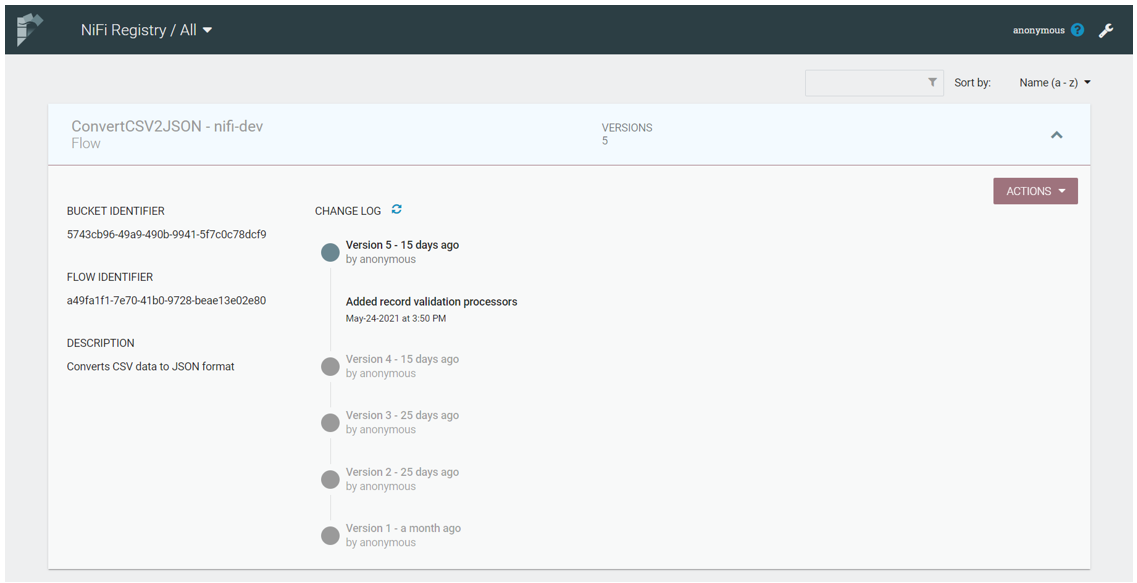
The NiFi Registry instance is running on the same server, on port 18080. The interface is much simpler than the NiFi UI, as you can see below:
Figure 6: NiFi Registry UI
In the above picture, you can see one NiFi Registry bucket called “nifi-dev” and one versioned flow called “ConvertCSV2JSON”. The same flow has 5 versions, which we can see listed from the most recent to the oldest. If we click on each version, the commit comment will be shown. If required, we can add more buckets and separate versions of the flow, according to, for example, some milestones in the development. Note that NiFi Registry stores flows at the level of a Processor Group on the NiFi canvas: it cannot store only one independent component of the flow (like, for example, a single processor).
NiFi Registry can also be configured to push versions of the flow to GitHub automatically every time a commit is done from the NiFi canvas. This section of the NiFi Registry documentation describes how to add GitHub as a flow persistence provider.
3. NiFi Flow Versioning
To be able to store different versions of the flow in the Development environment, the NiFi instance needs to be connected to the NiFi Registry service. To connect NiFi to NiFi Registry, go to the upper right corner of the NiFi taskbar and select the little “hamburger” menu button. Then, select “Controller setting” and the “Registry clients” tab. There, click on the upper right + symbol to add a new Registry client.
Figure 7: Adding a new Registry client
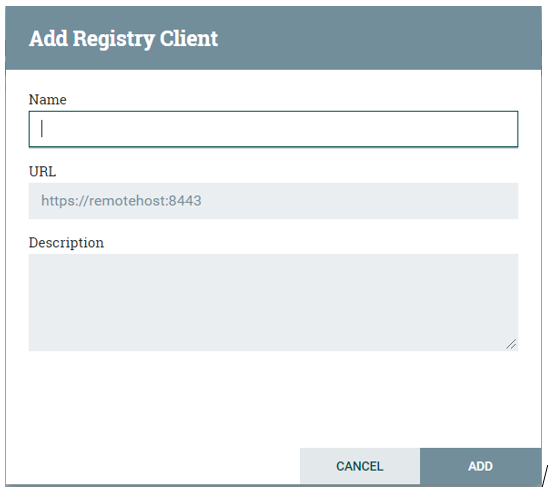
In the next window, we have to specify the Registry name and URL; optionally we can add a description.
Figure 8: Adding Registry client details
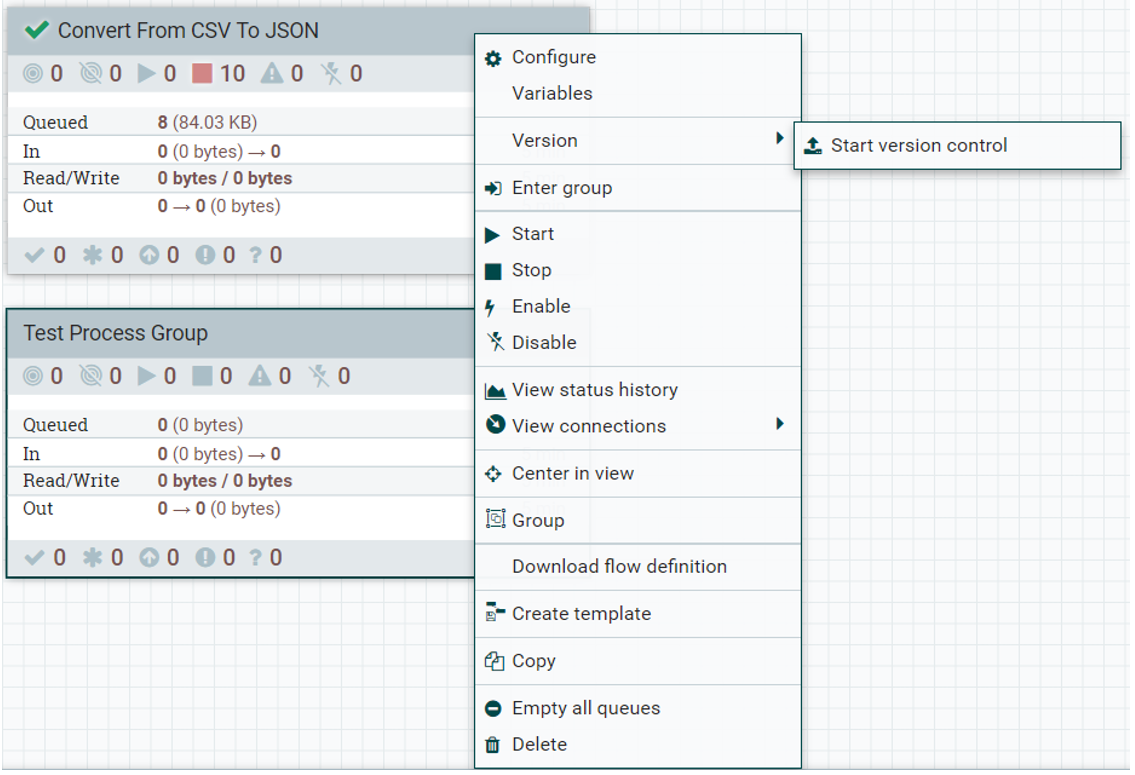
To be able to version the flows after making some changes, you need to start version control for that Processor Group. To do so, right-click on the desired Processor Group, select “Version”, and click on “Start version control”.
Figure 9: Start flow version control
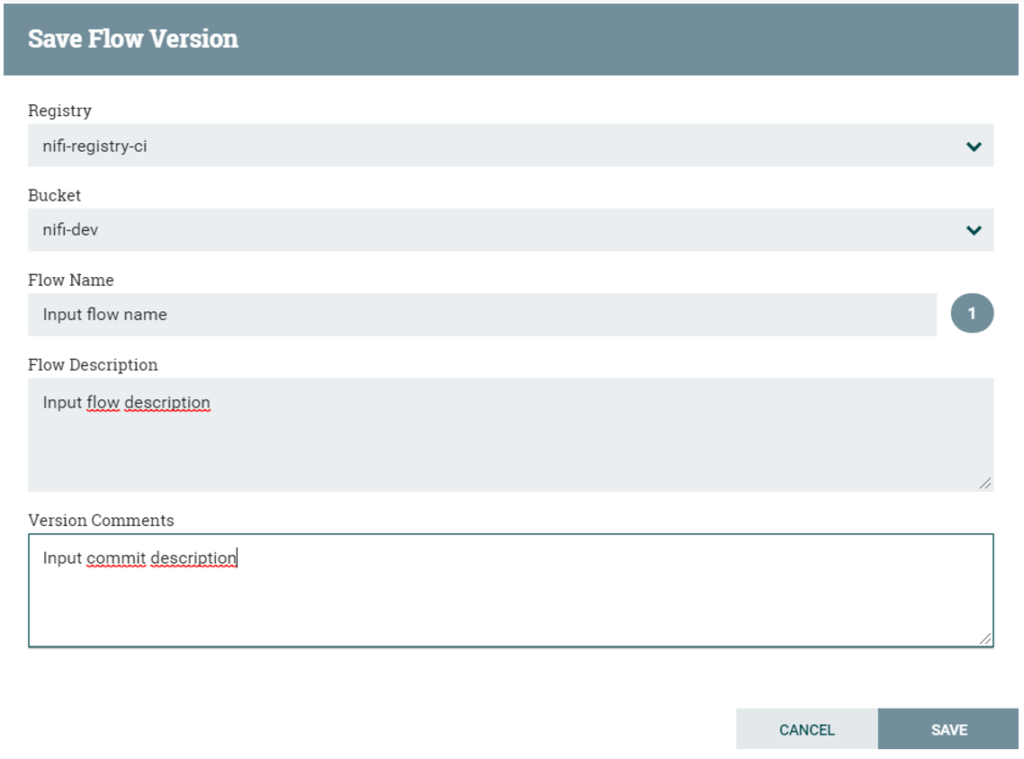
In the following window, select the desired NiFi Registry instance, select the bucket, and specify the flow name, the flow description and the commit message with a description of the changes.
Figure 10: Flow version commit details
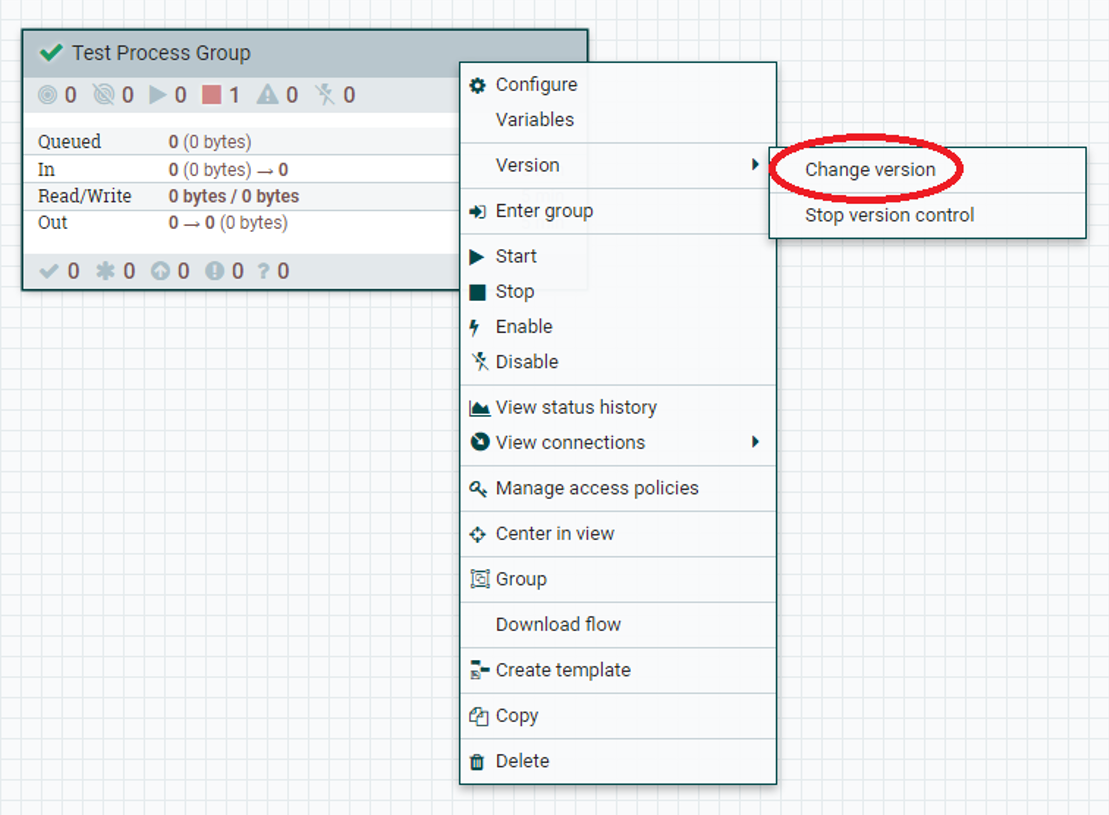
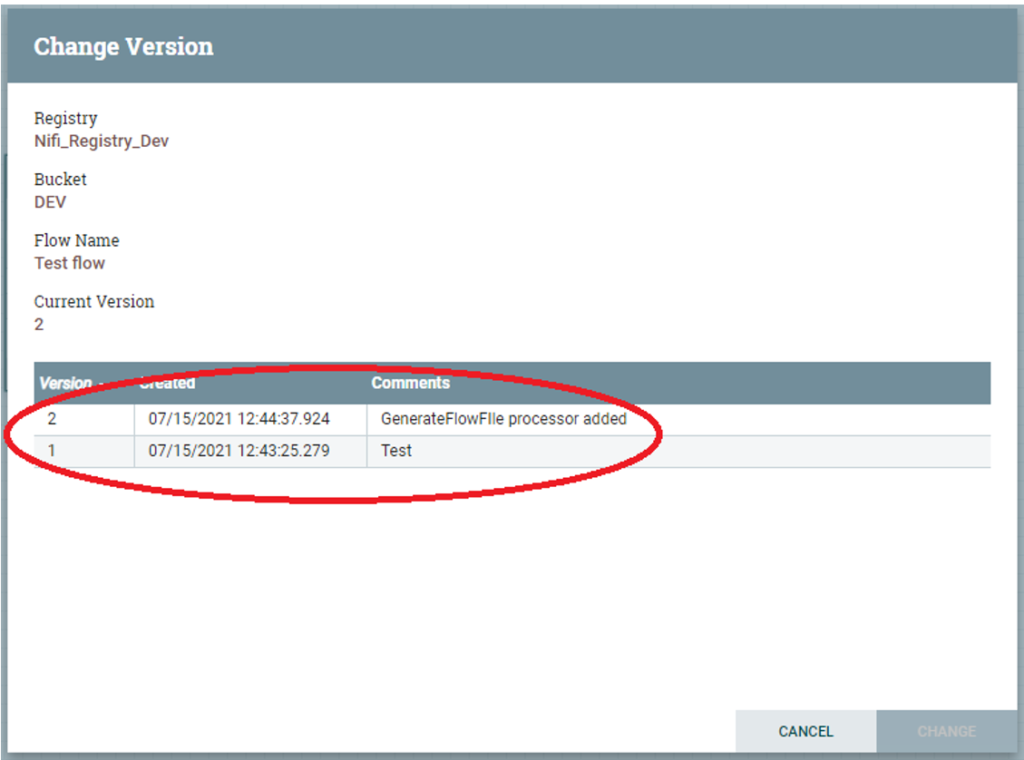
In this way, the current version of the Processor Group is saved as the initial version in the NiFi Registry bucket with its corresponding commit message. As the development of the flow progresses, you will create new versions, but you will always be able to roll back to a previous version if required. To do this, right-click on the desired Processor Group, go to “Version” and then to “Change version”.
Figure 11: Changing the flow version
A window like the one below will open, where we can select the desired version of the flow to which we want to roll back. There are also comment details for each version, so it is always a good idea to add some meaningful comments to every commit to help you later when rolling back.
Figure 12: Saved flow versions list
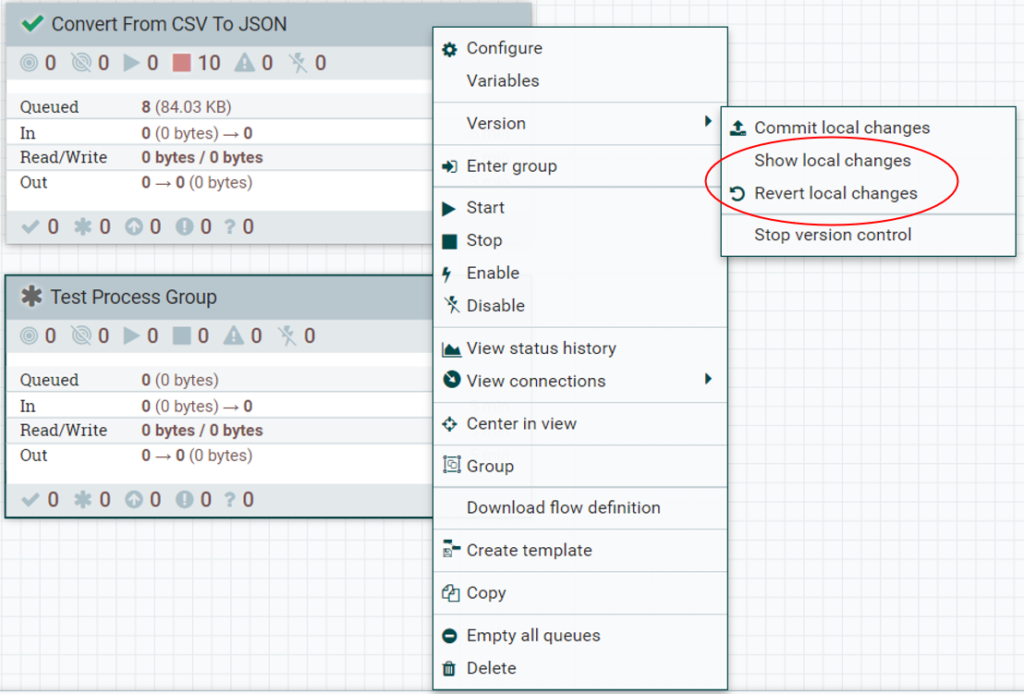
You can also list or revert local changes before they are committed: after changes have been made in the Processor Group, in the upper left corner there will be a * symbol, which indicates there are uncommitted changes in this Processor Group. After they have been committed, the symbol changes to a green ✓. To list local changes or to revert them, right-click on the desired Processor Group and then go to “Version”. After that, depending on the need, select either “Show local changes” or “Revert local changes”, as shown below:
Figure 13: Local changes actions
4. NiFi Flow Deployment without a common NiFi Registry
What we have described in the above sections relates to scenarios in which we have a central NiFi Registry that is shared between different environments. However, as we mentioned in the introduction, there may be situations in which, as seen in scenario 2, the various environments are isolated and cannot share a common NiFi Registry. For these cases we recommend applying the approach detailed below. Note that in this article, we are simulating a scenario with two NiFi instances and one NiFi Registry running on the same machine with connectivity between them; in real life this may not be the case. So before importing the exported files into the target environment, you will obviously have to move the files to a location with connectivity to the target environment.
4.1. Installing NiFi Toolkit
Nifi Toolkit can be downloaded from the Apache NiFi official page, in the Downloads section. At the time of writing, the most recent version is 1.13.2.
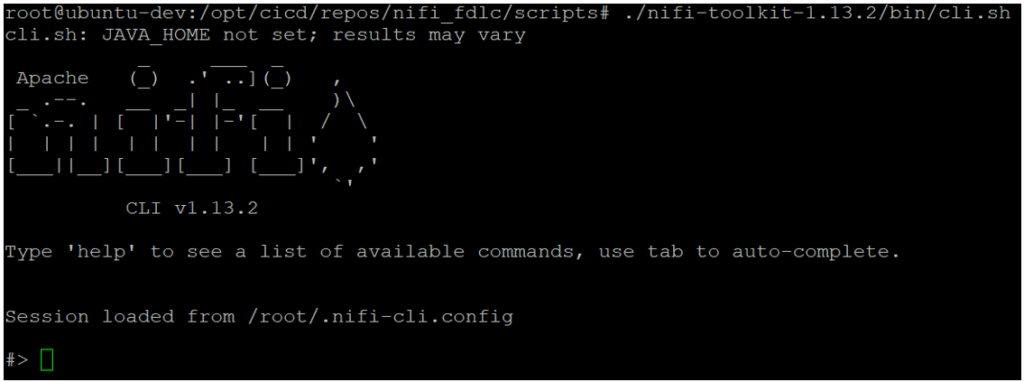
To download it, we use the “wget” command. This will download a .gzip archive to the desired folder; then we can extract the file using the “tar” tool and we can start the toolkit CLI, as shown below:
mkdir /etc/nifi-toolkit
cd /etc/nifi-toolkit
wget https://www.apache.org/dyn/closer.lua?path=/nifi/1.13.2/nifi-toolkit-1.13.2-bin.tar.gz
tar -xvf nifi-toolkit-1.13.2-bin.tar.gz
cd nifi-toolkit-1.13.2
./bin/cli.sh
The “help” command will list all possible commands which can be used inside the toolkit. In our case, we will be using the following:
- nifi list-param-contexts
- nifi export-param-contexts
- nifi import-param-contexts
- nifi merge-param-context
- registry list-buckets
- registry list-flows
- nifi pg-import
- nifi pg-change-version
- nifi pg-enable-services
- nifi pg-start
By typing “command-name help”, we can see the command description, its purpose and its possible options and arguments.
4.2. Migrating the parameter context
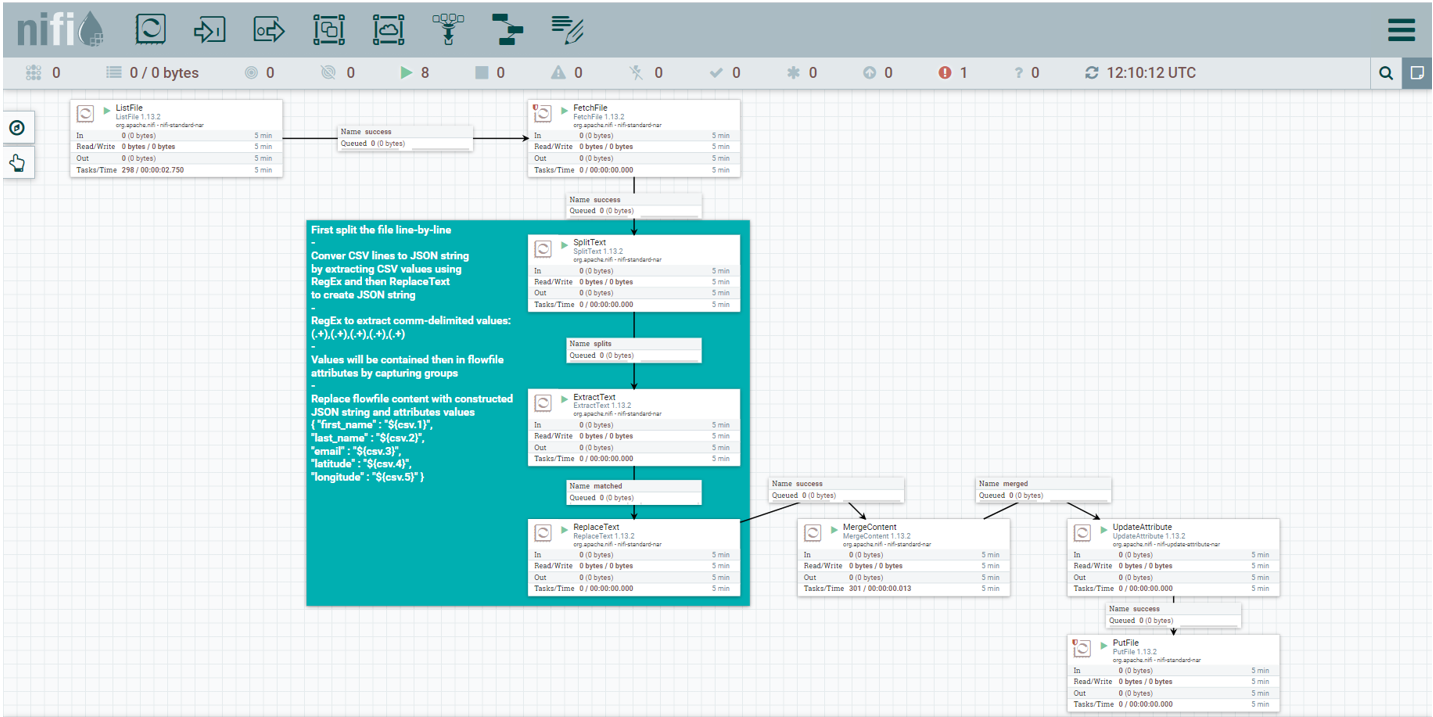
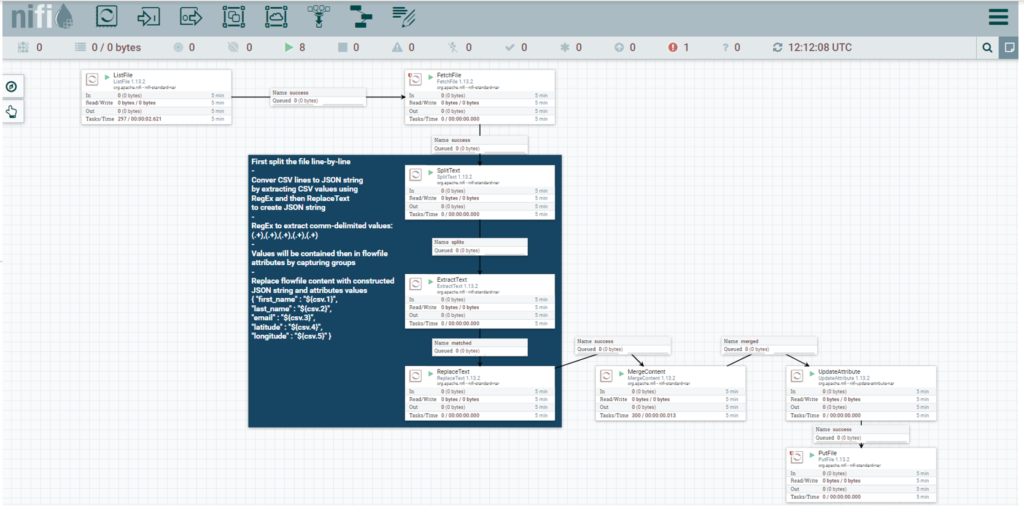
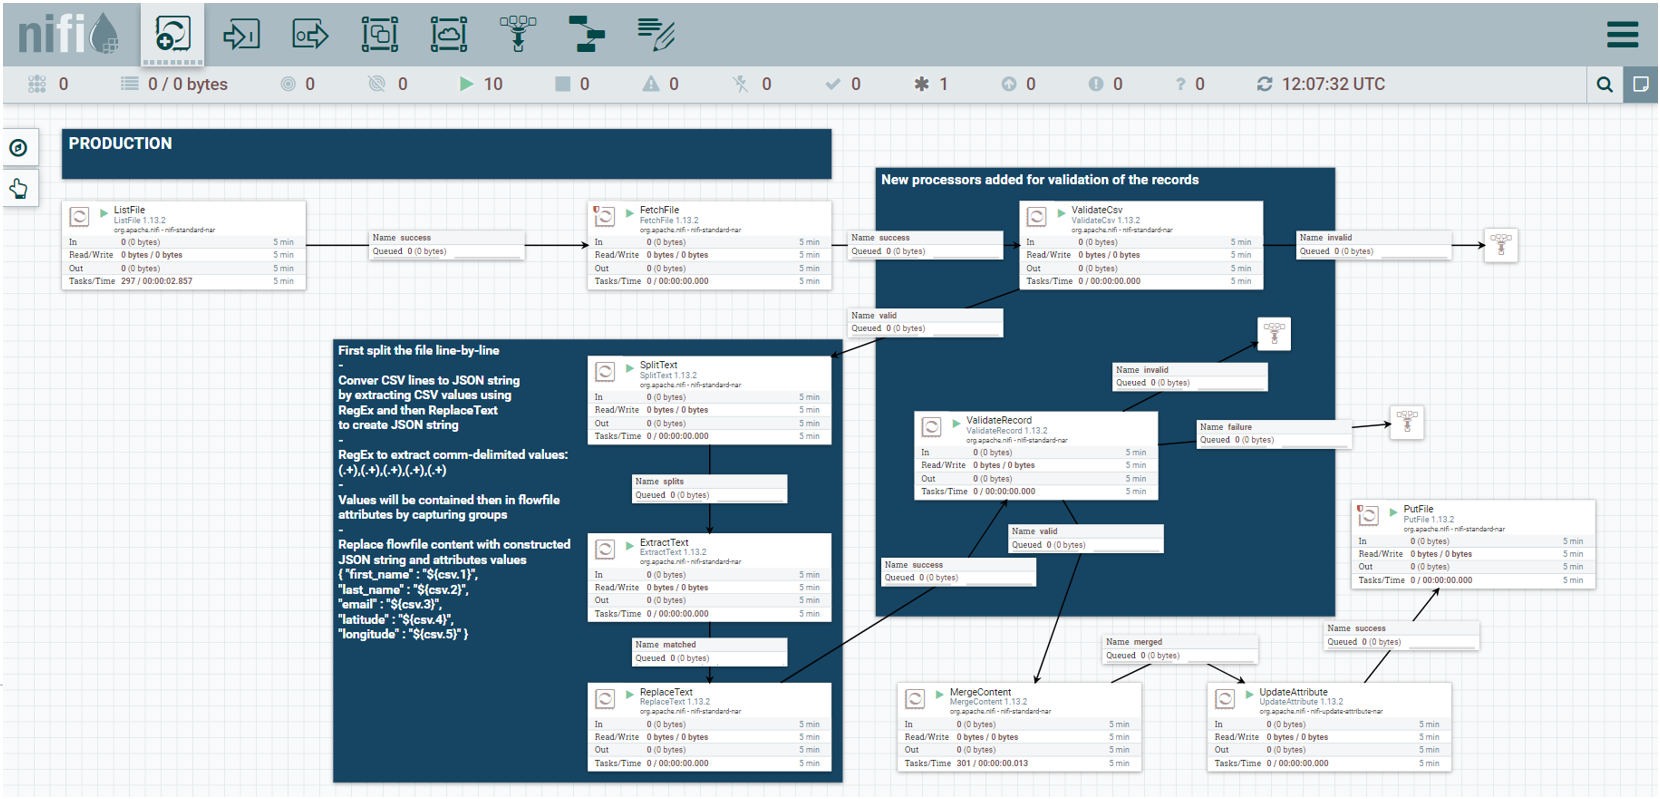
In our development NiFi instance, we have created a data flow which converts CSV data to JSON data and dumps the converted data file in a specific folder.
Figure 14: Development data flow
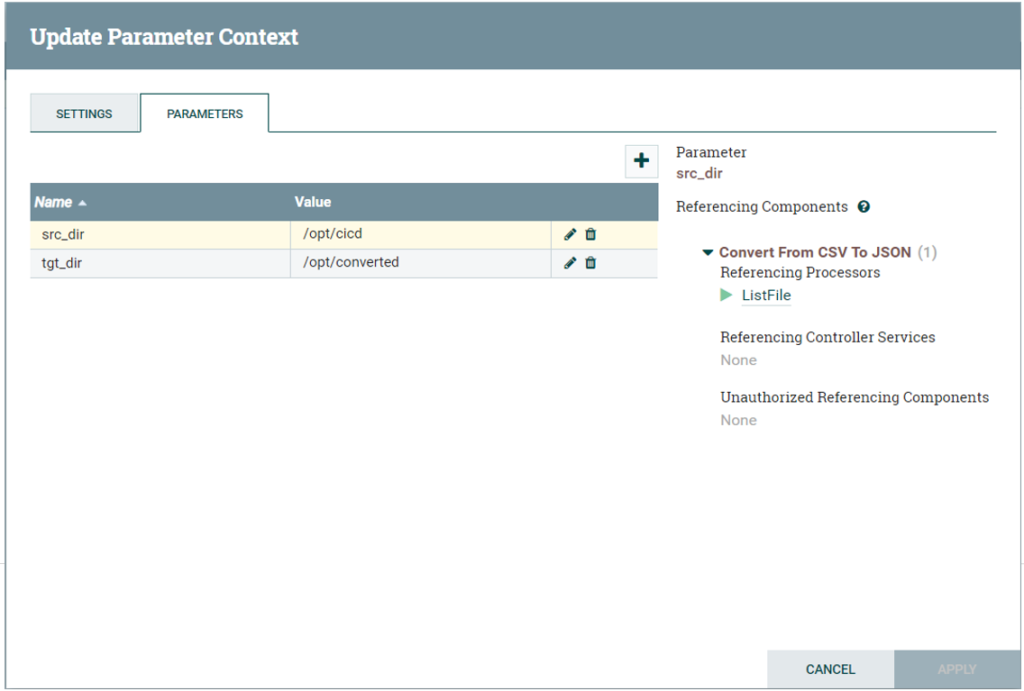
Source and target folders for the input CSV and output JSON files are specified in the parameter context of the NiFi flow.
Figure 15: Parameter context
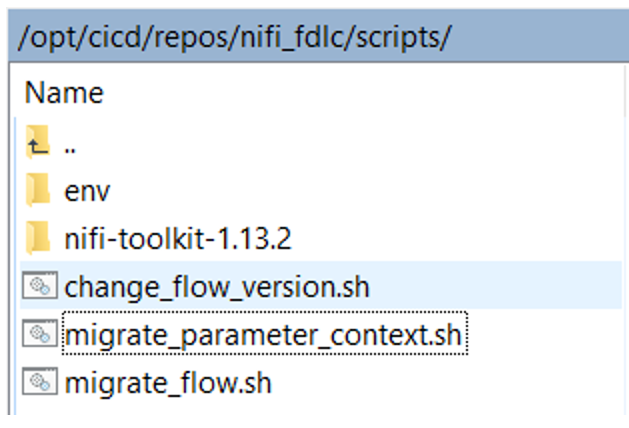
This is the first version of our flow, and we want to deploy it to the Production NiFi instance. As we said earlier, here we will use shell scripts combined with NiFi Toolkit. It is important to note that there needs to be a NiFi Toolkit folder with all its dependencies and libraries in the same folder as the deployment shell scripts. Moreover, there should also be an “env” folder containing property files for every NiFi instance we are using and for the NiFi Registry instance in the same folder.
The picture below shows the content of the folder for our demo (containing all the shell scripts we will describe in the following sections):
Figure 16: Folder structure with deployment scripts
The property files in the /env folder enable NiFi Toolkit commands to know on which URL the target NiFi instances are running. An example of the property file for the Production NiFi instance is shown below:
baseUrl=http://192.168.1.8:8081
keystore=
keystoreType=
keystorePasswd=
keyPasswd=
truststore=
truststoreType=
truststorePasswd=
proxiedEntity=
In the Property file we can also specify the keystore and truststore file paths in case we have secured NiFi instances using SSL/TLS, but this is beyond the scope of this article.
To migrate our flow to the Production NiFi instance, we first need to migrate the parameter context which is used by the FetchFile and PutFile processors in the flow. To do so, we have developed the following shell script. Note that migrating the parameter context in this way is only necessary when we are not using a common NiFi Registry; only in that situation do we need to migrate the parameter context between NiFi Registries by using exported JSON files. However, it is an option even if we have scenario 1 with a common NiFi Registry as described above, but it is not mandatory.
#!/bin/bash

#Migrates parameter context from one environment to another
set -e #Exit if any command fails
output_file="$1"# Read agruments
src_env="$2"
tgt_env="$3"
#Set Global Defaults
[ -z "$FLOW_NAME" ] && FLOW_NAME="ConvertCSV2JSON"
case "$src_env" in
dev)
    SRC_PROPS="./env/nifi-dev.properties";;
*)
    echo "Usage: $(basename "$0")    "; exit 1;;
esac
case "$tgt_env" in
prod)
    TGT_PROPS="./env/nifi-prod.properties";;
*)
    echo "Usage: $(basename "$0")    "; exit 1;;
esac
echo "Migrating parameter context from '${FLOW_NAME}' to ${tgt_env}...."
echo "==============================================================="
echo -n "Listing parameter contexts from environment "$src_env"....."
param_context_id=$(./nifi-toolkit-1.13.2/bin/cli.sh nifi list-param-contexts
-ot json -p "$SRC_PROPS" | jq '.parameterContexts[0].id')
echo "[\033[0;32mOK\033[0m]"
echo -n "Exporting parameter context from environemnt ${src_env}......"
./nifi-toolkit-1.13.2/bin/cli.sh nifi export-param-context -pcid ${param_context_id}
-o ${output_file} -p "$SRC_PROPS" > /dev/null
echo "[\033[0;32mOK\033[0m]"
echo -n "Importing parameter context to environment ${tgt_env}........"
./nifi-toolkit-1.13.2/bin/cli.sh nifi import-param-context -i ${output_file} -p "$TGT_PROPS" >
/dev/null
echo "[\033[0;32mOK\033[0m]"
echo "Migration of parameter context from ${src_env} to ${tgt_env} successfully finished!"
exit 0
This script is referencing the environment property files that we mentioned before. In total, it is using three arguments:
- the path of the JSON export file with parameter context
- the name of the Source environment
- the name of the Production environment
The first step of the script lists the parameter contexts on the Development environment and saves the parameter context identifier in a local variable for later usage. This is done by the JSON command line tool “jq”, which we are using to mimic the backreferencing feature: in the interactive NiFi Toolkit mode, results of the previously typed commands can be referenced using the & character (as described here); in our case, however, since we are in a shell script, backreferencing is not possible, so we have to save the command results in JSON format in the local variable, and use them in the next command.
techo@ubuntu-dev:/opt/cicd/repos/nifi_fdlc/scripts$ sh migrate_parameter_context.sh
/opt/cicd/repos/nifi_fdlc/scripts/env/dev_parameter_context.json dev prod
Migrating parameter context from 'ConvertCSV2JSON' to prod....
===============================================================
Listing parameter contexts from environment dev.....[OK]
Exporting parameter context from environment dev......[OK]
Importing parameter context to environment prod........[OK]

Migration of parameter context from dev to prod successfully finished!
Once the script is completed successfully, we can see that the parameter context has been imported to the Production NiFi environment.
Figure 17: Imported Parameter context in production NiFi instance
4.3. Migrating the developed flow
After migrating the parameter context, we are ready to migrate our developed flow from the Development to the Production NiFi instance. To do so, we will use another shell script which includes some NiFi Toolkit commands for importing process groups from one instance to another. The requirement for this task is that both NiFi instances are integrated with the central NiFi Registry instance. The shell script for the migration has the following code:
#!/bin/bash

#Migrates flow from one environment to another
#Exit if any command fails
set -e
# Read agruments
version="$1"
target_env="$2"
#Set Global Defaults
[ -z "$FLOW_NAME" ] && FLOW_NAME="ConvertCSV2JSON"
case "$target_env" in
prod)
    PROD_PROPS="./env/nifi-prod.properties";;
*)
    echo "Usage: $(basename "$0")   "; exit 1;;
esac
echo "Migrating flow '${FLOW_NAME}' to environment ${target_env}"
echo "==============================================================="
echo -n "Listing NiFi registry buckets......"
bucket_id=$(./nifi-toolkit-1.13.2/bin/cli.sh registry list-buckets -ot json
-p "./env/nifi-registry.properties" | jq '.[0].identifier')
echo "[\033[0;32mOK\033[0m]"
echo -n "Listing NiFi registry flows........"
flow_id=$(./nifi-toolkit-1.13.2/bin/cli.sh registry list-flows -b ${bucket_id} -ot json
-p "./env/nifi-registry.properties" | jq '.[0].identifier')
echo "[\033[0;32mOK\033[0m]"
echo -n "Deploying flow ${FLOW_NAME} to environment ${target_env}......."
./nifi-toolkit-1.13.2/bin/cli.sh nifi pg-import -b ${bucket_id} -f ${flow_id} -fv ${version}
-p "$PROD_PROPS" > /dev/null
echo "[\033[0;32mOK\033[0m]"
echo "Flow deployment to environment ${target_env} successfully finished!"
exit 0
This script is also using the property files from the /env folder to locate the URL on which NiFi Registry and the Production NiFi instances are running. It is using two arguments: the flow version number, and the name of the environment which the script uses to locate the property file and the required URL.
The first step in the script lists all the buckets from NiFi Registry and saves the bucket identifier in a local variable. In the following step, the script lists the flow identifier and saves it in a local variable for later usage. In the last step, the script uses the identifier from the previous step to find the flow in the NiFi Registry before importing it to the Production NiFi instance.
techo@ubuntu-dev:/opt/cicd/repos/nifi_fdlc/scripts$ sh migrate_flow.sh 6 prod
Migrating flow 'ConvertCSV2JSON' to environment prod
===============================================================
Listing NiFi registry buckets......[OK]
Listing NiFi registry flows........[OK]
Deploying flow ConvertCSV2JSON to environment prod.......[OK]
Flow deployment to environment prod successfully finished!
After the script execution is finished, we can see our flow has been deployed in the Production NiFi instance:
Figure 18: Deployed flow in production NiFi instance
4.4. Changing the flow version live
The flow is now deployed in the Production NiFi instance, and it is up and running. Let us now suppose that the business users realised that there are some invalid records in the CSV data coming in and out of the flow. These records are empty, having value “null” or just an empty string, so we need to introduce some data quality checks in our flow and develop a new version of it. After the development is finished, we want to migrate the flow to the Production environment, but we do not want to interfere with the existing flow which is already running, and maybe there is some data in the pipeline that we do not want to corrupt. To do so, we will use another shell script combined with NiFi Toolkit commands which will allow us to migrate the flow without risking such errors.
On the Development NiFi instance we have prepared the new version of the flow. It includes an updated parameter context (with a new parameter called “validation_schema_name”), two new processors to validate data records (“ValidateCsv” and “ValidateRecord”) and new Controller services to go along with them. All of these elements will be migrated to the Production NiFi instance.
First, we need to update the parameter context. This can be done using the NiFi Toolkit command for merging parameter contexts, as in the shell script shown below:
#!/bin/bash

#Merges parameter context from one environment with another
#Adds missing parameters from one environment that are missing
#in another environment

#Exit if any command fails
set -e
# Read agruments
output_file="$1"
src_env="$2"
tgt_env="$3"
pc_id="$4"
#Set Global Defaults
[ -z "$FLOW_NAME" ] && FLOW_NAME="ConvertCSV2JSON"
case "$src_env" in
dev)
    SRC_PROPS="./env/nifi-dev.properties";;
*)
    echo "Usage: $(basename "$0")     "; exit 1;;
esac
case "$tgt_env" in
prod)
    TGT_PROPS="./env/nifi-prod.properties";;
*)
    echo "Usage: $(basename "$0")    "; exit 1;;
esac
echo "Merging parameter context from '${FLOW_NAME}' to ${tgt_env}...."
echo "==============================================================="
echo -n "Listing parameter contexts from environment "$src_env"....."
param_context_id=$(./nifi-toolkit-1.13.2/bin/cli.sh nifi list-param-contexts -ot json
-p "$SRC_PROPS" | jq '.parameterContexts[0].id')
echo "[\033[0;32mOK\033[0m]"
echo -n "Exporting parameter context from environment "${src_env}"......"
./nifi-toolkit-1.13.2/bin/cli.sh nifi export-param-context -pcid ${param_context_id}
-o ${output_file} -p "$SRC_PROPS" > /dev/null
echo "[\033[0;32mOK\033[0m]"
echo -n "Merging parameter context to environment "${tgt_env}"........"
./nifi-toolkit-1.13.2/bin/cli.sh nifi merge-param-context -pcid ${pc_id} -i ${output_file}
-p "$TGT_PROPS" > /dev/null
echo "[\033[0;32mOK\033[0m]"
echo "Merging parameter context from "${src_env}" with "${tgt_env}" successfully finished!"
exit 0
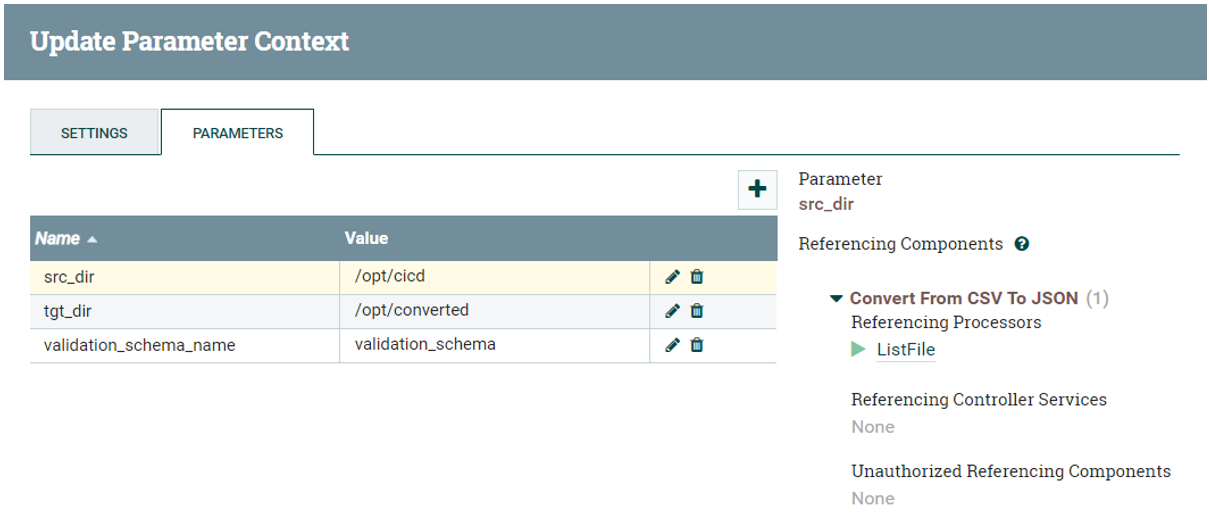
After the script has been successfully executed, we can see that the parameter context in the Production NiFi instance has the newly added parameter containing the validation schema name.
Figure 19: Merged parameter context in production NiFi
Now we can migrate the newly developed flow to the Production NiFi instance. To do so, we use another shell script. The first step implicitly disables all the services and controllers in the Production flow and changes the flow version to the desired new one; the second step re-enables all the services and controllers; the last step restarts the Processor Group to continue with the data flow.
#!/bin/bash

#Deploys development flow to target environment
#Exit if any command fails
set -e
# Read agruments
version="$1"
target_env="$2"
target_pgid="$3"
#Set Global Defaults
[ -z "$FLOW_NAME" ] && FLOW_NAME="ConvertCSV2JSON"
case "$target_env" in
dev)
    DEV_PROPS="./env/nifi-dev.properties";;
prod)
    PROD_PROPS="./env/nifi-prod.properties";;
*)
    echo "Usage: $(basename "$0")    "; exit 1;;
esac
echo "Deploying version ${version} of '${FLOW_NAME}' to ${target_env}"
echo "==============================================================="
echo -n "Checking current version..."
current_version=$(./nifi-toolkit-1.13.2/bin/cli.sh nifi pg-get-version -pgid "$target_pgid" -ot json
-p "$PROD_PROPS" | jq '.versionControlInformation.version')
echo "[\033[0;32mOK\033[0m]"
echo "Flow ${FLOW_NAME} in ${target_env} is currently at version: ${current_version}"
echo -n "Deploying flow........."
./nifi-toolkit-1.13.2/bin/cli.sh nifi pg-change-version -pgid "$target_pgid" -fv $version
-p "$PROD_PROPS" > /dev/null
echo "[\033[0;32mOK\033[0m]"
echo -n "Enabling services......"
./nifi-toolkit-1.13.2/bin/cli.sh nifi pg-enable-services -pgid "$target_pgid" -p "$PROD_PROPS" > /dev/null
echo "[\033[0;32mOK\033[0m]"
echo  -n "Starting process group...."
./nifi-toolkit-1.13.2/bin/cli.sh nifi pg-start -pgid "$target_pgid" -p "$PROD_PROPS" > /dev/null
echo "[\033[0;32mOK\033[0m]"
echo "Flow deployment successfully finished, ${target_env} is now at version ${version}!"
exit 0
After a successful execution, we can see that the updated flow has been deployed in the NiFi Production instance, and is running correctly.
techo@ubuntu-dev:/opt/cicd/repos/nifi_fdlc/scripts$ sh change_flow_version.sh 7 prod
fa62a037-0179-1000-7075-953ab6326d53
Deploying version 7 of 'ConvertCSV2JSON' to prod
===============================================================
Checking current version...[OK]
Flow ConvertCSV2JSON in prod is currently at version: 6
Deploying flow.........[OK]
Enabling services......[OK]
Starting process group....[OK]
Flow deployment successfully finished, prod is now at version 7!
Figure 20: Deployed flow in Production NiFi instance
Conclusion
In this article, we have explained how to use NiFi Registry to version data flows, and how to use NiFi Toolkit alongside it to automate flow deployments to another Nifi instance. We have integrated NiFi Registry and NiFi Toolkit with two NiFi instances to store and deploy different flow versions. We have also shown how to commit, pull, list, and revert changes to our flow, and demonstrated how to automate the flow deployment using a combination of shell scripts and NiFi Toolkit commands.
With these tools, both developers and administrators can benefit from a more efficient data flow development, while business users can expect significantly less down-time when the flow logics need to be changed and deployed to production. The shell scripts we developed can be run manually by sysadmins or they can be used in CI/CD pipelines to completely automate the deployment of the NiFi data flow. Either way, they significantly improve and speed up the deployment process.
At ClearPeaks, we are experts on solutions like this. If you have any questions or need any help related to Big Data technologies, Cloudera or NiFi services, please contact us. We are here to help you!

