05 Oct 2015 Oracle BI Cloud Service Part III: Modeling Data
Data Modeler tool
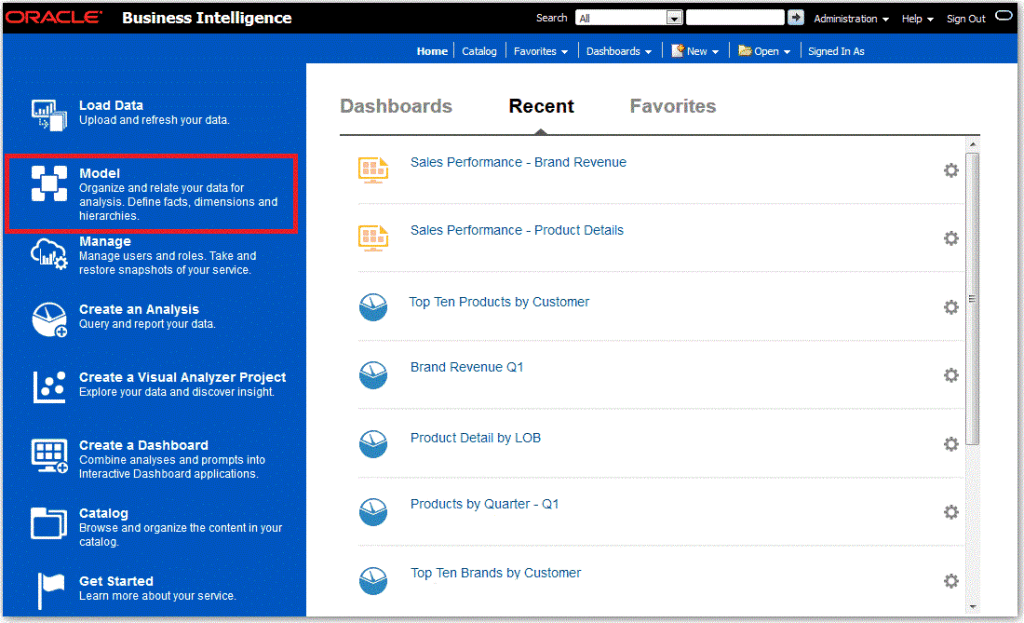
In the last post of this BICS series, we reviewed how data can be loaded into the cloud. Once you have all your data loaded and ready, it is time to build the business model, or in other words, create the repository. For that purpose, a browser-based tool called Data Modeler is accessible from the home page of the BI Cloud Service.
Figure 1: Accessing the Data Modeler tool
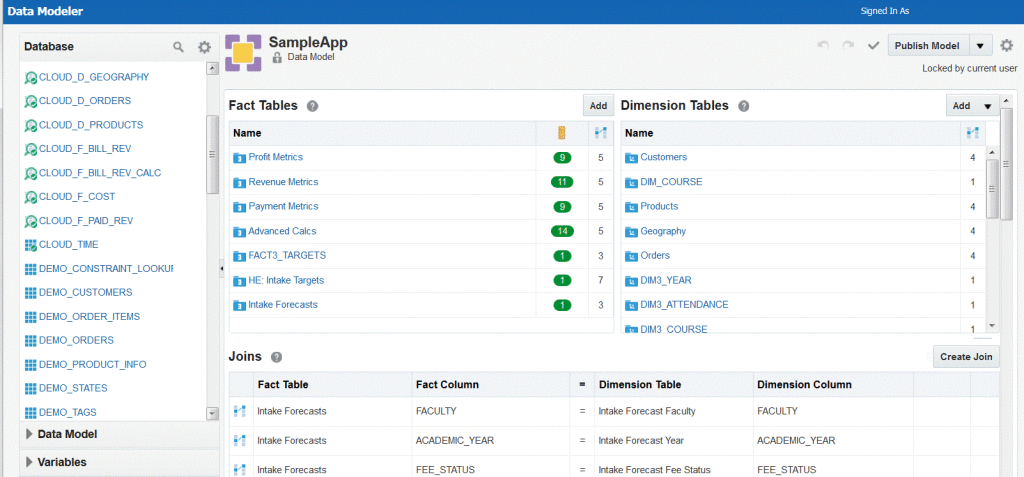
Data Modeler is the equivalent to the Administration Tool of the on-premise OBI, although much simplified and with a reduced set of its capabilities, considering that the main premise of the cloud version of OBI is precisely that is should be simple and with a fast deployment cycle. Still, the Data Modeler tool allows you to build a repository from your source tables with all the basic features of OBIEE Admin Tool, and all from your web browser. The application is divided into panes, with the left pane listing database objects, data model objects, variables, and users & roles, and the right pane listing in detail the fact tables, dimension tables, and joins in your data model.
Figure 2: Data Modeler
Since we are in a cloud environment, there has to be a way to ensure that multiple users can modify the model concurrently. Data Modeler uses a Lock & Edit system for this, so that users must lock the data model before making any changes to the model and database views (note that the lock only affects the Data Modeler tool and does not prevent other users from changing database views using other tools such as SQL Developer). Only one user at a time can have the lock, with the possibility to override locks and discard changes made by other users if you have administrative privileges.
After every change, the data model has to be validated (equivalent to a consistency check in OBIEE Admin Tool), and any validation error will appear at the bottom of the right pane. All the changes made to the model need to be published in order to to save them permanently and make them available to other users. There is the possibility to retain the lock after publishing the changes, discard the changes and release the lock, and discard the changes reverting to the previous published state. Data should be refreshed frequently to ensure that it reflects the most up-to-date information. You can refresh the source objects, the data model, and synchronize with the database to automatically detect new columns, obsolete objects, and other discrepancies. It is advisable to clear the cache after loading new data as well, to ensure that the most recent data is displayed in analyses. Data Modeler also offers users the possibility to create source views, i.e., saved data queries in the database. Source views are useful when using a single table as a source for more than one table, when creating a dimension table based on multiple source tables, and when performing pre-aggregation calculations.
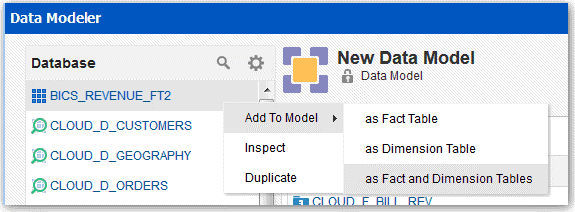
In general source views facilitate the handling of model objects and should be used as a base when subsequent changes in these objects might be needed. You can partition a single source table into fact tables and dimension tables, or create fact and dimension tables from single source tables.
Figure 3: Adding fact and dimension tables to the model
Joins are automatically created between fact and dimension tables if the join reference exists in the source tables, and of course you can create manually other joins in Data Modeler. Hierarchies and levels can be added to dimension tables joined to fact tables, and aggregation levels can be set for measures. As in OBIEE Admin Tool, you can make use of variables (static / dynamic repository variables and session variables supported). You can also secure the model, setting permissions to tables, columns, and even records using filters. A recently added feature of Data Modeler is the possibility to upload a full repository to the cloud service, so if you had already modeled your business data with OBIEE you don’t need to start from scratch in the cloud. This also allows a single model to be used both on-premise and in the cloud. Something to bear in mind however is that repositories uploaded from on-premises OBIEE cannot be edited through the BICS Data Modeler, so changes should be done in OBIEE Admin Tool and then uploaded again (after the consistency check). So once you have your data and repository in the cloud, you are ready to start reporting against it. Check out our next post of the BICS series to learn about analyses, reports, and dashboards in the BI Cloud Service.


