19 Jun 2024 Introduction to Version Control in IDMC (Informatica Data Management Cloud) with GitHub
Version control has become an indispensable tool in the modern computing and BI world, thanks to the advantages it offers, such as better cooperation and coordination across large teams, software traceability, and its ability to manage backups and precise rollbacks for multiple versions of the software.
For all these reasons, implementing version control has become essential in almost every system, including, of course, the data loading, reading, and storage systems of all businesses. That’s why Informatica Data Management Cloud (IDMC) has integrated two different tools for this purpose within its work environment: GitHub and Azure DevOps. After integrating the repository through either of these options into IDMC, they function in the same way, the only distinction being the path taken for repository creation and configuration.
The implementation also works with every IDMC feature, meaning that we can back up any kind of component (data integration, mass ingestion, file listener) at the same time and in the same repository. We can harness the advantages of version control regardless of what tools we are using!
In this article we will show you how to create, configure and integrate a GitHub repository into IDMC, how to use it, and how versioning in IDMC works. Once we have finished the integration, we will benefit from:
- Direct management of the repository from the IDMC environment: We can handle everything related to the version control of the system from the integration tool, so we don’t need to manage both environments (Git and IDMC) simultaneously.
- IDMC has retained the same versioning system that was implemented in the old PowerCenter tool, which is simple and intuitive, even for those unfamiliar with Git or any other version control tool.
Repository Creation, Configuration, and Integration
Let’s see how to create an IDMC-compatible repository in GitHub and how to connect it to the IDMC platform.
Repository Creation in GitHub
First of all, we need to create a GitHub repository. This can be done by simply using the New Repository option on the GitHub platform; the initial options are sufficient. For security and privacy concerns, we recommend creating a private repository and then managing the users and their privileges.
For the purposes of this blog post, we have created the following sample repository:
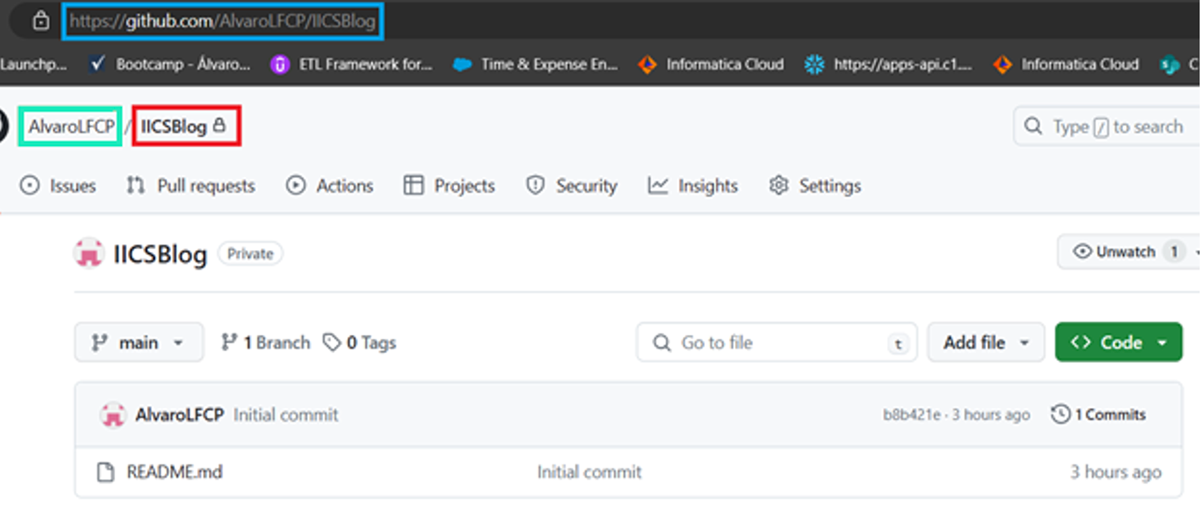
Figure 1: GitHub repository example
In this example, the green box indicates the owner of the repository. Since it is a private repository and we haven’t added any additional users, the owner is the only one with privileges over it. The red box indicates the name of the repository, and the blue indicates the URL; both will be needed when integrating it with IDMC.
Another requirement is to generate a Personal access token, currently the only way to pass credentials in IDMC. To do this, open your profile menu and click on Settings:
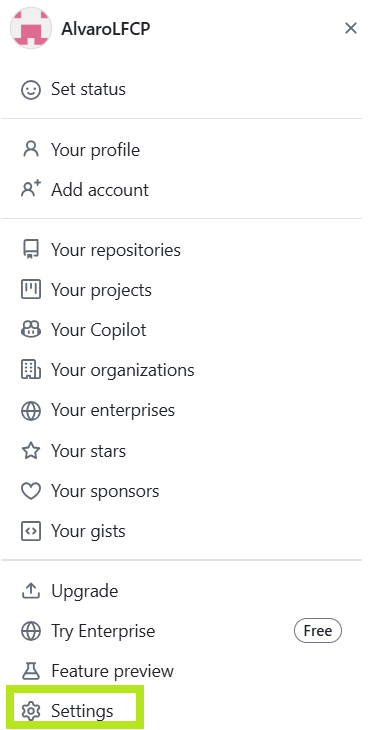
Figure 2: Profile Menu
Then go to Developer settings, the last option in the left submenu:
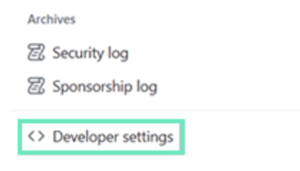
Figure 3: Left Submenu
From there we go to Personal access tokens and then Tokens (classic):
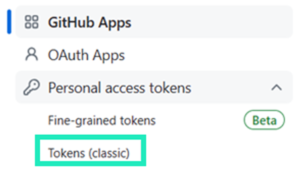
Figure 4: External apps and token submenu
And now we can go to Generate a personal access token.
It’s important to understand that the token generated will represent the user who created it. For example, if AlvaroLFCP created the token, it would inherit the privileges associated with that user. During token creation, it is possible to restrict the level of access provided. It is recommended that the repository admin account generates the tokens, as this account has the authority to grant all privileges and manage user-related tasks centrally, aligning with best practices.
For IDMC usage, the token should have a minimum of repo, write, delete, and project privileges. Enabling audit_log is also advisable, as it allows IDMC to record its activities in the repository log. Additionally, the token’s duration can be limited, or it can be set to permanent. Of course, periodically changing the token enhances security:
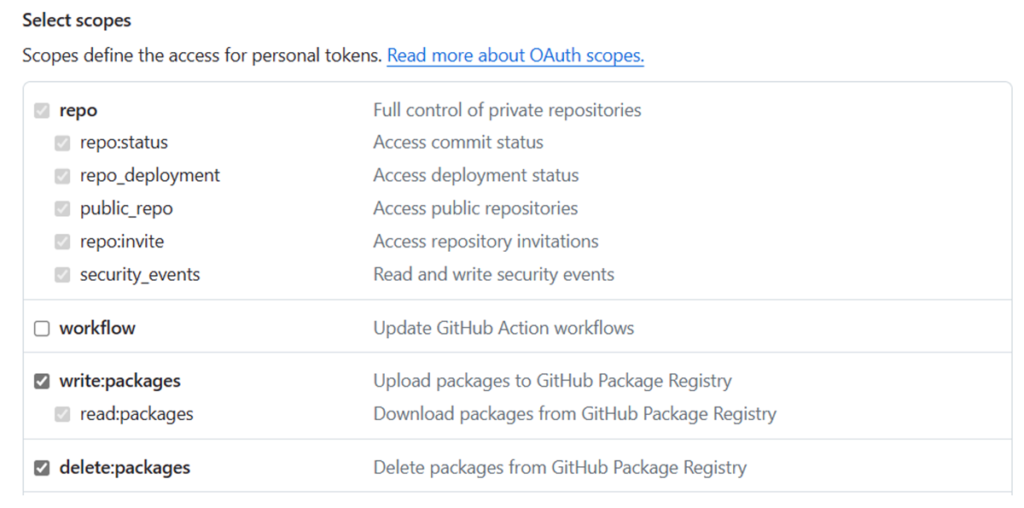
Figure 5: Token creation privileges – first part
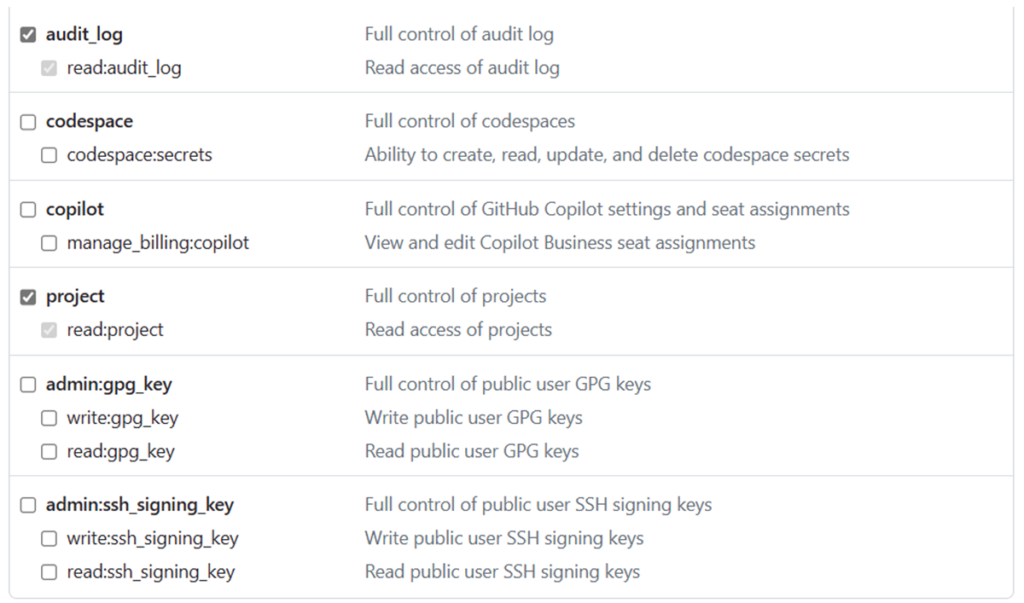
Figure 6: Token creation privileges – last part
The token will be generated as a string, and it’s important to keep this string private as it allows external agents to access the repository.
Now that the token has been generated, all the necessary configurations in GitHub are complete. Management tasks can be handled directly through the IDMC tool, with the only exception being the generation of a new token if the first was time-limited.
IDMC Repository Integration
Now that the repository has been created and configured, the next step is to log in to our IDMC platform and configure Version Control. First, we select the Administrator tool:
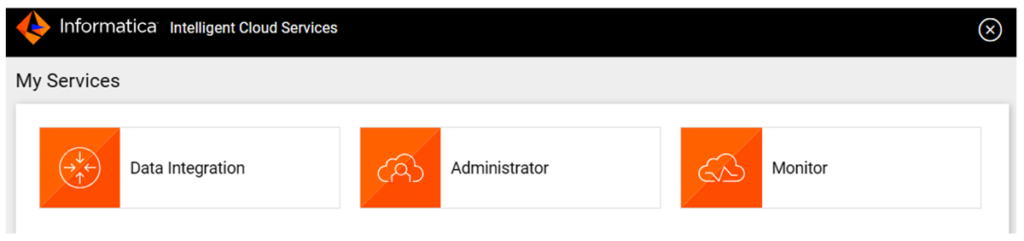
Figure 7: IDMC tool selection menu
Then we go to Settings where we can see the Source Control options. We tick Enable Source Control and Allow Push to Git Repository, then fill in the necessary configuration as follows, changing the URL for our repository. It is important to note that if we leave the Global Git Branch Name option blank, the “main” branch will be automatically selected. We also add the previously generated personal access token and save:
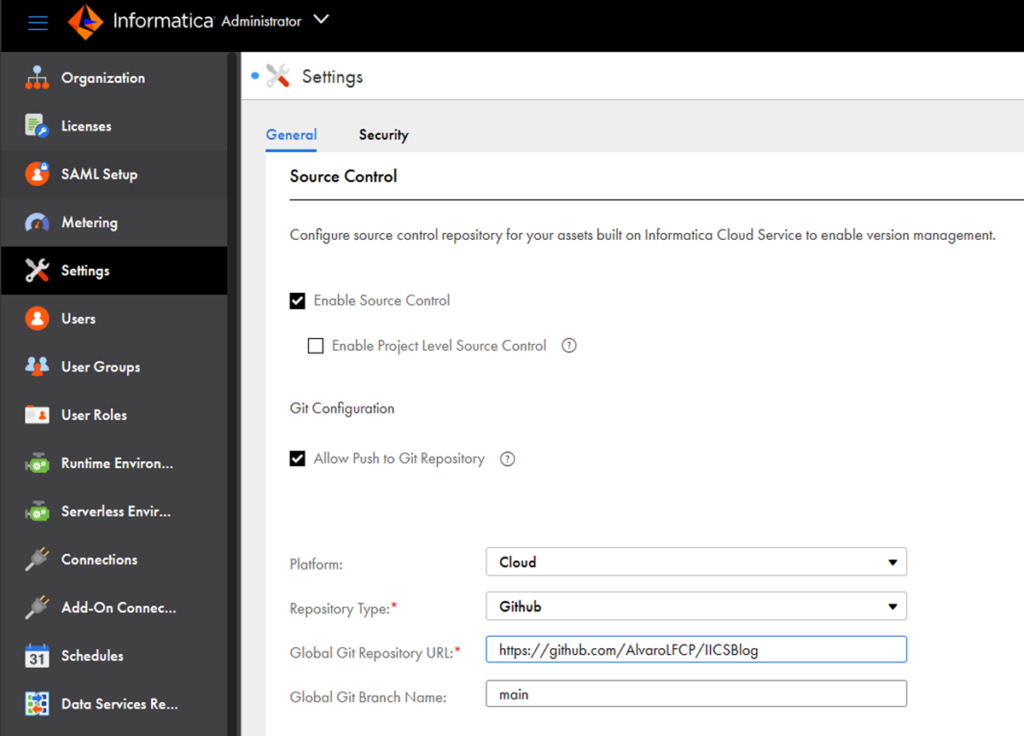
Figure 8: IDMC version control repository configuration
After setting up the integration, a success notification should appear on the screen. If not, check the following:
- URL Verification: Ensure that the URL used for integration is correct.
- Token Validation: Confirm that the token being used has the necessary privileges and is active.
- Repository Status: Check that the repository is accessible and functional on GitHub.
Verifying these aspects will help to troubleshoot any issues encountered during the integration setup.
Versioning in IDMC
To understand how the IDMC environment has evolved and how versioning works, it’s important to recognise that although this example was created with a GitHub repository, the functionality remains consistent from this point forward, even if Azure DevOps had been selected instead.
The previous steps created a link between our GitHub repository and our IDMC account, but is important to note that this link does not automatically upload all the IDMC assets to the repository. We must first upload everything manually with a commit.
Let’s create a simple mapping called GitTest for this example:
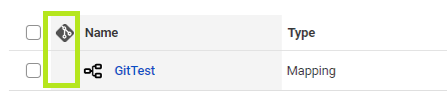
Figure 9: Version control status blank mark
When using IDMC, the first indication of a successful integration is the appearance of a Git icon, highlighted in red. In the image, you will notice that the row is blank, indicating that this asset has not been backed up in the repository. This blank state is the default for every asset upon creation or import.
In order to upload it to the repository, we need to push it into the repository via a Check In, which can be done by clicking on the 3 dots:
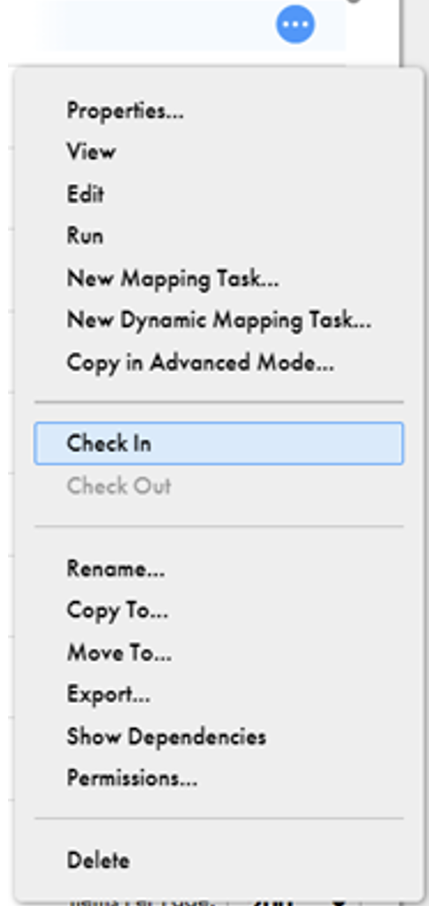
Figure 10: asset submenu 1
Subsequently, windows will appear, prompting for push information for the repository. It’s important to note that the Summary text will be the name and way of identifying the update in the future:
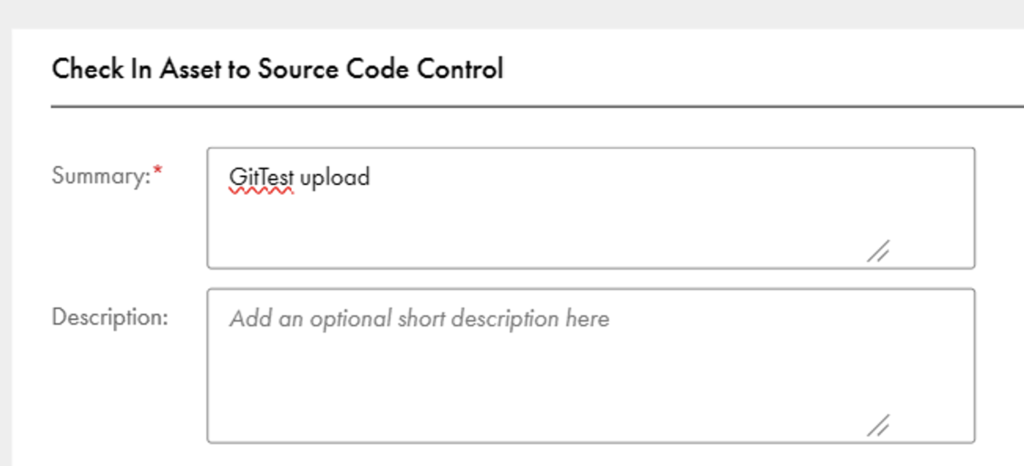
Figure 11: Check in/commit window
After clicking on OK, the upload process will start. Given its straightforward mapping, the upload is typically instant. However, considering the potential for future bulk Check Ins, it’s advisable to monitor the progress of the upload.
Go to the Monitor tool in IDMC:
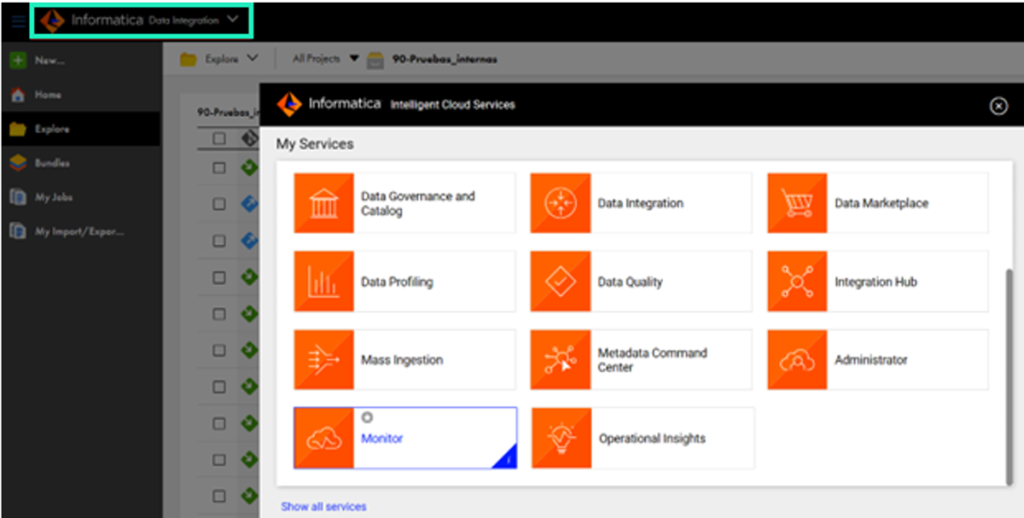
Figure 12: IDCM tool selection 2
Then go to Source Control Logs where we will be able to see everything related to our repository:

Figure 13: Source Control monitor
We can now return to the Data Integration tool to review our mapping:
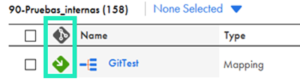
Figure 14: Version control status backed mark
This new green icon can mean two things:
- If the asset is a single entity (a mapping, a taskflow, etc.) then it is backed up in the repository and the version we currently see in IDMC should be the same as the one on Git.
- If we see this icon on a folder, it means that at least one asset inside that folder is backed up by the repository.
Any asset with this icon is also blocked from being modified or saved, but it can still be read and used.
To modify any asset backed up by the repository, we must perform a Check Out, which is the equivalent of creating a new branch in the GitHub repository for that asset, allowing us to work on it. This is done like a Check In:
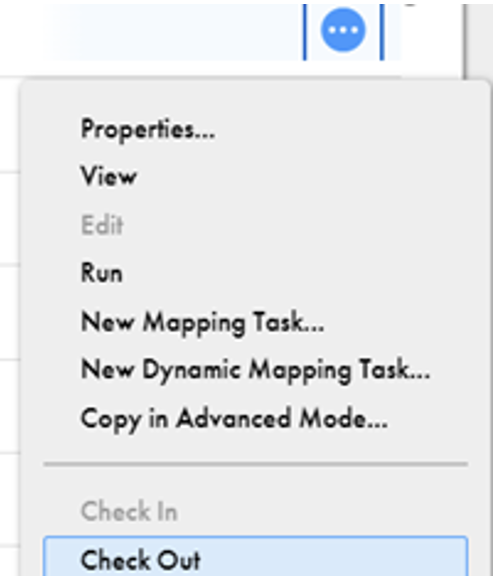
Figure 15: Asset submenu 2
This is immediate, and we will see that the icon has changed:

Figure 16: Version control status checked out by me mark
The blue icon means that this asset is checked out, and the red figure inside means that the user who checked it out was our current user. If it was somebody else, it would look like this:

Figure 17: Version control status checked out mark
In this state, we can safely modify and save the mapping as we wish, but is important to note that we are not affecting the original one in the repository because, as mentioned above, we are working on a new branch for this asset.
There are two options with this asset:
- If we want to discard all the changes made to it and to restore the previous version, we would use the Undo Check Out option. This would delete the created branch and revert the mapping to its original state.
- If we want to commit the changes made to the mapping, we would check it in again. This would merge the new branch with the previous one, making the updated asset the new version backed up by the repository.
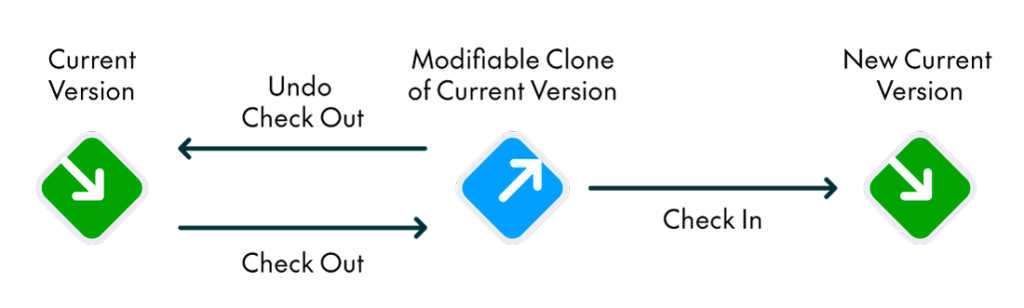
Figure 18: Version control status cycle
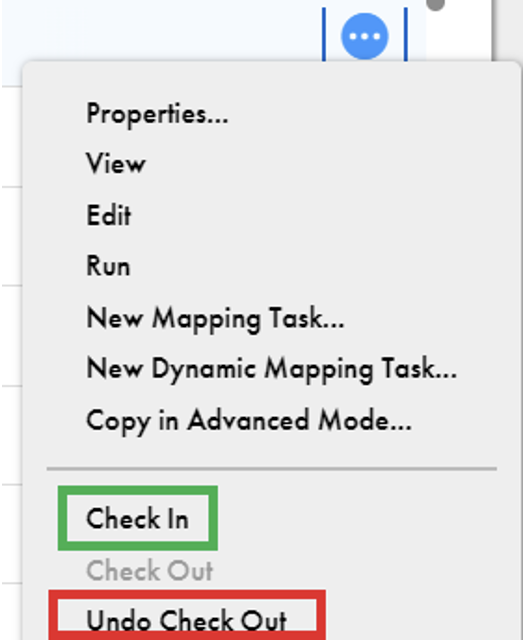
Figure 19: Asset submenu 3
Either of these options will return the asset to the green icon, meaning that it is blocked again from any changes.
IDMC also integrates a Pull option that allows the user to bring any version of any asset from the repository, meaning that we could restore the state of our mapping before the second Check Out, or even bring in the newest version to ensure that what we see on IDMC matches the one backed up in the repository:
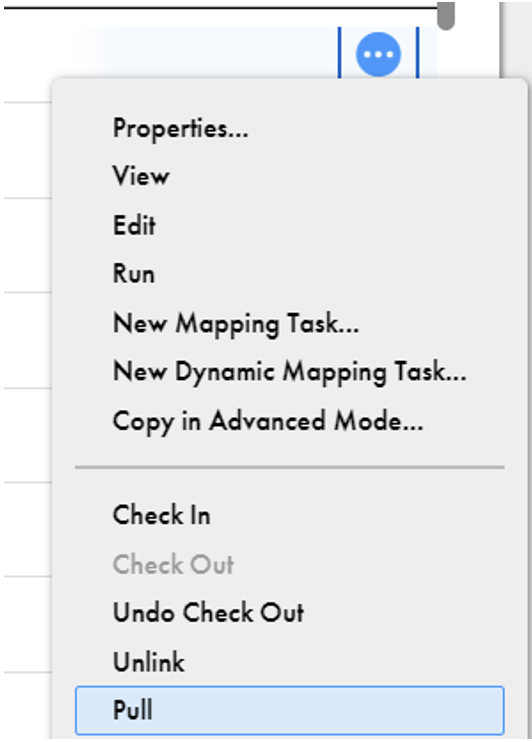
Figure 20: Asset submenu 4
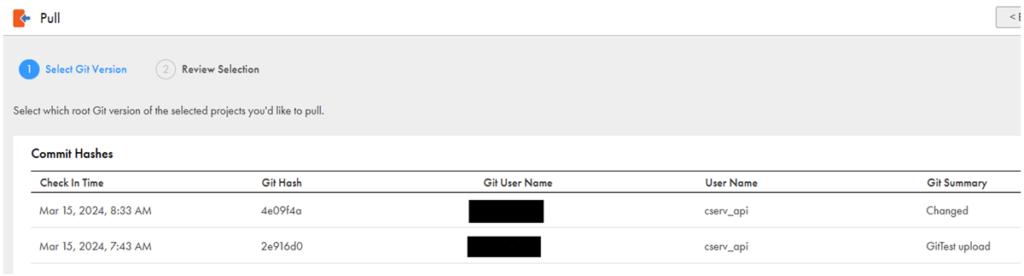
Figure 21: Version pull/history version window
As we can see, we can pick any Check In done to the asset. If we picked a previous one, like the GitTest upload in this example, we would need to do a new Check In to indicate to Git that it is again the main version of this mapping.
The Pull tool is exceptionally valuable as it enables us to reload any previous version of an asset at any time. This allows us to utilise the asset for various purposes, such as execution or duplication, and then seamlessly revert to the newest version without altering the asset’s versioning. The only way to affect the versioning of the asset is by performing another Check In. For instance, if we have an asset with 12 versions, with the 12th being the newest, and we wish to discard all versions since the 7th, we have two options:
- Pull the 7th version and perform a Check In: This would create the 13th version of the asset, which would be identical to the 7th.
- Pull the 7th version, create a duplicate of the asset, and then perform a Check In on the duplicate: This would back up a new asset into the repository, with the 7th version of the original being the 1st of the new asset.
Conclusion
We have seen how version control, so crucial for modern software, is perfectly integrated into IDMC tools. The creation and connection of the repository are straightforward, do not require advanced GitHub knowledge, and once done, everything can be managed from the IDMC environment.
IDMC Version Control management is simple and maintains the same functionality as the old repository tool in PowerCenter.
Considering this, we can conclude that there is no reason not to integrate every IDMC system into a repository for version control, regardless of components being assets for data integration, mass ingestion, or any of the multiple IDMC services. It provides all the advantages mentioned at the beginning without any disadvantages, and is not a difficult feature to implement and manage.