03 Jul 2024 Exploring Iceberg in Snowflake
Today we’re going to dive into data lakes and data mesh strategies, where table formats like Apache Iceberg play a crucial role in unleashing the power of scalable data querying. The choice of the right table format is key for organisations aiming to fully harness the potential of their data, delivering not just performance but also interoperability and user-friendly functionality.
The distinctive nature of the Iceberg table format sets it apart from other open-source alternatives: it boasts engine- and file format–agnosticism, wrapped within the framework of a highly collaborative and transparent open-source project. In our previous blog posts, we presented Iceberg and explored Iceberg in Cloudera Data Platform (CDP). In this blog post, we’ll run through the advantages of adopting an open table format for dissecting vast datasets and explain why Iceberg has emerged as one of the most sought-after open-source table formats for Snowflake.
How did Apache Iceberg Start?
Launched in 2018, Netflix generously contributed Iceberg to the Apache Software Foundation, making it fully open source. Developed to address the limitations of its predecessors, Iceberg rapidly gained traction and is now a leading choice among open-source table formats.
Why is Iceberg important?
Choosing a single tool for extensive datasets in large organisations can be challenging due to varying feature effectiveness; some opt for a dual-tool approach to cater to diverse business needs. In this context, a common data lake format proves invaluable, facilitating seamless data sharing across tools.
Data lakes, now predominantly hosted in AWS S3, Azure Blob, or Google Storage, present challenges in metadata and schema management. Iceberg offers a solution with direct and concurrent updates, treating all tools equally.
What are Iceberg Tables?
A recent addition to Snowflake, Iceberg tables align perfectly with the structure of native tables, benefiting from years of experience and innovation. Unlike some open-source products that may feel disconnected, Iceberg tables aim to provide a familiar and integrated experience. Think of them as Snowflake tables with the added advantages of open formats and customisable cloud storage!
Specifically, Iceberg tables work like Snowflake native tables with three key differences:
- Table metadata is in Iceberg format
- Data is stored in Parquet files
- Both table metadata and data are stored in customer-supplied storage
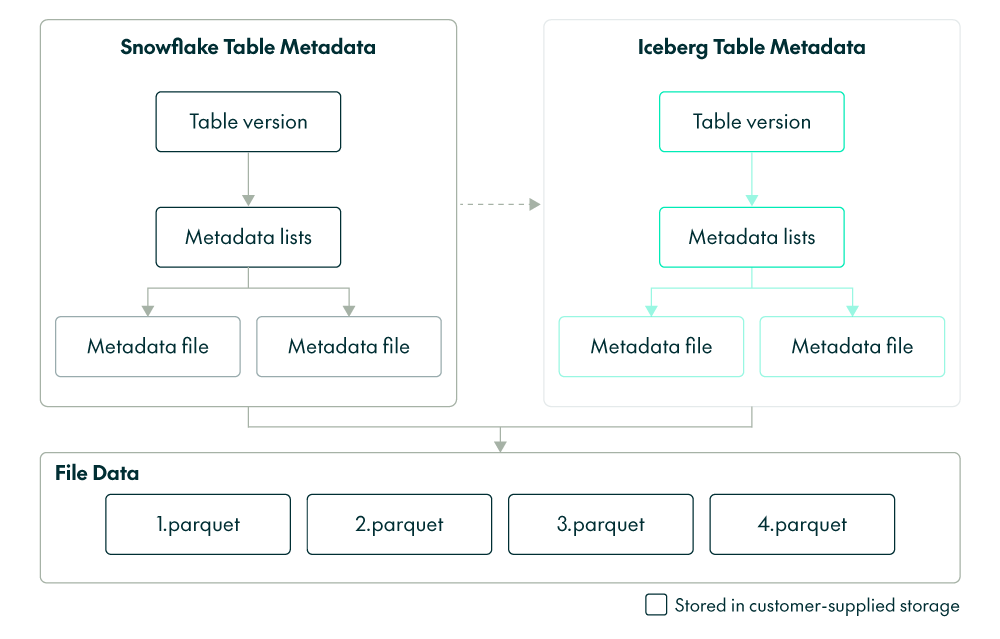
Figure 1: Key differences between Snowflake and Iceberg tables
(Source: Iceberg Tables: Power open standards with Snowflake)
Iceberg Tables adhere to three vital principles: primacy as a first-class table, the delivery of comprehensive platform advantages, and seamless interoperability with tools beyond the Snowflake ecosystem. The fusion of Snowflake’s innovations with open standards will offer functionalities and use cases that were previously challenging or impossible within open formats.
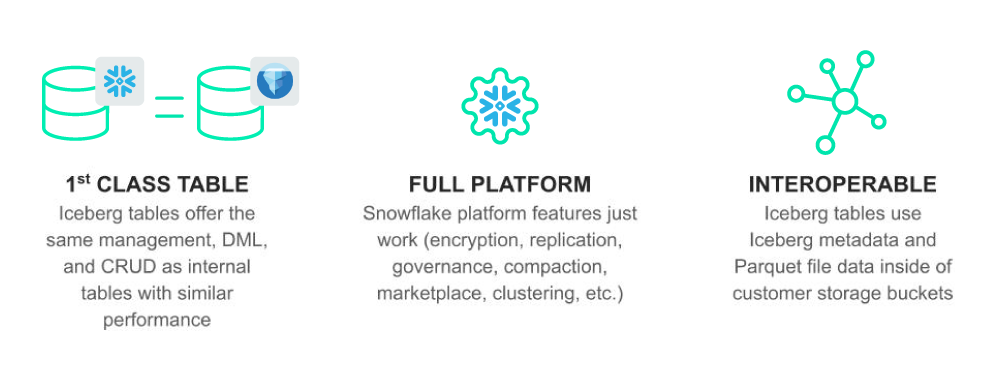
Figure 2: 3 main features of Iceberg tables
(Source: Iceberg Tables: Power open standards with Snowflake)
Iceberg tables are strategically designed to confront the initial challenges of control, cost, and interoperability:
- Control: Unlike Snowflake formats, Iceberg tables adopt open table and file formats, storing data in customer-supplied storage for increased control.
- Low cost: Leveraging customer-supplied storage, Iceberg tables eliminate the need for data duplication between systems. Now you can manage a unified dataset within Snowflake whilst enjoying separate storage and billing.
- Ecosystem: Iceberg tables integrate effortlessly with tools compatible with Iceberg and Parquet, offering a versatile ecosystem. Snowflake, acting as a unified control centre, ensures comprehensive security, management, and support for various workloads, including collaboration, data science, and applications.
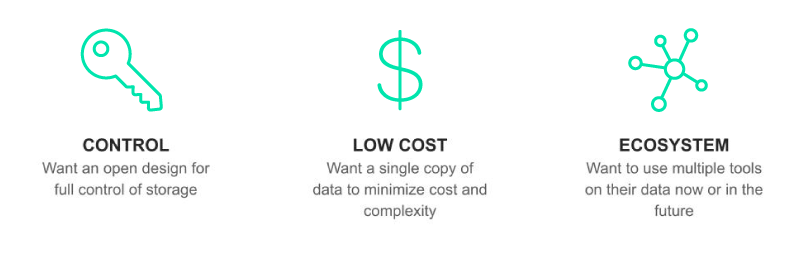
Figure 3: Challenges faced by Iceberg tables
(Source: Iceberg Tables: Power open standards with Snowflake)
Snowflake Iceberg tables support Iceberg in two ways: an internal catalogue (Snowflake-managed) or an externally managed catalogue (AWS Glue or Objectstore).
Snowflake-managed Catalogue
A Snowflake-managed catalogue is nearly identical in performance to a standard Snowflake table, showcasing the following attributes:
- Snowflake reads/writes
- Iceberg interoperability
- Full platform support
- Optimised performance
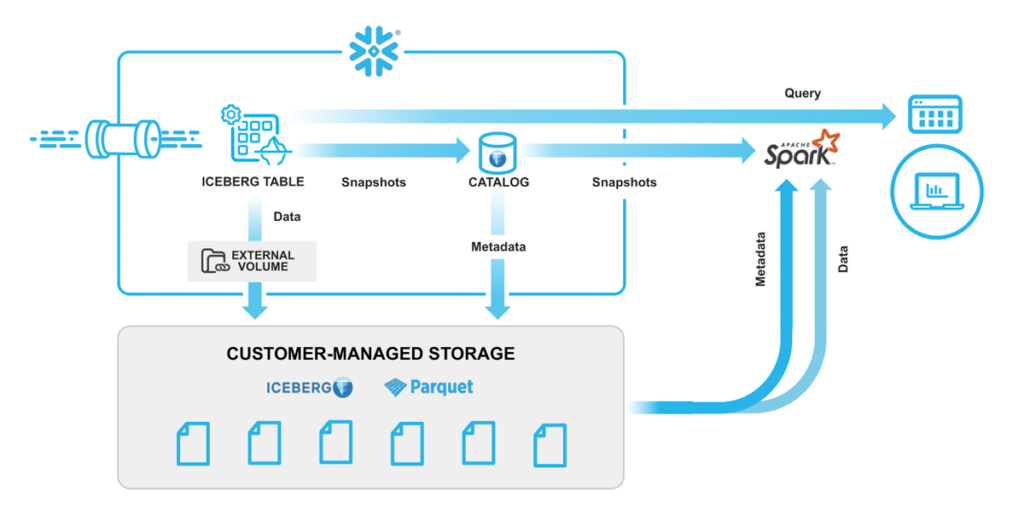
Figure 4: Snowflake-managed catalogue
(Source: Unifying Iceberg Tables on Snowflake)
Externally Managed Catalogue
Externally managed catalogues, such as AWS Glue, or Iceberg metadata files in object storage, can be used to create a table, with the resulting characteristics:
- Flexible sources
- Efficient onboarding
- Simplified operations
- Optimised performance
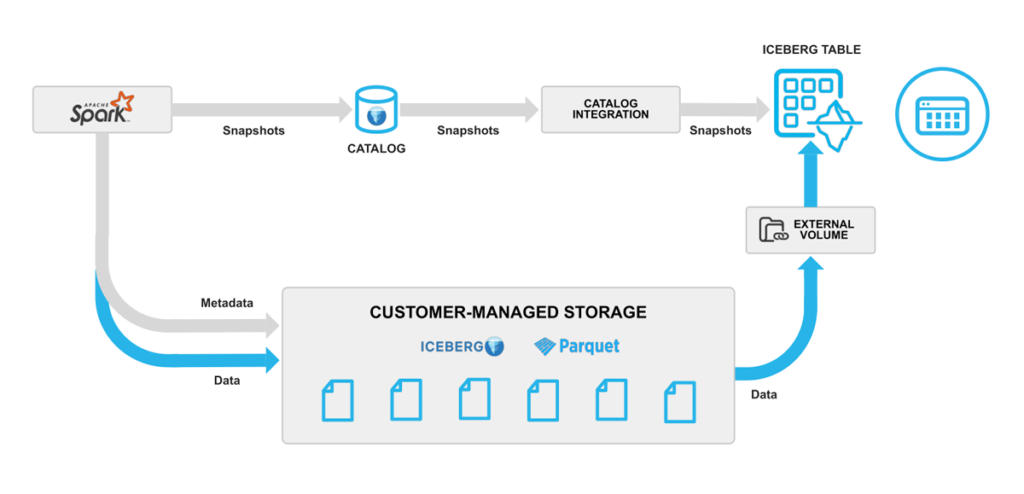
Figure 5: Externally managed catalogue
(Source: Unifying Iceberg Tables on Snowflake)
Benefits of the Iceberg Table Format
The Iceberg table format offers many features to help power your data lake architecture.
Expressive SQL
Iceberg empowers your data lake architecture with comprehensive support for flexible SQL commands, including tasks such as updating existing rows, merging new data, and targeted deletes. Additionally, Iceberg facilitates the rewriting of data files to enhance read performance and utilises delete deltas to expedite updates.
Schema Evolution
Embrace full schema evolution with Iceberg tables! Updates to the schema impact only the metadata, leaving the data files untouched; evolutionary changes encompass additions, drops, renaming, reordering, and type promotions.
Partition Evolution
Partitioning in Iceberg divides large tables into smaller, manageable ones, accelerating read and load times for targeted queries. The partition spec can evolve without affecting previously written data, with metadata for each partition version stored separately.
Time Travel and Rollback
Explore the past with Iceberg’s time travel feature, enabling reproducible queries on specific table snapshots. The rollback capability empowers users to easily revert tables to previous states, providing a safety net for possible errors.
Transactional Consistency
In a data lake or data mesh architecture, Iceberg ensures ACID transactions at scale. Concurrent writers can collaborate without compromising consistency, creating new, immutable versions of data files and metadata upon committing changes.
Faster Querying
Tailored for vast analytical datasets, Iceberg enhances querying speed and efficiency. Features like fast scan planning, metadata pruning, and the ability to filter out irrelevant data files contribute to a smooth querying experience.
Vibrant Community of Active Users and Contributors
As a flagship project from the Apache Software Foundation, Iceberg boasts a vibrant community of active users and contributors. Its compatibility with multiple processing engines and file formats, including Apache Parquet, Apache Avro, and Apache ORC, attracts diverse talents eager to contribute to its ongoing success.
Better Performance
External tables feature an adaptable external scanner compatible with diverse file sizes and formats like CSV, Avro, ORC, and Parquet. However, this flexibility may compromise performance. In contrast, Iceberg tables, whether managed by Snowflake or an external catalogue, benefit from a highly optimised Parquet scanner developed during the creation of native Iceberg tables. This scanner uses comprehensive statistics from Parquet and Iceberg, resulting in a notable 2x performance improvement compared to external tables integrated with an external catalogue. Additionally, Iceberg table data is locally cached in the warehouse, providing an extra performance boost for concurrent workloads, unavailable with external tables.
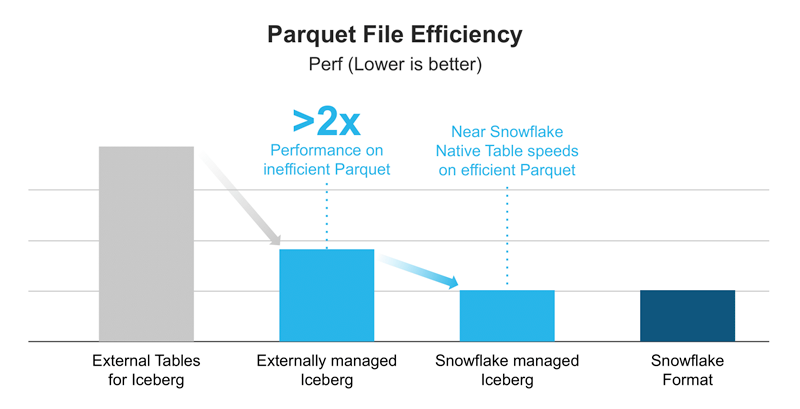
Figure 6: Parquet File Efficiency
(Source: Unifying Iceberg Tables on Snowflake)
Snowflake‘s performance with Iceberg tables hinges on the efficiency of writing Parquet files. If an alternate engine writes to the table, generates Parquet files, but neglects to write complete statistics, it adversely affects performance within Snowflake.
Hands-on Exploration of Iceberg Tables in Snowflake
Now we are going to get down to work to see how the Iceberg tables work in Snowflake. To do so, we are going to carry out some tests as a demonstration.
Snowflake Setup
First, we create a database, schema, warehouse, role, and user called ICEBERG_LAB in our Snowflake account:
CREATE WAREHOUSE iceberg_lab;
CREATE ROLE iceberg_lab;
CREATE DATABASE iceberg_lab;
CREATE SCHEMA iceberg_lab;
GRANT ALL ON DATABASE iceberg_lab TO ROLE iceberg_lab WITH GRANT OPTION;
GRANT ALL ON SCHEMA iceberg_lab.iceberg_lab TO ROLE iceberg_lab WITH GRANT OPTION;
GRANT ALL ON WAREHOUSE iceberg_lab TO ROLE iceberg_lab WITH GRANT OPTION;

CREATE USER iceberg_lab
    PASSWORD='Trial123',
    LOGIN_NAME='ICEBERG_LAB',
    MUST_CHANGE_PASSWORD=FALSE,
    DISABLED=FALSE,
    DEFAULT_WAREHOUSE='ICEBERG_LAB',
    DEFAULT_NAMESPACE='ICEBERG_LAB.ICEBERG_LAB',
    DEFAULT_ROLE='ICEBERG_LAB';

GRANT ROLE iceberg_lab; TO USER iceberg_lab;
GRANT ROLE iceberg_lab; TO USER trial;
GRANT ROLE accountadmin TO USER iceberg_lab;
Figure 7: Initial queries to configure our Snowflake environment
Create an External Volume
Before creating an Iceberg table, it is necessary to have an external volume. This Snowflake object stores details about our cloud storage locations and identity and access management (IAM) entities, such as IAM roles.
To establish the external volume, we followed the instructions provided to access Microsoft Azure as our chosen cloud storage service. Subsequently, we executed the following queries in Snowflake:
USE ROLE accountadmin;
CREATE EXTERNAL VOLUME exvol2
CREATE DATABASE iceberg_lab;
  STORAGE_LOCATIONS =
   (
     (
       NAME = 'exvol2'
       STORAGE_PROVIDER = 'AZURE'
       STORAGE_BASE_URL = 'azure://mbisnowflakestorage.blob.core.windows.net/snowflake/'
       AZURE_TENANT_ID = 'd5b4529b-7457-49d9-931b-7c7f9b9eed54'
     )
   );

DESC EXTERNAL VOLUME exvol2;

Figure 8: Queries used for the creation of the external volume
Once the external volume is in place, we utilise the ACCOUNTADMIN role to provide usage permissions to the ICEBERG_LAB role:
GRANT ALL ON EXTERNAL VOLUME exvol2 TO ROLE iceberg_lab WITH GRANT OPTION;
Figure 9: Query used to provide usage permissions to the ICEBERG_LAB role
Create A Snowflake-Managed Iceberg Table
In our setup, Iceberg tables can use Snowflake, AWS Glue, or object storage as the catalogue. For this lab we chose Snowflake as the catalogue, to facilitate both read and write operations on tables. Further details on catalogue integration can be accessed here.
Now, let’s create an Iceberg table, referencing the recently established external volume. We can specify BASE_LOCATION to guide Snowflake on where to store table data and metadata, or leave it empty to use the location specified in the external volume definition:
USE ROLE iceberg_lab;
USE DATABASE iceberg_lab;
USE SCHEMA iceberg_lab;
CREATE OR REPLACE ICEBERG TABLE customer_iceberg (
  c_custkey INTEGER,
  c_name STRING,
  c_address STRING,
  c_nationkey INTEGER,
  c_phone STRING,
  c_acctbal INTEGER,
  c_mktsegment STRING,
  c_comment STRING
)
  CATALOG='SNOWFLAKE'
  EXTERNAL_VOLUME='exvol2'
  BASE_LOCATION='';
Figure 10: Creating an Iceberg table referring to the newly established external volume.
Load Data
There are various methods to load new data into Iceberg tables managed by Snowflake, such as INSERT, COPY INTO, and Snowpipe.
In this quickstart, we will INSERT data from the sample tables within our Snowflake account into an Iceberg table. This process will generate Parquet files and Iceberg metadata, storing them in our external volume:
INSERT INTO customer_iceberg
SELECT * FROM snowflake_sample_data.tpch_sf1.customer Figure 11: Query to load the data into our Iceberg table
Upon inspecting our cloud storage bucket (in our case, a storage account in Microsoft Azure), we should observe files authored by Snowflake during the table creation process. Although Snowflake handles the automatic writing of these files, we also have the option to use a function to generate table metadata files. These files capture any changes made using data manipulation language (DML) since the last Iceberg metadata generation:

Figure 12: Storage account containers created in Microsoft Azure
Once inside the Snowflake container, we will see two folders, the first for the data and the second for the metadata:
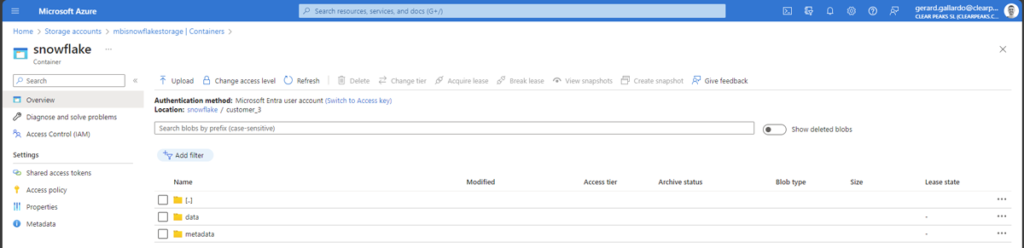
Figure 13: Folders inside the Snowflake container
If we now go to the data folder, we will see that the data is in Parquet format:

Figure 14: Parquet files inside the data folder
Finally, if we move to the metadata folder, we can see that it contains the metadata and manifest files:
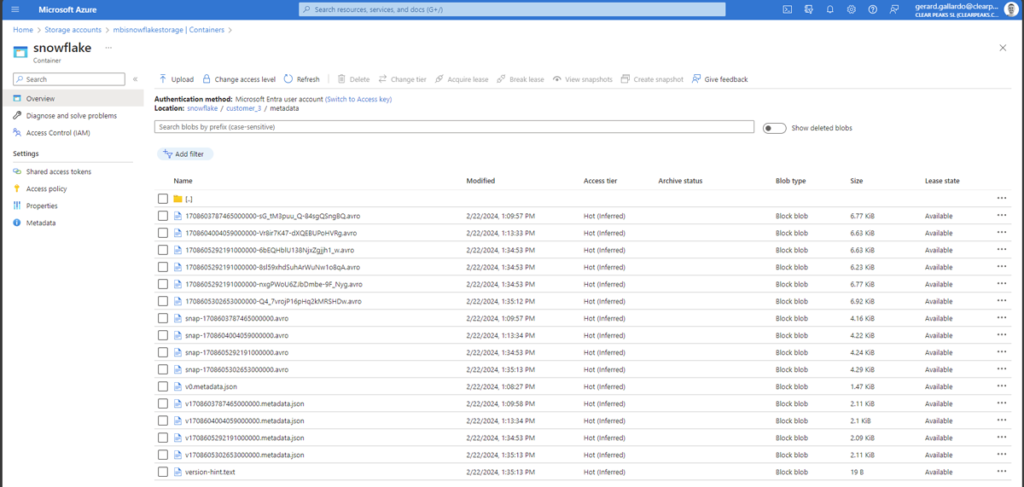
Figure 15: Metadata and manifest files inside the metadata folder
Query and Time Travel
We treat Iceberg tables similarly to other tables within Snowflake. For instance, we can execute queries that read different table types simultaneously. In this query, we perform a join between an Iceberg table and a conventional Snowflake table:
SELECT
  *
FROM customer_iceberg c
INNER JOIN snowflake_sample_data.tpch_sf1.nation n
  ON c.c_nationkey = n.n_nationkey;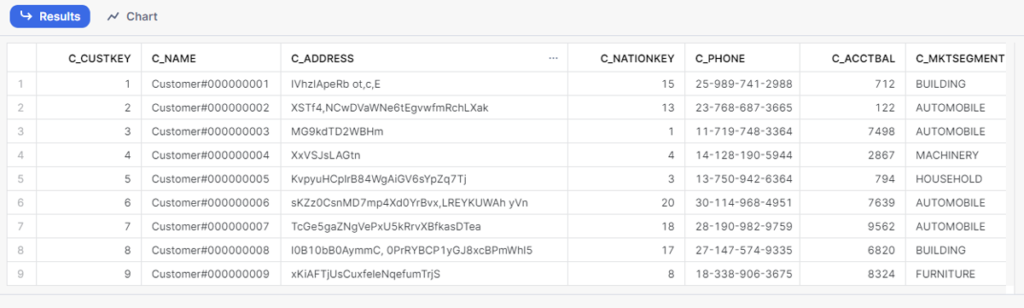
Figure 16: Sample query
The advantages of the supplementary metadata offered by table formats such as Iceberg and Snowflake include features like time travel. Snowflake’s Iceberg tables combine functionalities, referring to Iceberg metadata for retention time and defaulting to the standard Iceberg value of five days if not specified. Note that Fail-Safe is not implemented for Iceberg tables. To illustrate this, let’s make a simple update to the table:
INSERT INTO customer_iceberg
  SELECT
    *
  FROM snowflake_sample_data.tpch_sf1.customer
  LIMIT 5;
Figure 17: Sample query with time travel example
Now we can observe an increase in the row count compared to the previous version of the table:
SELECT
  count(*) AS after_row_count,
  before_row_count
FROM customer_iceberg
JOIN (
     SELECT count(*) AS before_row_count
     FROM customer_iceberg BEFORE(statement => LAST_QUERY_ID())
  )
  ON 1=1
GROUP BY 2;
Figure 18: The increase in row count compared to the previous version of the table
Governance for Iceberg Tables
In our context, governance and access controls operate seamlessly on Iceberg tables, mirroring their functionality with internal tables. It’s important to note that all these features need the Enterprise or Business Critical Edition of Snowflake.
Row-Level Security
Let’s suppose that we need to manage row-level access to an Iceberg table for users with different roles. In this scenario, we will establish a role that has visibility into US customers and another that exclusively accesses non-US customers. To do this we need to implement a row access policy (RAP) on the Iceberg table; to simplify the example we will apply the RAP by nation_key:
USE ROLE accountadmin;
CREATE ROLE tpch_us;
GRANT ROLE tpch_us TO USER Trial;
CREATE ROLE tpch_intl;
GRANT ROLE tpch_intl TO USER Trial;

USE ROLE iceberg_lab;
USE DATABASE iceberg_lab;
USE SCHEMA iceberg_lab;

CREATE OR REPLACE ROW ACCESS POLICY rap_nation
AS (nation_key number) RETURNS BOOLEAN ->
  ('TPCH_US' = current_role() and nation_key = 24) OR
  ('TPCH_INTL' = current_role() and nation_key != 24)
;

ALTER ICEBERG TABLE customer_iceberg
ADD ROW ACCESS POLICY rap_nation ON (c_nationkey);

GRANT ALL ON DATABASE iceberg_lab TO ROLE tpch_intl;
GRANT ALL ON SCHEMA iceberg_lab.iceberg_lab TO ROLE tpch_intl;
GRANT ALL ON ICEBERG TABLE iceberg_lab.iceberg_lab.customer_iceberg TO ROLE tpch_intl;
GRANT ALL ON DATABASE iceberg_lab TO ROLE tpch_us;
GRANT ALL ON SCHEMA iceberg_lab.iceberg_lab TO ROLE tpch_us;
GRANT ALL ON ICEBERG TABLE iceberg_lab.iceberg_lab.customer_iceberg TO ROLE tpch_us;
GRANT USAGE ON EXTERNAL VOLUME iceberg_lab_vol TO ROLE tpch_intl;
GRANT USAGE ON EXTERNAL VOLUME iceberg_lab_vol TO ROLE tpch_us;
GRANT USAGE ON WAREHOUSE iceberg_lab TO ROLE tpch_us;
GRANT USAGE ON WAREHOUSE iceberg_lab TO ROLE tpch_intl;

Figure 19: Implementing a row access policy on the Iceberg table
We have two distinct roles to assign to Snowflake users, enabling them to access a subset of customers, either international or US-based:
USE ROLE tpch_intl;
USE WAREHOUSE iceberg_lab;
SELECT
  count(*)
FROM iceberg_lab.iceberg_lab.customer_iceberg;
Figure 20: Enabling the tpch_intl role to access a subset of international customers
USE ROLE tpch_us;
USE WAREHOUSE iceberg_lab;
SELECT
  count(*)
FROM iceberg_lab.iceberg_lab.customer_iceberg;
Figure 21: Enabling the tpch_us role to access a subset of US-based customers
Column-Level Security
In our case, we want the team of analysts to query the customer table whilst restricting their view of sensitive fields such as name (c_name), address (c_address), or phone number (c_phone). To do so, we’ll grant them access to all rows but implement a masking policy on those specific fields:
USE ROLE accountadmin;
CREATE ROLE tpch_analyst;
GRANT ROLE tpch_analyst TO USER Trial;

USE ROLE iceberg_lab;
ALTER ROW ACCESS POLICY rap_nation
SET body ->
  ('TPCH_US' = current_role() and nation_key = 24) or
  ('TPCH_INTL' = current_role() and nation_key != 24) or
  ('TPCH_ANALYST' = current_role()) or
  ('ICEBERG_LAB' = current_role())
;

GRANT ALL ON DATABASE iceberg_lab TO ROLE tpch_analyst;
GRANT ALL ON SCHEMA iceberg_lab.iceberg_lab TO ROLE tpch_analyst;
GRANT ALL ON TABLE iceberg_lab.iceberg_lab.customer_iceberg TO ROLE tpch_analyst;
GRANT USAGE ON WAREHOUSE iceberg_lab TO ROLE tpch_analyst;
GRANT USAGE ON EXTERNAL VOLUME iceberg_lab_vol TO ROLE tpch_analyst;
USE ROLE iceberg_lab;

CREATE OR REPLACE MASKING POLICY pii_mask AS (val string) RETURNS string ->
  CASE
    WHEN 'TPCH_ANALYST' = current_role() THEN '*********'
    ELSE val
END;
ALTER ICEBERG TABLE customer_iceberg MODIFY COLUMN c_name SET MASKING POLICY pii_mask;
ALTER ICEBERG TABLE customer_iceberg MODIFY COLUMN c_address SET MASKING POLICY pii_mask;
ALTER ICEBERG TABLE customer_iceberg MODIFY COLUMN c_phone SET MASKING POLICY pii_mask;

USE ROLE tpch_analyst;
SELECT
  *
FROM customer_iceberg;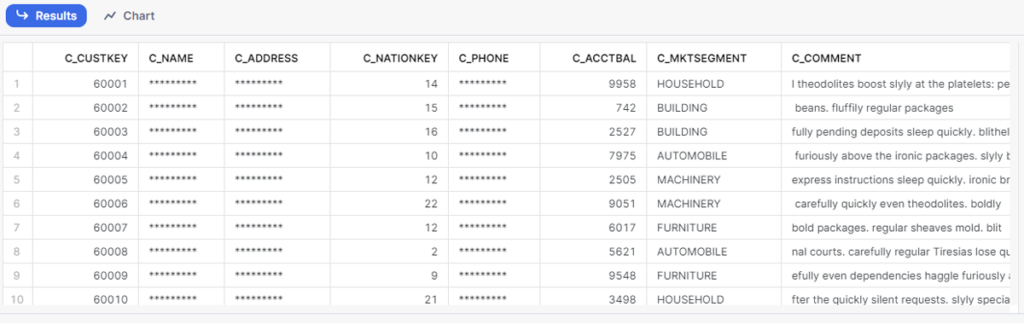
Figure 22: Implementing a masking policy on sensitive fields
We can apply additional governance features to Iceberg tables, such as object tagging and tag-based masking. What’s more, if you’re interested in data masking, we’ve got a blog post covering it.
Monitoring Governance in Snowsight
As data administrators, we use the built-in Dashboard and Tagged Objects interfaces to monitor and report on the usage of policies and tags, encompassing tables, views, and columns. This monitoring includes policies and tags applied to Iceberg tables.
By leveraging the ACCOUNTADMIN role or an account role with GOVERNANCE_VIEWER and OBJECT_VIEWER database roles, we navigate to these interfaces by clicking on Data » Governance. This allows us to inspect the policies applied to the Iceberg table:
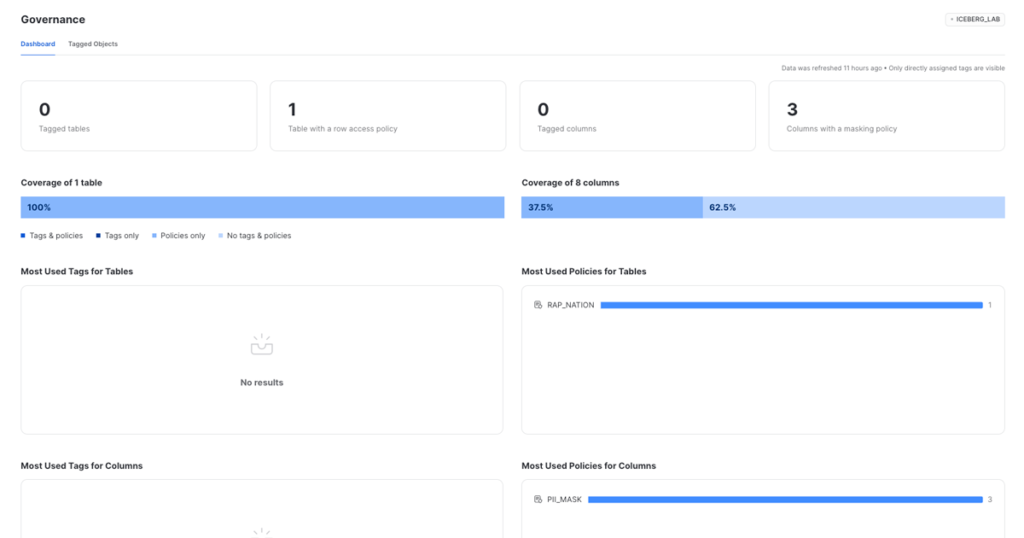
Figure 23: Inspection of the policies applied to the Iceberg table
If we see that specific tables lack tags or policies, we can directly modify, create, and apply them from the interface:
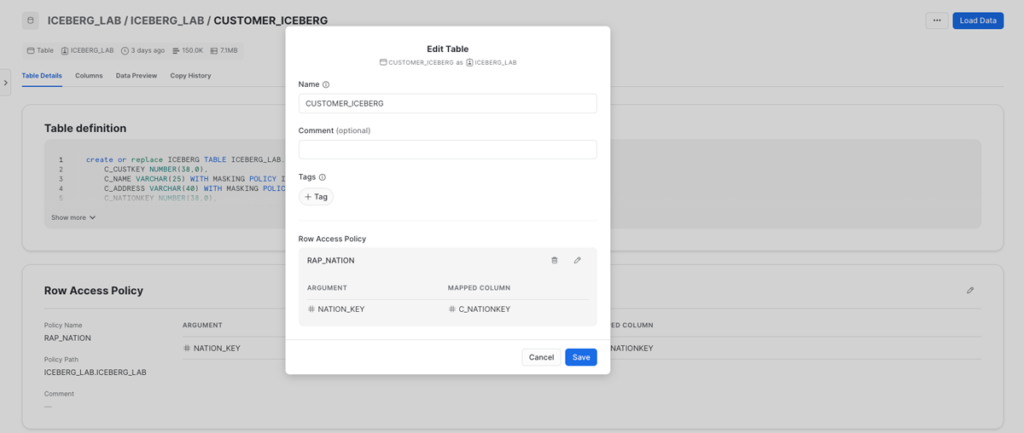
Figure 24: Modifying policies implemented through the interface
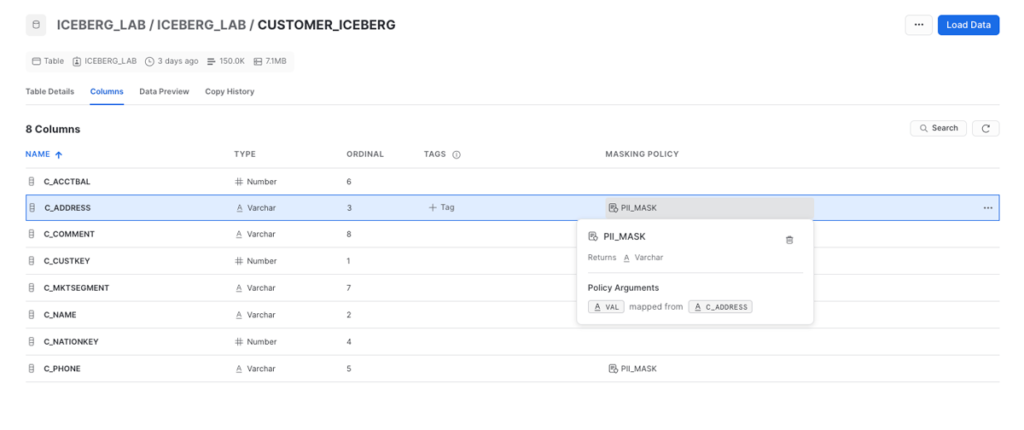
Figure 25: Analysing the masking policies applied to each column
Estimating Cloud Resource Costs
We have performed a cost estimation for the cloud resources required to carry out this Proof of Concept using 1 GB of capacity, representing the amount of data stored within the Iceberg table.
Before starting the estimation, the following points should be noted:
- Snowflake connects to your storage location using an external volume.
- There will be a variable warehouse cost for accessing this data, depending on usage.
- Iceberg tables incur no Snowflake storage costs.
The parameters used for this cost estimation are detailed below:
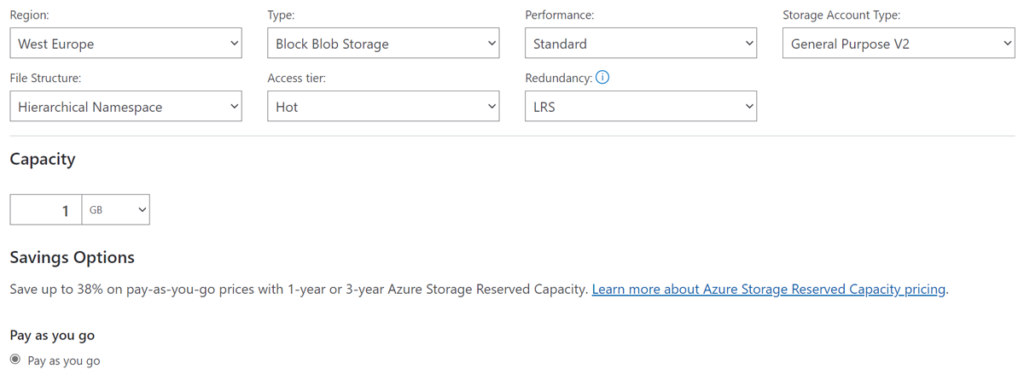

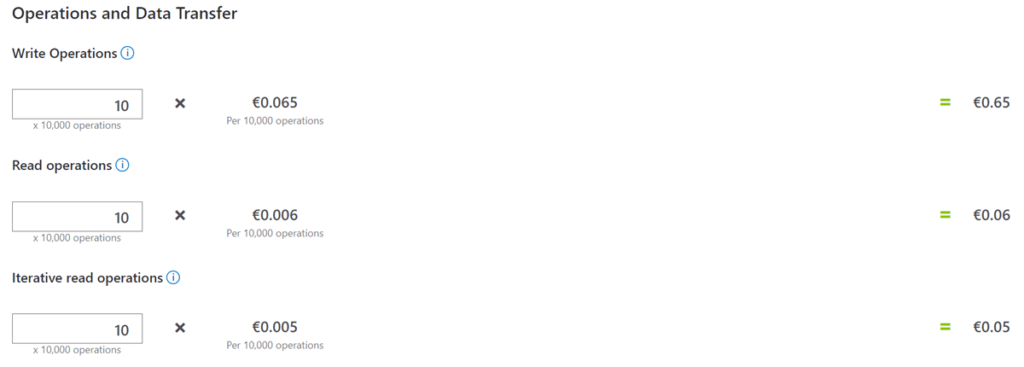
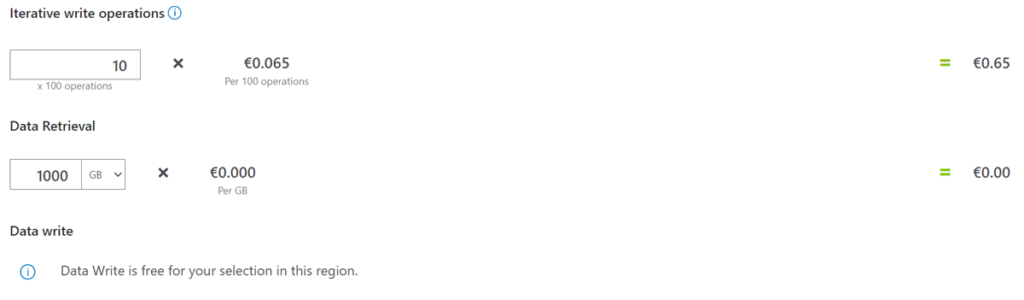
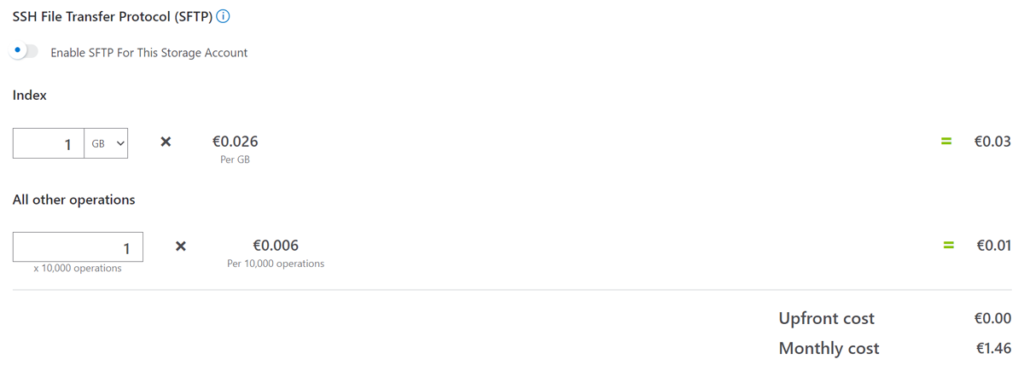
Figure 26: Details of the parameters used to estimate the cost of cloud resources
Conclusion
In this blog post we have continued our series on Apache Iceberg with its integration into Snowflake, showing some of its practical applications in real-world scenarios.
It is essential to highlight that Apache Iceberg is a fully open-source solution, developed with engine and format agnosticism, which enhances its adaptability and makes it a valuable asset in various data management scenarios.
If you would like more information on this topic, please do not hesitate to contact our team of experts – we’re just a click away! Our team is ready to assist you with any queries and help you to implement these technologies to meet your specific business needs.