13 Jun 2024 Exploring Iceberg in Cloudera Data Platform
In a recent blog post, we presented Apache Iceberg, an open-source data table format originally developed at Netflix that is quickly becoming the new standard in modern, open data lakes.
In this new post, we will take a deeper dive into its impressive capabilities, exploring how and why a giant like Cloudera adopted it within its Cloudera Data Platform (CDP).
As of today, Iceberg V2 is available in all the CDP form factors: Private Cloud Base (7.1.9), Data Services and Public Cloud. In our case, we will leverage the robust infrastructure of the CDP Public Cloud to explore Iceberg through Cloudera Data Warehouse (CDW), showing how it can unlock a new level of scalability, flexibility, and performance for your data-intensive tasks.
Integration with the Cloudera Ecosystem: A Tech Marvel
Within the Cloudera environment, Iceberg comes with all its valuable features, bringing additional scalability, performance, data consistency, and security for managing and analysing large datasets in CDP. The great thing is that it integrates seamlessly with the existing CDP core components without requiring any setup. Let’s look at some of the advantages this offers.
Acid Compliance
Iceberg V2 tables, when used with Impala, are ACID compliant with serialisable isolation and an optimistic concurrency model, ensuring data consistency and integrity. Furthermore, with the introduction of the V2 specification, it became crucial for implementations to identify newly created tables accurately to ensure the correct behaviour for both readers and writers. As a result, the value assigned to the format-version property for Iceberg tables gained significant importance, a factor that had been largely overlooked prior to the release of the V2 specification.
Integration with Hive Metastore
Iceberg integrates perfectly with the Hive Metastore, serving as a repository for key metadata, including pivotal table location details. This enables rapid and hassle-free scaling without any adverse effects on the Metastore performance, opening up a new world of possibilities (such as time travel) from the get-go.
Security Integration
In terms of data security and access management, Iceberg has also advanced by integrating with Ranger in the CDP environment, offering meticulous control over access to sensitive data within Iceberg tables, allowing the implementation of rigorous security policies, ensuring that your valuable information is safeguarded like never before.
Integration with Data Visualisations
Iceberg also integrates with visualisation tools, allowing data analysts, data scientists and business users to easily incorporate Iceberg data into their dashboards, reports, and visualisations.
Iceberg At Work: Real-World Applications and Functionalities
In this section, we’ll test how the main Iceberg features behave in CDP. As mentioned, we chose to use CDW within Public Cloud, but the same steps apply to all the other CDP form factors (for Private Cloud Base, you need version 7.1.9).
(If you want to know how to set up a Cloudera Public Cloud environment, check out our previous blog post).
Now that our environment is ready, let’s use the Iceberg framework in the context of both Hive and Impala. We’ll explore fundamental operations that can be performed with Iceberg tables, leveraging its features (already described in our previous blog post on Iceberg) for improved data management, query performance, and more!
Unearthing Historical Insights
Time travel is undoubtedly one of the most appreciated Iceberg features, so let’s see how it can be harnessed from Hive and Impala.
Creating A Table
First of all, we need to create an Iceberg table; all we need to do is to append STORED BY ICEBERG to a typical CREATE TABLE statement:
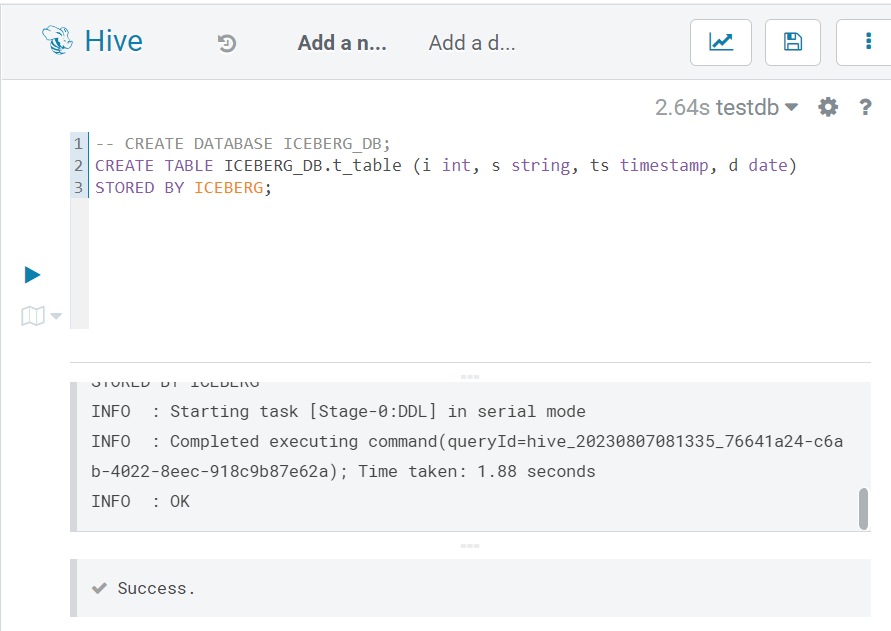
Figure 1: Creating an Iceberg table in Hive
The same syntax applies in Impala, and as with any other Hive table, the usual EXTERNAL/MANAGED table concepts are applicable (more information here).
Table History
In Hive, every Iceberg tables comes with its own history. By selecting the table history, we get access to the following metadata:
- Timestamp: When a record was inserted.
- Snapshot_ID: Associated with the specific insertion, allowing you to track and to reference this snapshot.
- Parent_snapshot_ID: Provides a link to the previous snapshot. This relationship between snapshots helps to trace the data lineage.
- is_current_ancestor: Indicates whether the current snapshot is an ancestor of another snapshot. This information is valuable for understanding the hierarchical structure of snapshots.
This level of detail empowers us to better manage, analyse, and comprehend the historical changes and relationships within our Iceberg tables.
In the following screenshot, we can see how the history is readily available in Hive, accessible through a simple SELECT statement:
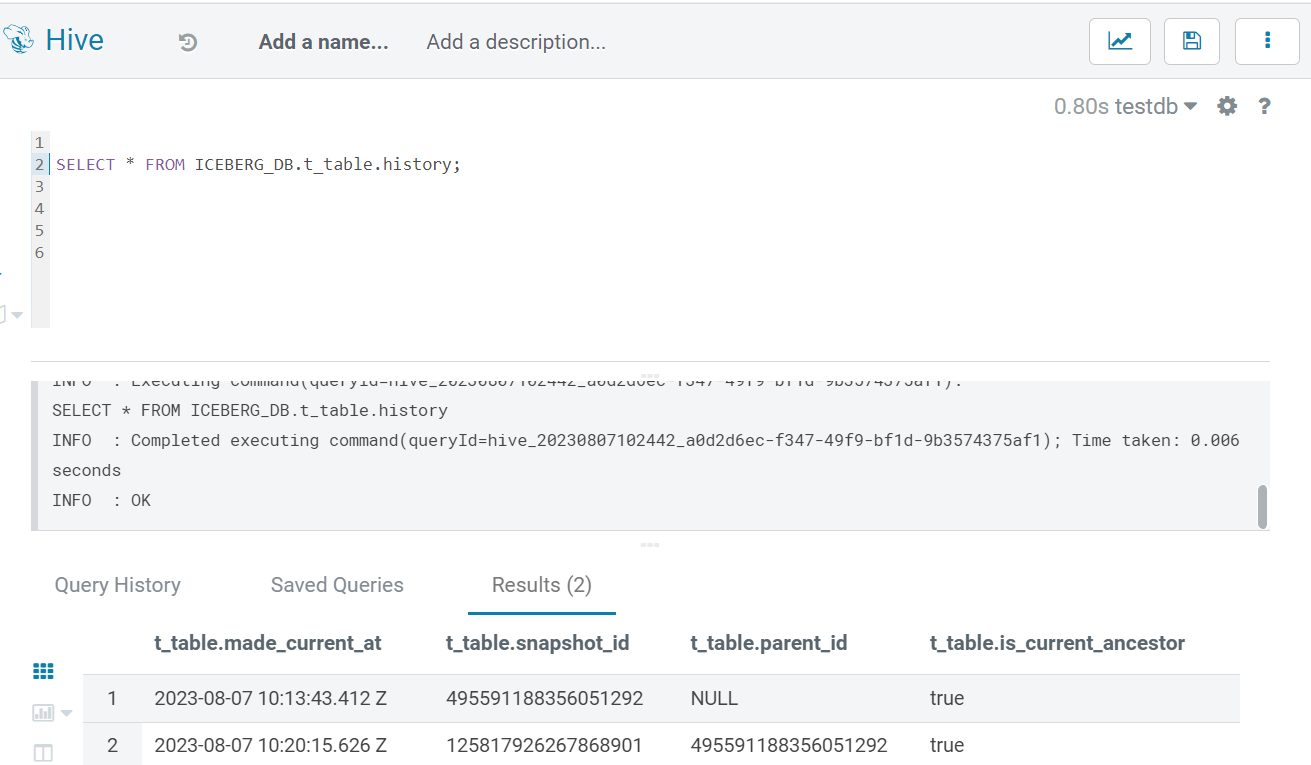
Figure 2: Table History in Hive
Time Travel
Thanks to the availability of a table’s history, Iceberg allows us to perform time travel. Imagine being able to view historical records with ease and thus gain a dynamic perspective on updates, changes, and trends!
In Iceberg, we can explore data based on timestamp and version, and of course, we can do the same in Hive. Timestamp and version values can be obtained from the history, as we just saw (with the version being the snapshot_id).
Below you can see a template query (and two sample screenshots) to perform time travel on a specific table using both these methods:
SELECT *
FROM ICEBERG_DB.your_table
FOR SYSTEM_TIME AS OF <TIMESTAMP>
-- OR
FOR SYSTEM_VERSION AS OF <VERSION_NO>;
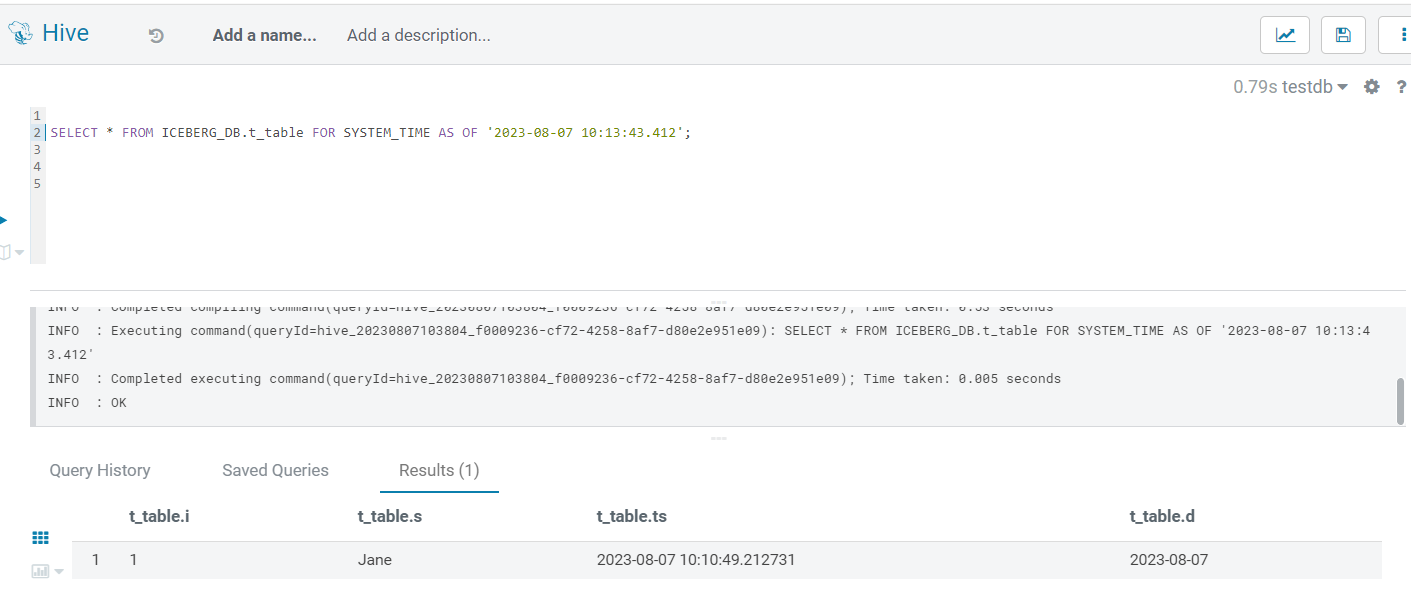
Figure 3: Time Travel via Timestamp
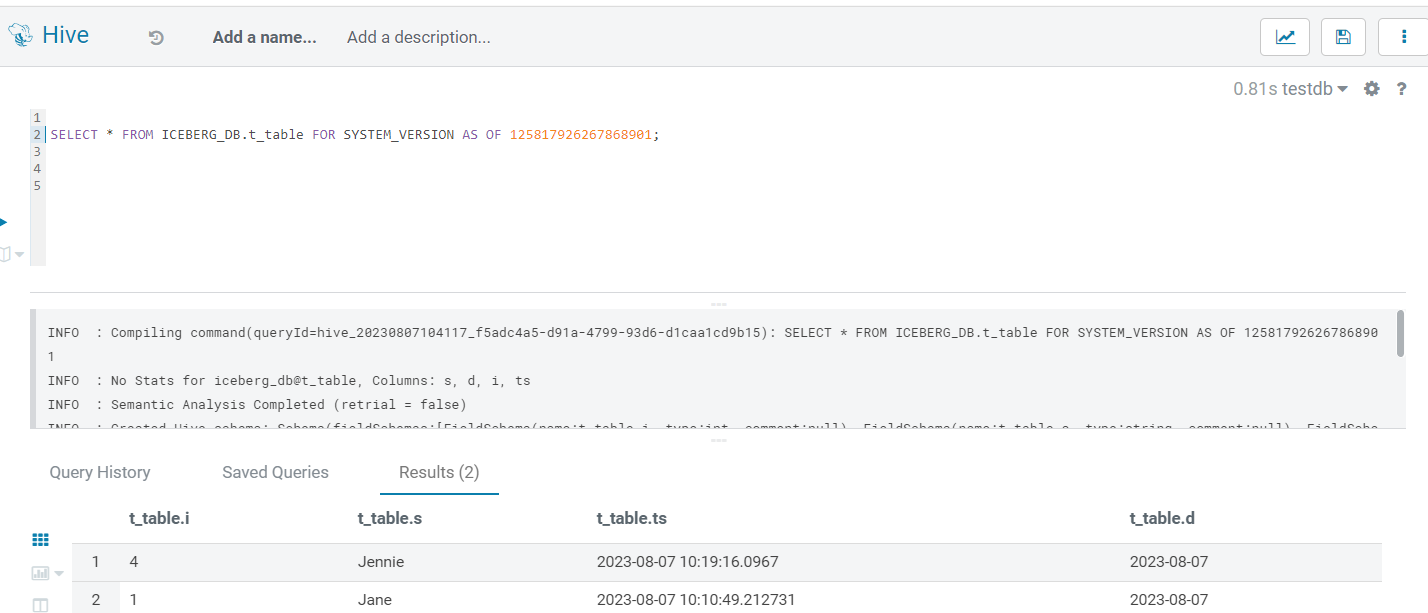
Figure 4: Time Travel via Version
Time Travel with Impala
Unlike Hive, Impala introduces its own distinctive method to access historical details. To reveal a table’s history using Impala, we need to use the DESCRIBE HISTORY command:
DESCRIBE HISTORY ICEBERG_DB.impala_table;
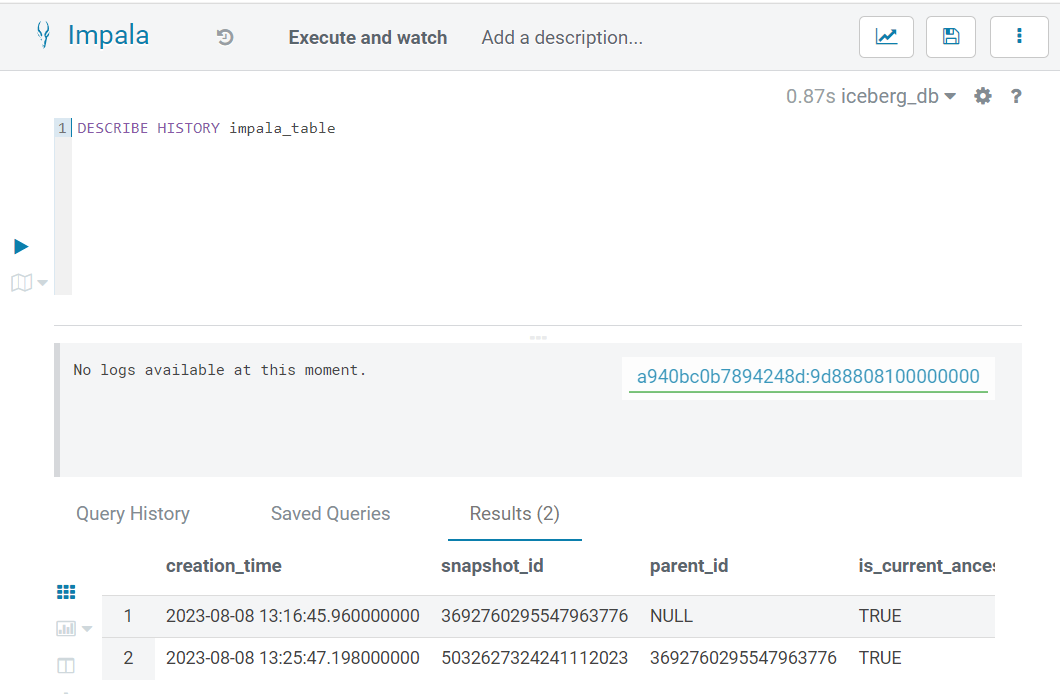
Figure 5: Table History in Impala
Rollback
Iceberg’s Rollback function employs both the history and time travel capabilities to allow us to effortlessly return our data to previous versions. To use this feature, we need a command like this:
ALTER TABLE ICEBERG_DB.t_table EXECUTE ROLLBACK(<snapshot_id>);
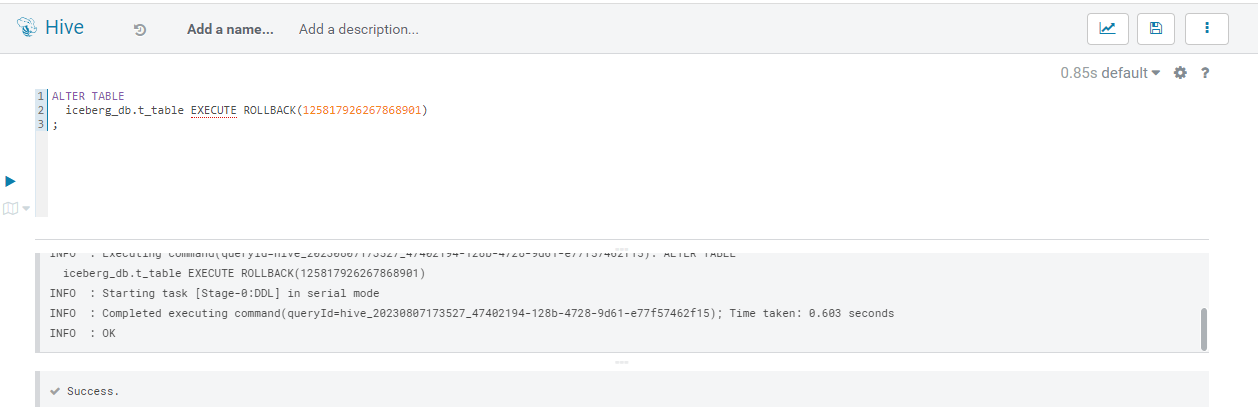
You can also perform a rollback based on a timestamp:
ALTER TABLE ICEBERG_DB.t_table EXECUTE rollback('timestamp');
Figure 6: Rollback example
The result of this operation is clearly visible in the table’s history. The is_current_ancestor value of the latest version is turned to False (record 3 in the screenshot below), and a new record is added as the last current ancestor (record 4), with the same snapshot_id and parent_id of the one we rolled back to (record 2):
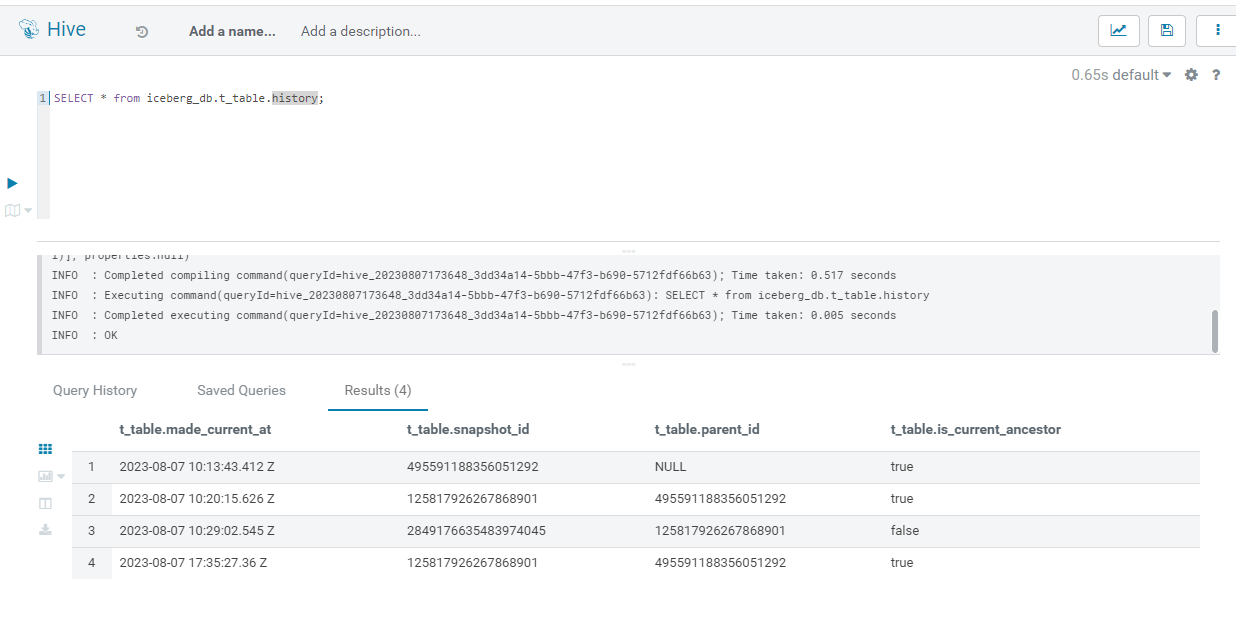
Figure 7: Updated History after Rollback
Note that we cannot initiate a rollback to a snapshot where the is_current_ancestor flag from the history metadata is set to False, meaning that we can only use snapshots marked as current ancestors for rollback operations. In other words, we cannot “rollback a rollback”.
Rollback operations are available in Hive as well as in Impala.
Efficient Metadata Management: Storing and Organising Data Insights
In our previous blog post, we discussed the architecture of Iceberg extensively, examining crucial components like the catalogue, metadata, and data files. Now it’s time to look at the implementation of such concepts within the CDP environment. Assuming we’ve already created an Iceberg table, we can now delve into the specifics of where its metadata and data files are located.
By using the familiar SHOW CREATE TABLE command, we can see these interesting properties:
- Metadata_location
- Previous_metadata_location
Let’s try it:
SHOW CREATE TABLE ICEBERG_DB.t_table EXECUTE ROLLBACK(<version id>);
The same information is also easily accessible in Hue thanks to the table browser. In the screenshot below, the metadata location values are highlighted:
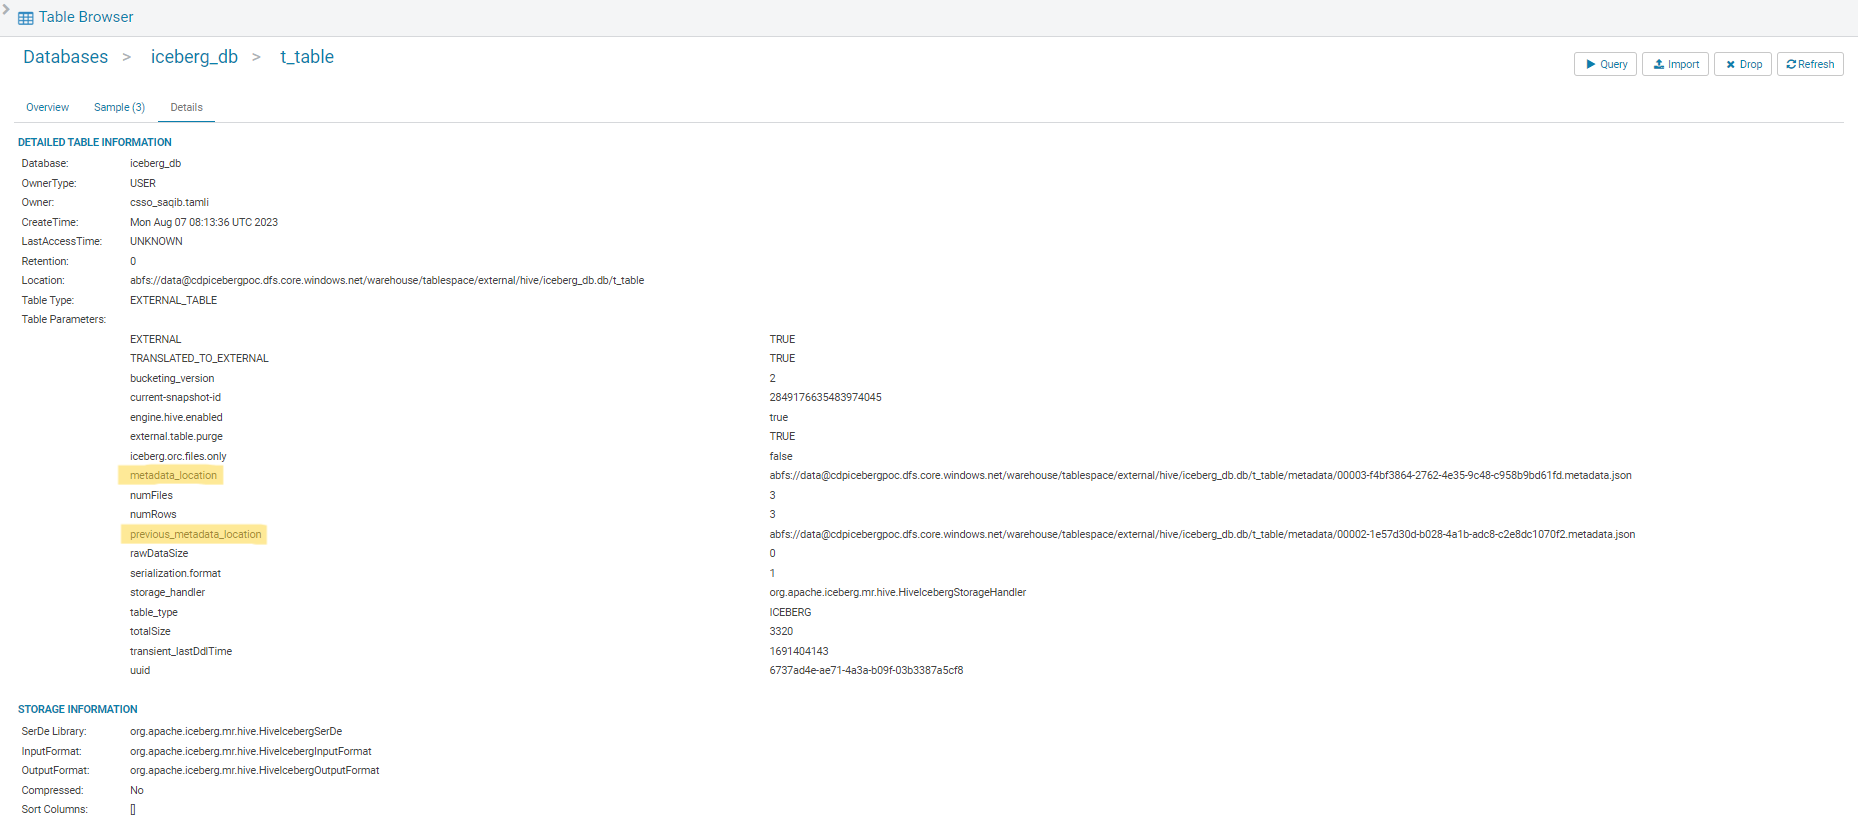
Figure 8: Iceberg table metadata
This is the physical location where all the metadata layers of Iceberg for this table are stored (metadata files, manifest, etc.). Refer to our previous post if you need a reminder!
In our case, we use Azure Blob Storage locations because our cluster is a Public Cloud instance on Azure. For AWS, these would be S3 locations, and for Iceberg on Private Cloud they would be HDFS directories. However, the underlying concept remains the same across these platforms.
We can access this location to explore these files. Next to them we find, of course, the /data directory, corresponding to the Location property of the table:

Figure 9: Metadata and Data directories for an Iceberg table
Navigating to these directories, we can see the table data and its metadata files:

Figure 10: Iceberg table data
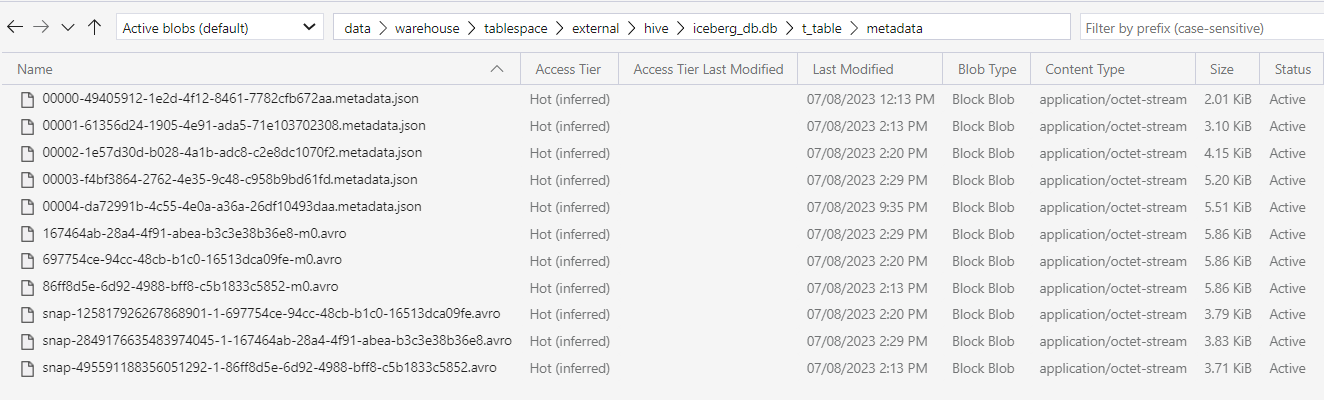
Figure 11: Iceberg table metadata
Optimising Data Management: Partitioning in Iceberg
In our previous blog post, we also explored the fascinating concept of partition evolution, and as we might expect, this works in exactly the same way in Cloudera. Let’s create a partitioned table in Hive:
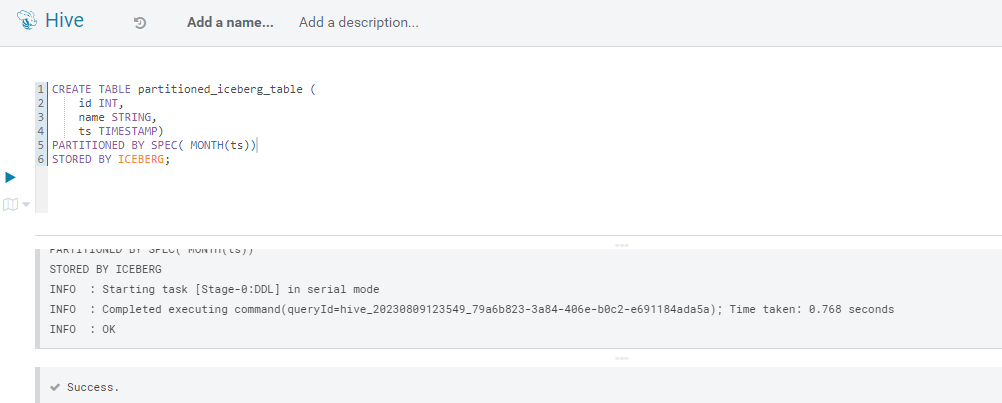
Figure 12: Iceberg partitioned table in Hive
As we proceed to insert records into this table, we can observe how additional sub-directories are created within the original /data location. The behaviour is exactly as expected, demonstrating once again how Iceberg is seamlessly embedded in the structure of CDW, providing a fully transparent integration for users:
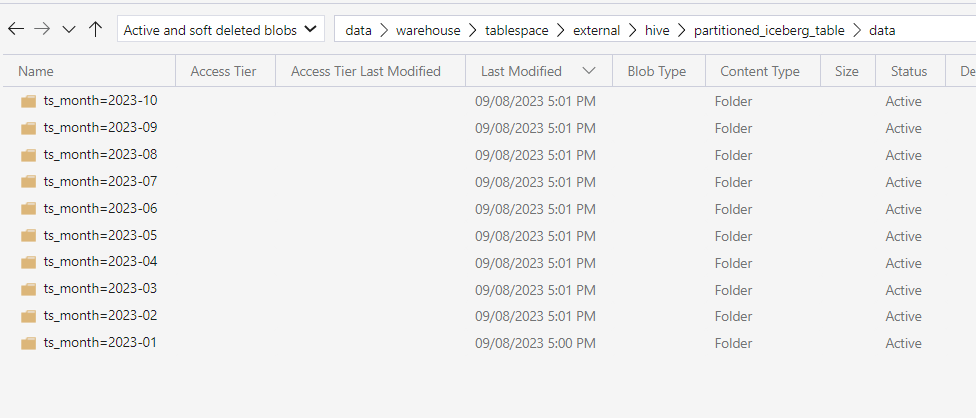
Figure 13: Partitioned data in Iceberg
Seamless Migration: Transitioning Your Hive Table with Ease
The final key concept to explore in today’s post is the transition from Hive to Iceberg. For users with an existing CDP instance containing significant data stored as Hive tables, understanding this process and the feasibility of migrating these tables to Iceberg is crucial.
There are two ways to migrate such tables:
- In-place migrations
- Shadow migrations
Both are very straightforward, but with different implications (as their names suggest). Here are the details.
In-place Migrations
In an in-place migration, the existing data is transformed directly within the current storage system.
For instance, consider a scenario where we have a Hive table called employee_parquet in a Hadoop HDFS storage system. To migrate this data to Iceberg using an in-place migration, we have to apply Iceberg’s format to the existing data within the same storage infrastructure. This approach minimises the need for additional storage resources, as the data transformation occurs within the same storage location:
CREATE TABLE employees_parquet(
	id int,
	name string,
	salary DOUBLE)
STORED BY PARQUET;
ALTER TABLE
  EMPLOYEES_PARQUET
SET
  TBLPROPERTIES (
   'STORAGE_HANDLER' = 'org.apache.iceberg.mr.hive.HiveIcebergStorageHandler',
   'FORMAT-VERSION' = 2
);
Following the execution of the given query and a subsequent review, the SHOW CREATE TABLE statement confirms the table’s successful migration to the Iceberg format:
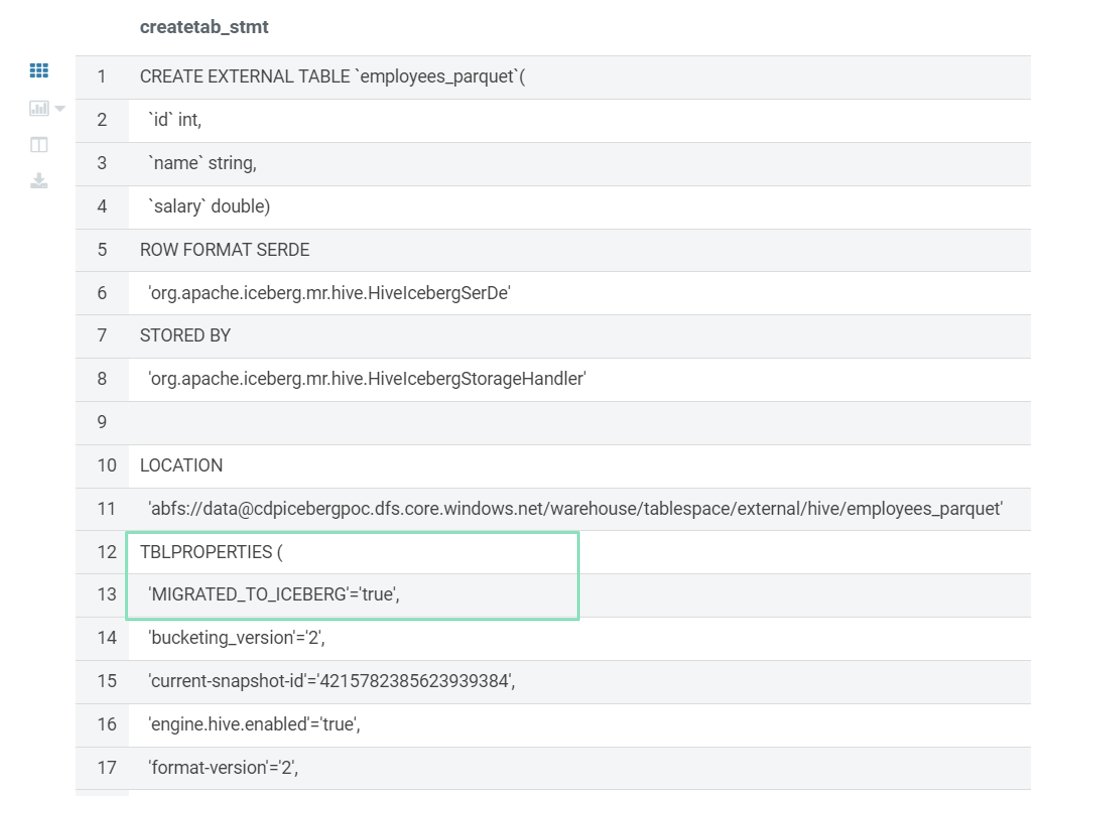
Figure 14: In-Place migration
Shadow Migrations
Shadow migration involves creating a copy of the data in the Iceberg format without changing the original data.
To illustrate this, imagine that we have an Employees table in a relational database. Using the following CTAS statement, we can duplicate it as an Iceberg table (note the use of the STORED BY clause):
CREATE TABLE employee1
STORED BY 'org.apache.iceberg.hive.HiveCatalog'
AS (SELECT
*
    FROM
    Employees
);
You can see the result in the screenshot below. All the typical Iceberg properties are present, confirming that this is indeed a new Iceberg table:
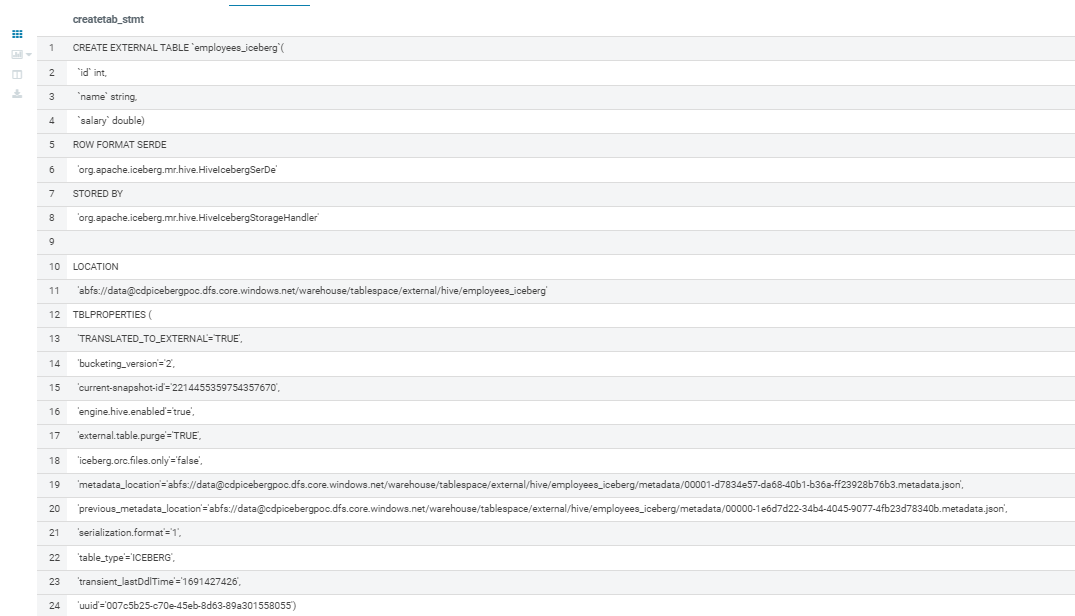
Figure 15: Shadow migration
In the screenshot, we can see various pieces of information related to the migration process. One noteworthy detail is the specific snapshot used for the migration, which serves as a key reference point for tracking and managing changes within your data.
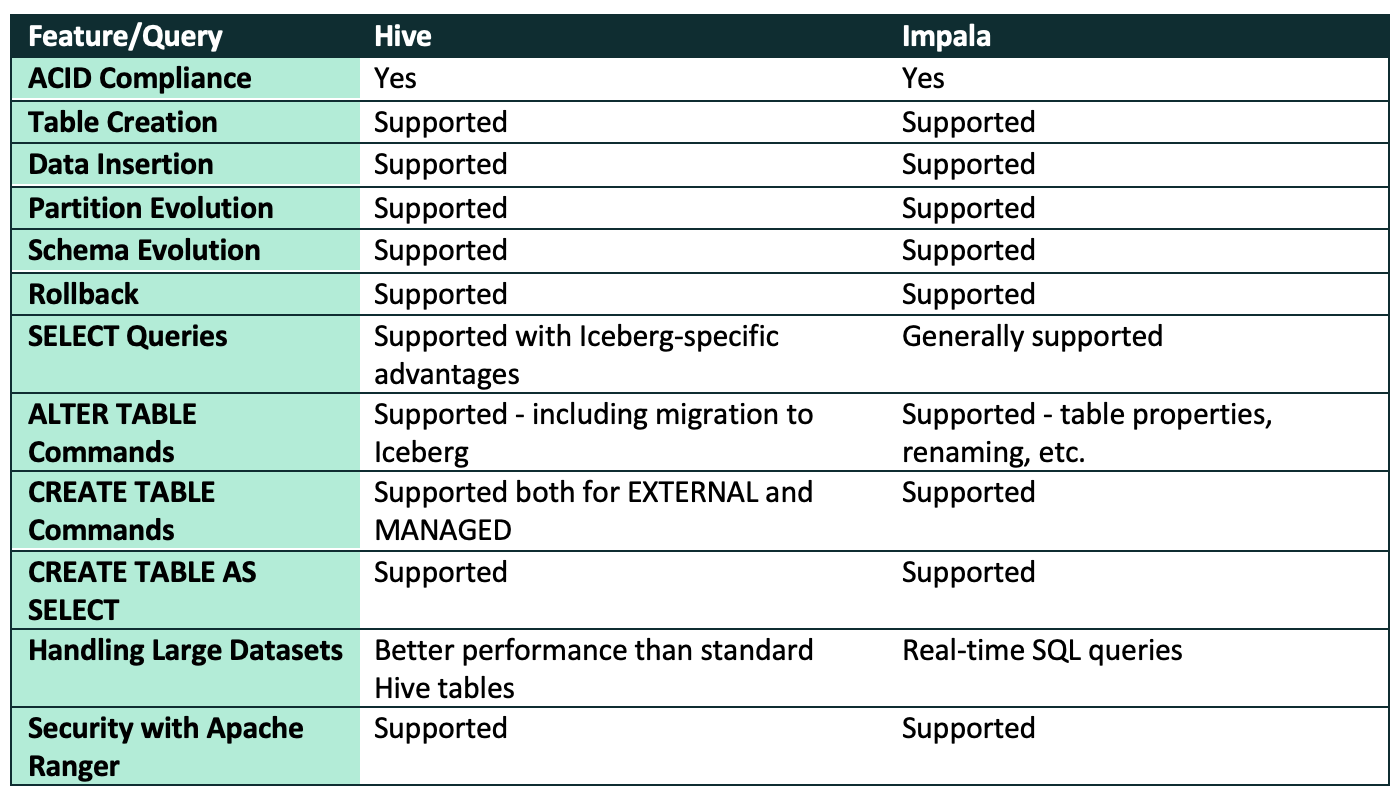
Comprehensive Evaluation
In this article, we’ve delved deep into Iceberg-supported functionalities within Hive and Impala using Cloudera Data Platform. In the table below we’ve summarised the compatibility of these services for different Iceberg operations:
Summary
In this article, our second about Apache Iceberg, we’ve explored its powerful functionalities within the context of Cloudera Data Platform, and more specifically, using CDW in CDP Public Cloud. By integrating perfectly with CDW, Apache Iceberg provides CDP-based organisations with enhanced capabilities for managing their data, enabling the seamless scaling of data lakes, improved data governance, and streamlined data operations.
If you are interested in exploring the world of Iceberg or CDP, don’t hesitate to contact us with any questions that you might have. Our team of certified experts has extensive experience and is ready to assist you to fully leverage Apache Iceberg within your data infrastructure. We look forward to helping you to optimise your data management strategies and so to achieve greater efficiency and performance in your sector.