15 Sep 2022 Managing Infrastructure with Terraform & Azure DevOps
In this article we’ll talk about Terraform, a relatively new technology that allows us to create and manage cloud infrastructure using code, and present a use case in which we created the necessary infrastructure using Terraform. We’ll also look at Azure DevOps and see how we employed its pipelines to automate resource management in our use case.
But what exactly is Terraform?
Terraform
Infrastructure as code (IaC) is the process of creating and managing infrastructure from a set of files that contain the specifications required for the resources to be created.
Terraform is an IaC tool developed by HashiCorp that allows us to provision resources using human-readable code.
Terraform allows us to declaratively define, in a set of configuration files, what infrastructure we want to deploy, what resources we require, and how they are going to relate to one another.
The main files in Terraform are the configuration files, where we can declaratively describe the infrastructure. The user can create as many configuration files as they want, allowing for a more organised infrastructure description. Additionally, by uploading the configuration files to a code repository, like GitHub, we will enable version control of the infrastructure (through the different file versions), as well as allowing more users to contribute to our code.
Besides the configuration files, there is also the state file – this is where Terraform will store the current state of the infrastructure, i.e. the metadata of how the current resources are configured, and if there are later changes it will serve as a reference point from which to compare the existing infrastructure to the new one we are declaring, minimising the workload by performing only the required changes. Unlike the configuration files, the state file is automatically created and updated by Terraform, so the end user can focus on describing the desired infrastructure instead.
To enable collaboration between team members, Terraform allows us to store this state file in the cloud. By combining this with a Git repository storing the configuration files, a whole team can manage the same infrastructure with Terraform.
Another benefit of Terraform is that it is open source, meaning that it is free to use, but more importantly, that it will be able to connect with multiple cloud providers (through different modules) and apply its own simple management mechanism to all of them, simultaneously.
Once the configuration files have been properly created, we will use a set of commands to activate Terraform and then we can begin to enjoy its advantages.
Terraform Commands
The first command we’ll use is Init; this will carry out the steps necessary to prepare the working directory for use with Terraform.
With the Refresh command, Terraform connects with the providers in order to find out the real state of the infrastructure we want to manage.
The Plan command will compare the real world with our desired configuration, described in the configuration files, and list the required changes so that the real infrastructure matches our needs. These changes may include creating or deleting resources, or they could simply be modifications to the existing resources.
Finally, the Apply phase will take the plan with the required changes and apply them to the real infrastructure. In some cases, it may need to modify the resources in a particular order (for instance, when there is a natural dependency, like virtual machines connected to a virtual network). In these cases, Terraform will automatically take care of things and sequentially create or modify the resources in the necessary order, and even save time by applying the changes in parallel when possible.
And finally, when we don’t need this infrastructure anymore, there is the Destroy command, which will automatically unwind the whole process and destroy all the resources managed by Terraform.
Now that we know what Terraform is, and how it works, let’s see how we used it to manage cloud infrastructure in one of our recent projects.
Use Case
We used Terraform to build (and update) the infrastructure required for an Internet of Things (IoT) project we recently worked on. We will talk more about this IoT project in a future blog post, but here our scope focuses only on the IaC and DevOps components of the project.
In this project we used Terraform to manage a simulated IoT system with several Azure products, including a Resource Group, Storage Account, Cosmos DB, and App Function with three functions inside plus the Application Insights and Service Plan. Additionally, we created some billing alerts for the Resource Group, and assigned relevant roles for our team to work with the infrastructure from the Azure Portal. Figure 1 below provides a graphic representation of the Azure resources used:
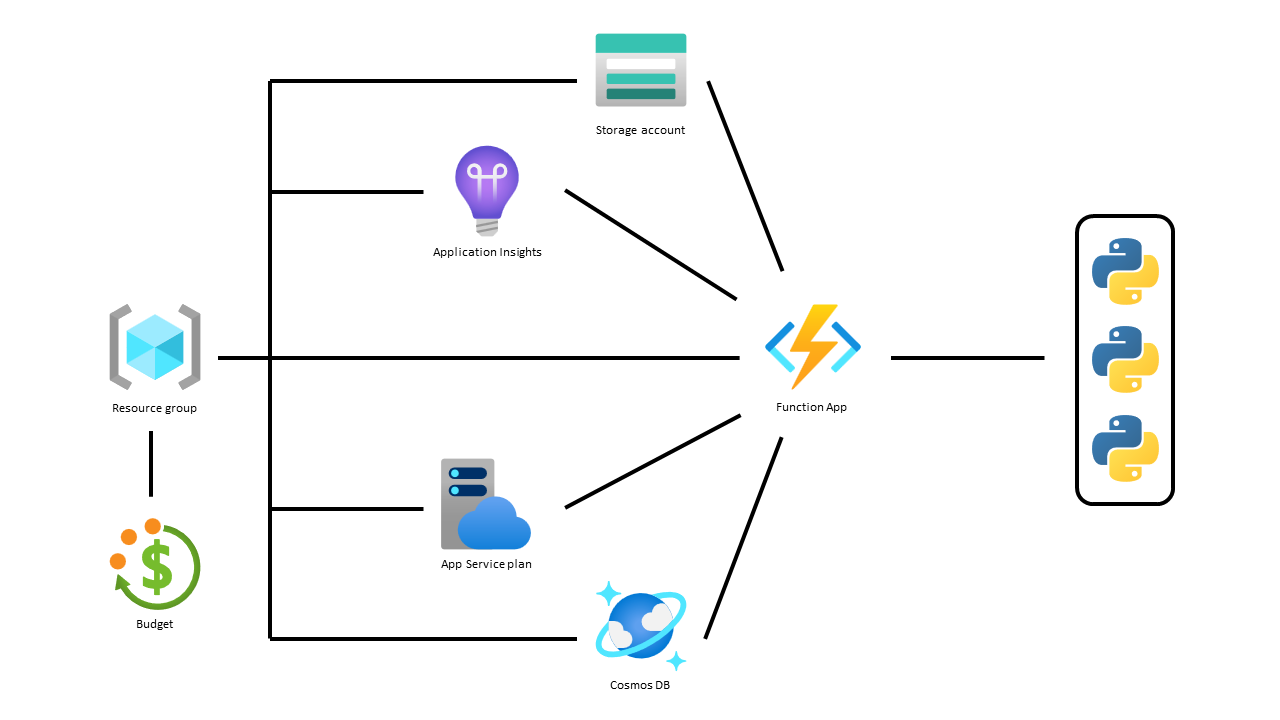
Figure 1: Diagram of the resources required for the IoT project
The first step was to create the Terraform configuration files to create the required resources.
As we could create as many configuration files as we wanted, we split the code into three different files: the first was dedicated to managing the role assignment for the designed users (iam.tf), the second to create all the variables we would use in the code (variables.tf), and the third, where all the resources are described, as well as the Azure providers needed for Terraform to interact with it (main.tf).
The configuration files were stored in a GitHub repository. That way, we enabled version control of the files (which directly translates to a version control of the infrastructure). Moreover, it allows team collaboration on the configuration files, i.e. there can be more than a single contributor to update the infrastructure code.
In addition to contributing to the code, if we want all our team to be able to use Terraform commands and interact with the infrastructure, we need to store the state file in the cloud. In our case, we stored the file in a blob container in an Azure Storage account; adding the proper backend configuration to the configuration file means all the team members can interact with the infrastructure through Terraform.
To prevent multiple users from applying changes at the same time (for instance, creating duplicate resources), which may lead to unexpected issues, Terraform blocks the state file when running the apply command, thus allowing only a single apply command to be executed at a time.
Now let’s see what a Terraform configuration file looks like – in the image below you can see a snippet from a configuration file used to create a Resource Group that contains a Storage Account, Application Insights and a Cosmos DB:
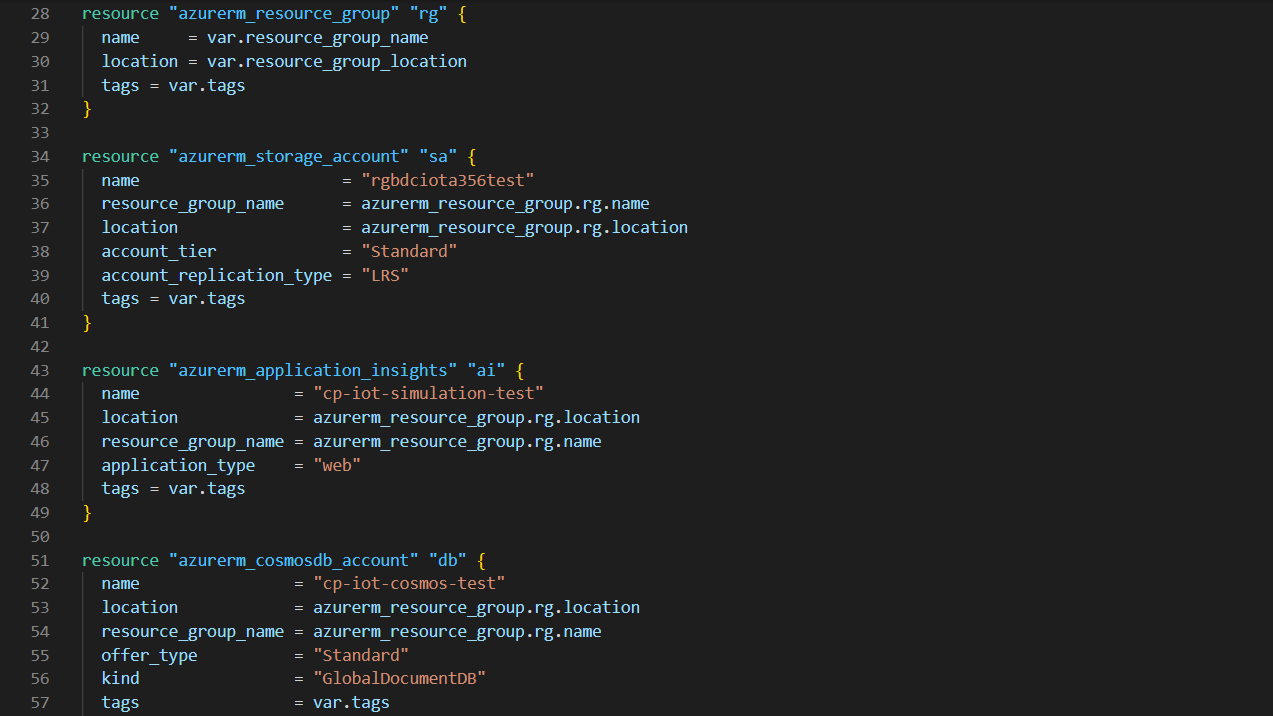
Figure 2: Extract from main Terraform configuration file
As we can see, Terraform is written in high-level code, meaning it is easy to read and understand. We can also see how each function input can be hard-written in the file, saved in variables, or extracted from previously created resources.
Using variables from other resources is very useful, allowing us to connect multiple resources in Terraform without needing to know the specific value or reusing variables. As shown in the image, the name of the Resource Group for the rest of the resources is set as the name of the one created at the beginning by Terraform.
Variables are defined like any other resource, with a name acting as a key for Terraform to recover the variable value, and a set of parameters to complement the resource creation. To keep our configuration code cleaner, we defined the variables in a separate file (called “variables.tf”), leaving the main file ready for the Azure resources themselves.
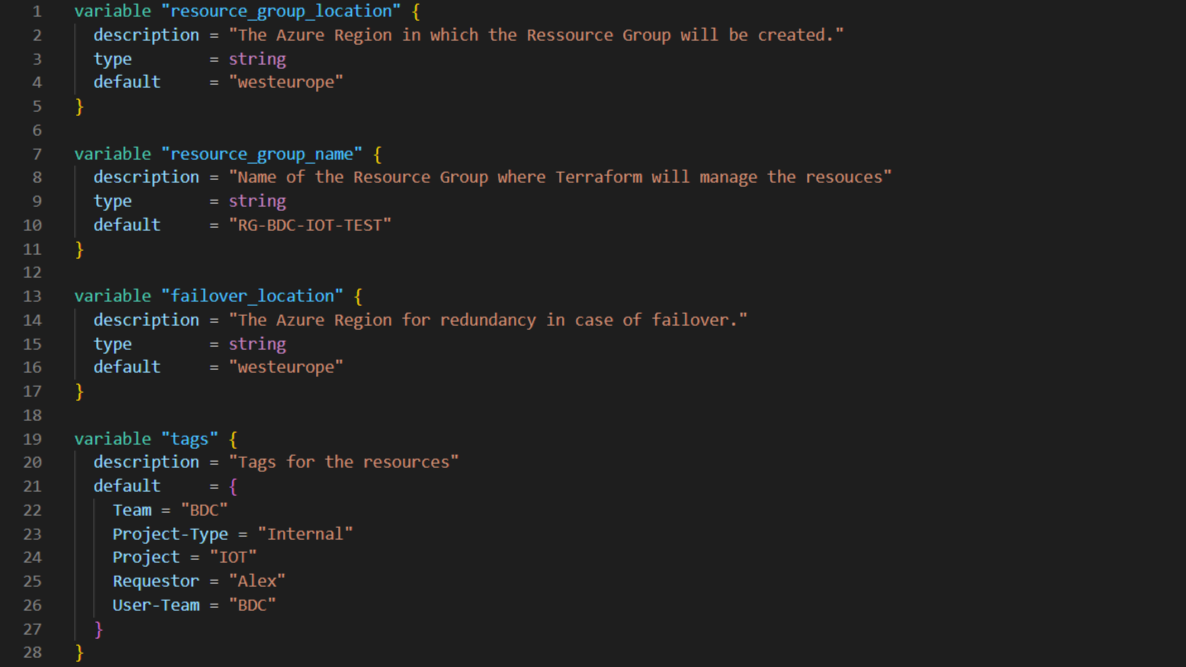
Figure 3: Extract from variables configuration file
Figure 3 is a snippet from the variables configuration file, and we can see how the variables are defined like a normal resource. This also helps us to understand how naming works in Terraform. For instance, “rg” will not be the name of the Resource Group in Azure, but only its name inside Terraform, used to recall this resource and to get its properties like the location or the actual Azure name.
Another interesting point in this project is how we created the functions running in the Function App. Although we can create functions as Terraform resources, they are tricky to define. As depicted in Figure 4, to simplify the process, we created the functions together with the Function App through a compressed ZIP file containing the functions code as well as a Python environment with the required modules. The ZIP file is uploaded into Azure Blob storage. As we will see in the Azure DevOps section below, this is handy for decoupling the infrastructure and the functions code, both having their own repository.
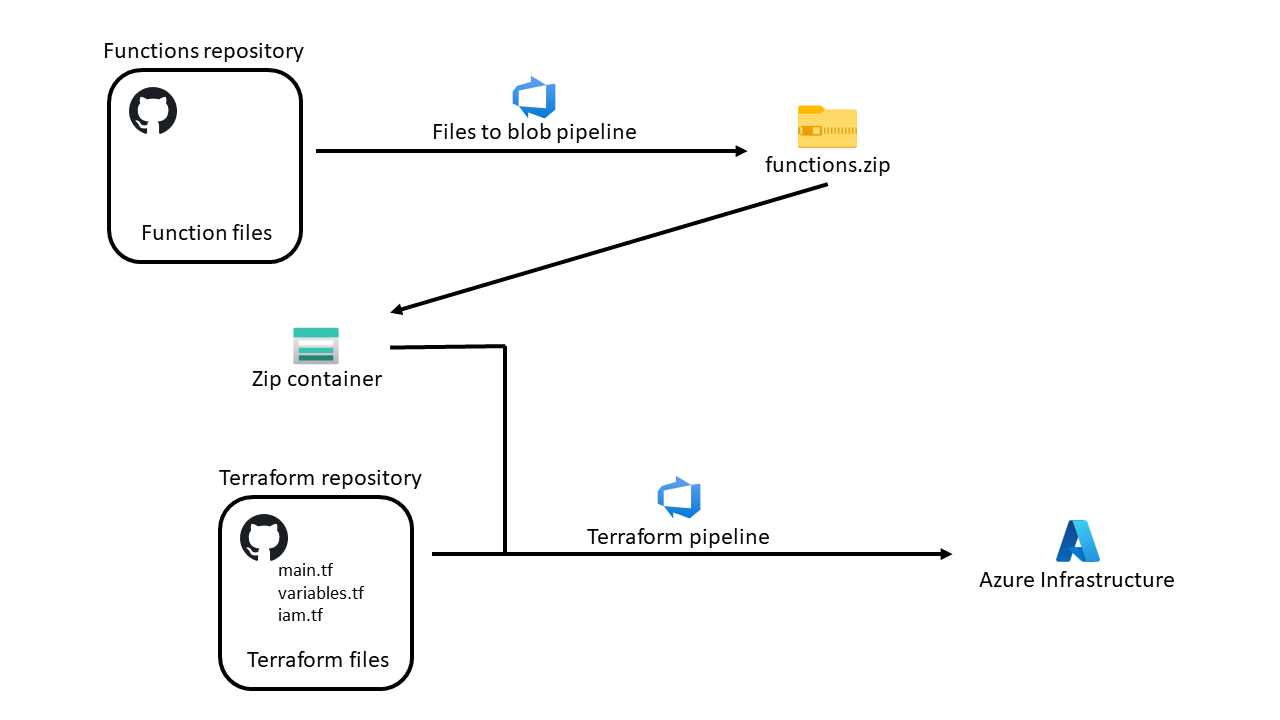
Figure 4: Functions and Terraform repository
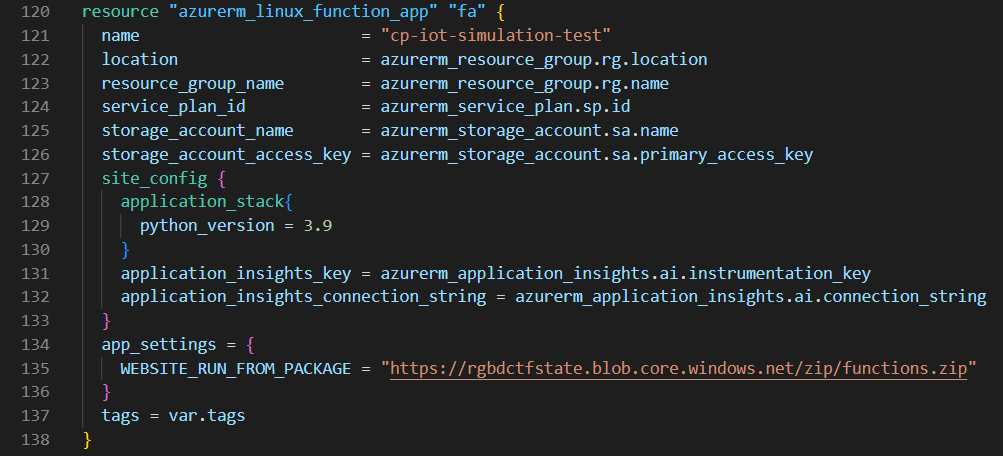
Figure 5: Definition of Azure Linux Function App
As we can see above, in addition to the numerous connections that the Function App was provided with to create the functions, we only specified a URL to a ZIP file stored in a blob container. We will see how this compressed file was created in the following section about Azure DevOps, the service used to automate its creation.
But first, let’s take a look at Azure DevOps.
Azure DevOps
Azure DevOps is a Software as a Service (SaaS) platform from Microsoft; it allows teams to plan work, collaborate on code development, and build and deploy applications.
To be more precise, Azure DevOps is a set of cloud-hosted services that will help with the DevOps process and that works for any language targeting any platform.
Among these services are Azure Repos, which can be connected to Git to access and even edit the files from a repository; it includes an overview of commits, pushes, and branches.
Another of the most important services, and the one we focused on in this project, is Azure Pipelines: a rich, cross-platform, CI/CD system capable of building any language and targeting any platform. It can pull our code from the most popular source-control systems (like GitHub in our case) and divide the work into steps, which can perform actions or tasks in different agents (like Windows, Linux, or macOS). Additionally, each step can be related to an environment, which will help to keep them well organised, decoupling them, for example, in PROD and DEV, and introducing the ability to require different permissions in each environment (and therefore stage).
However, in this project the use of Terraform allows us to simplify the CI/CD process even more, only requiring the DevOps pipelines to connect to a GitHub repository and, with every commit to its main branch, execute the desired Terraform commands.
Specifically, this pipeline will work by creating a virtual agent with the files from the repository and executing a set of tasks specified by the user, including the Terraform commands.
Thanks to our having configured Terraform with a backend, we will only need to install Terraform in this agent and run the necessary commands there and the changes will be applied to the infrastructure.
To simplify the pipeline even more, we can find a Terraform extension, by Microsoft DevLabs, at the Visual Studio Marketplace, which will take care of installing and running Terraform in the pipeline agent.
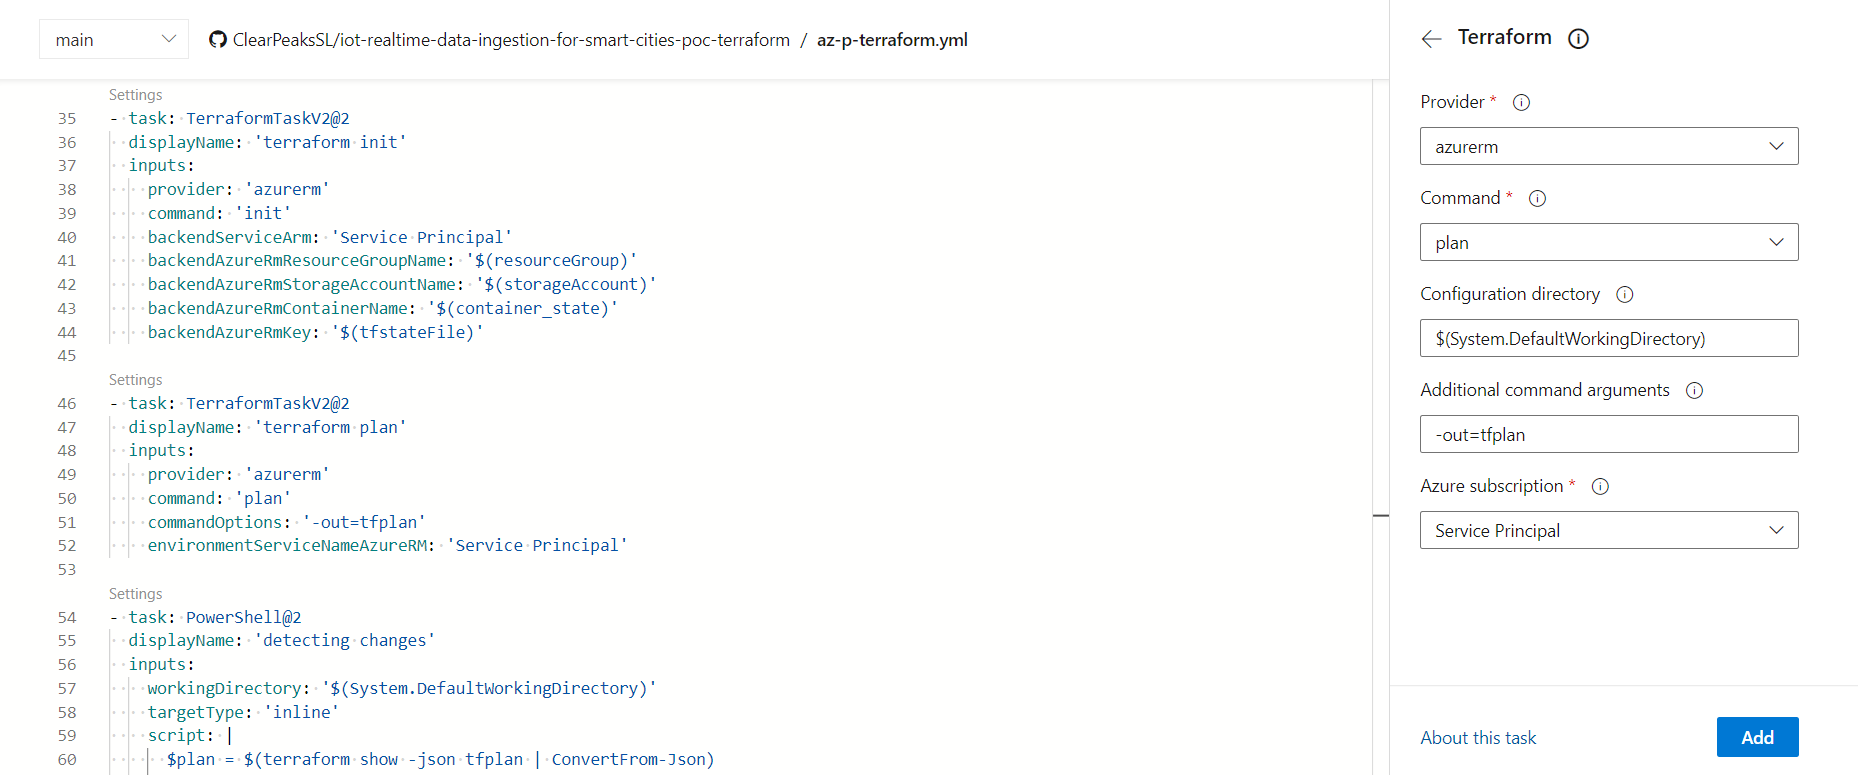
Figure 6: Extract from Terraform pipeline viewed from Azure DevOps editor
As we can see in the previous image, the Azure DevOps interface will simplify the coding work, asking only for the required parameters and generating the required task – and we can edit the pipeline file (a YAML file) at any point and write the tasks ourselves.
Those who have used Terraform before will realise that we need the appropriate cloud credentials (Azure credentials in our case) to create resources with Terraform. Normally, for security reasons, these values are saved as environment variables in our local machine, eliminating the need for them to be written in the configuration file (which would be stored in a repository for collaborative reasons). To solve this problem, Azure DevOps allows us to configure connections that will handle the authentication, meaning there is no need for us to specify our credentials in either the configuration files or the pipeline code.
DevOps can store other variables we might want to use, both general and secret, in their service, again without the need for them to appear in the Terraform script or the pipeline code.
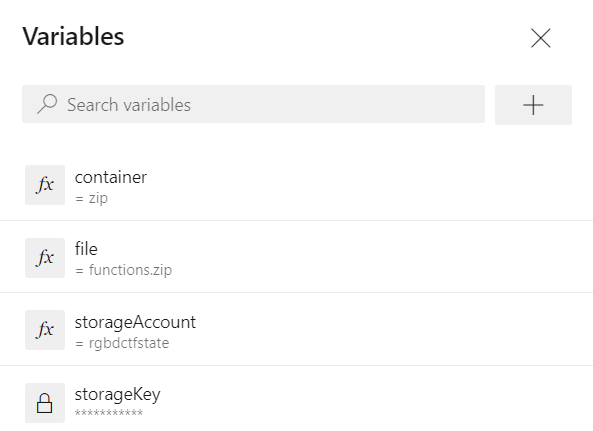
Figure 7: Extract from variables tab in Azure DevOps editor
Apart from Terraform commands, we can run all sorts of tasks in these pipelines. For instance, we used a PowerShell task to read the output from the Terraform plan command and skip the apply if no changes were detected.
We previously mentioned that the functions were created together with the Function App through a single compressed file stored in a blob container; now let’s see how this was done.
Functions File
This project required the creation of a set of functions inside a Function App. Usually, these functions are created in an editor, like Visual Studio Code, and updated from there to Azure. However, in our case we wanted to implement an automated approach.
As we said before, we needed a ZIP file with the functions code as well as a Python environment with the requisite modules. As we would have done in a local machine, we ran a script to perform the job, and made the virtual agent from the pipeline run it.
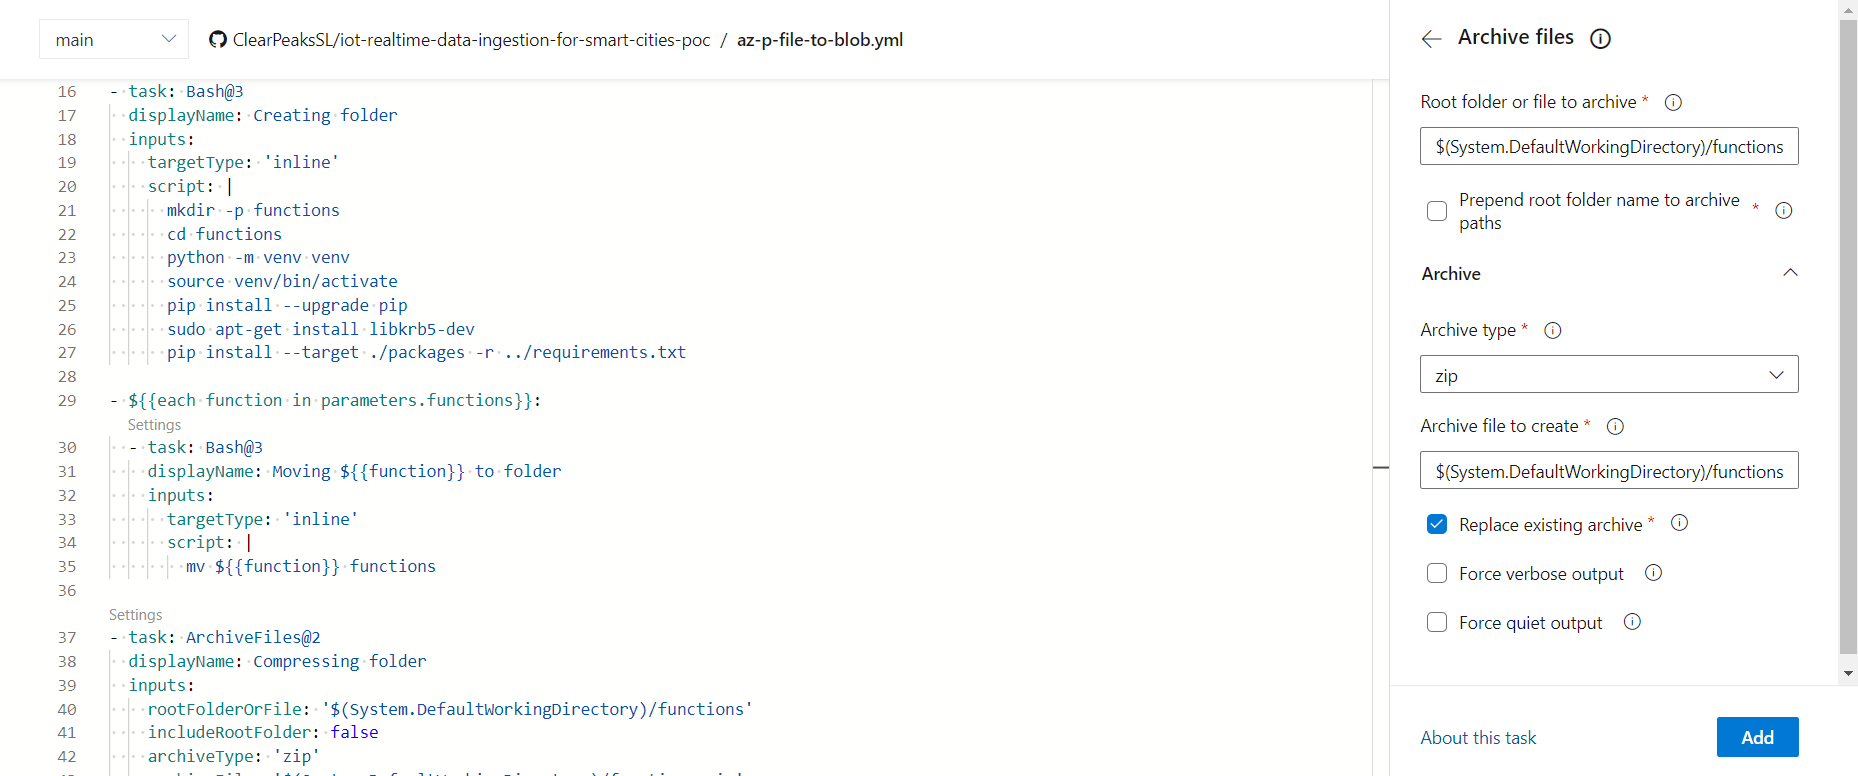
Figure 8: Extract from Files to Blob pipeline viewed from Azure DevOps editor
In the above image we can see the script to install Python and its modules, and also how we used a loop to move each function file to this folder, and how the folder is compressed when everything is ready.
To perform the loop, we defined an object parameter with the names of the functions to load to the compressed file, and ran the task as shown in the previous image.
Finally, the pipeline uploaded this file to the blob container with a simple Azure CLI script in the agent.
This pipeline would run with every commit to the main branch in the repository where the functions are written. However, as in this project, there may be two independent repositories to isolate the functions files from the Terraform files, so when we update the functions code, we will want to run the Terraform pipeline again to apply the changes to the managed infrastructure. With this in mind, we can add triggers to execute pipelines after a successful run of another pipeline, allowing us to concatenate them to run sequentially. In our case this translates to the Terraform pipeline updating the infrastructure when one of its configuration files is updated, as well as when the ZIP file storing the functions is overwritten.
Conclusions
In this article we have offered a solution to completely automate the creation, management, and even destruction of a cloud infrastructure thanks to Terraform and Azure DevOps, allowing the end user to automate resources by simply committing the changes to a code repository.
Thanks to Terraform, we can define the required resources with simple, human-readable code, compare the desired system with the one already created in the cloud, and allow all the members of a team to manage the same infrastructure, as well as allowing version control of the resources through code repositories.
DevOps allows us to trigger pipelines with each commit to a repository to perform a wide range of tasks, from preparing and updating the compressed file that stores the functions code to running a set of Terraform scripts to automatically look for infrastructure changes (changes in the Terraform files and also in the function files).
If you would like further information about this solution and whether it can meet your specific needs, don’t hesitate to contact us – we’ll be happy to help!
