30 Oct 2024 How to Send Power BI Reports Via WhatsApp
Currently, there is a native way to send Power BI reports to users in PDF or JPG format by using Power BI subscriptions. However, this traditional method relies solely on email as the communication channel, and whilst in some organisations this may be sufficient to meet business expectations, there are scenarios where more immediate and direct communication is required. In such cases, sending reports via email can present a few challenges:
- Emails may end up in the spam folder.
- Reduced immediacy: although fast, email is not as fast as other native messaging applications, especially if the user does not check their inbox frequently.
To address these limitations and ensure that users receive reports promptly and reliably, alternative methods are needed. One such option is sending Power BI reports via WhatsApp. This mobile-friendly solution allows for quicker delivery, leveraging WhatsApp’s push notifications to ensure that users can easily access the information on their devices in real time.
In this article, we’ll walk you through how the ClearPeaks team developed a solution that enables organisations to send Power BI reports to their users through WhatsApp, based on the following key considerations:
- The reports sent will be in PDF or JPG format.
- Each report will contain about 3 pages.
- Exported PDF reports must be no larger than 100 MB.
- Exported PNG files of specific pages or visuals must not exceed 5 MB.
- The greater the number of recipients, the better the cost-benefit.
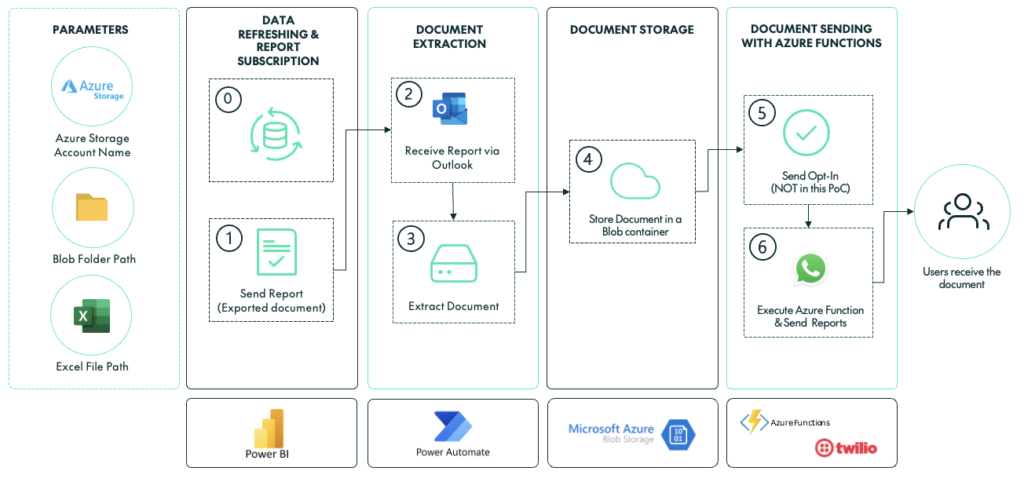
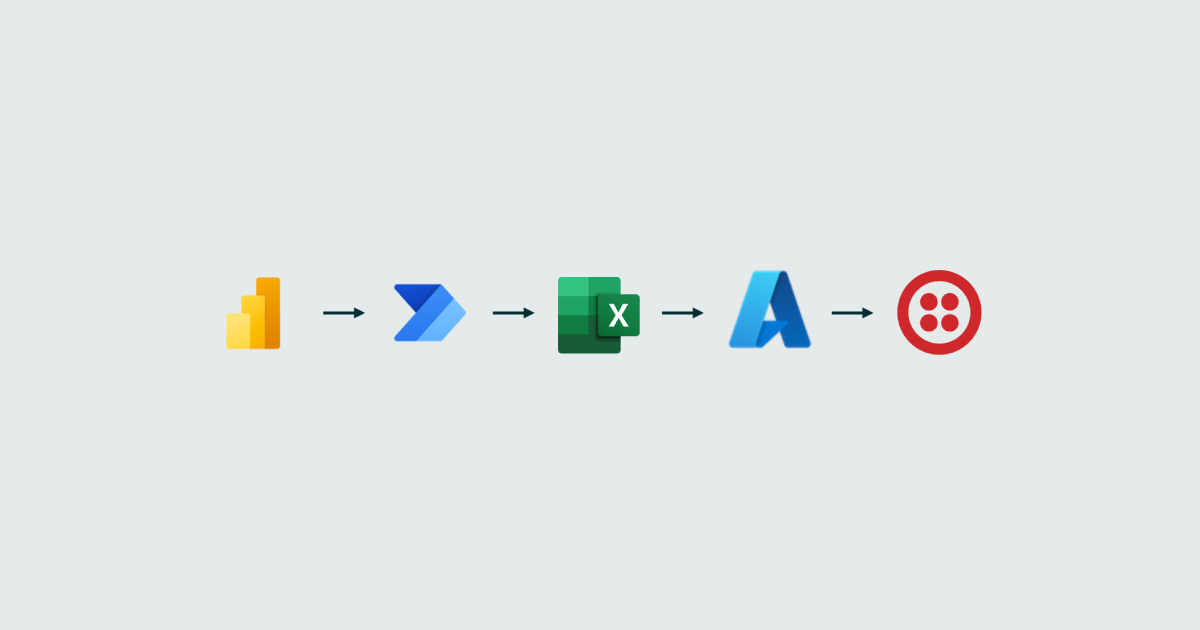
Obviously, this method implies the use of different components to send the Power BI reports, including:
- Power BI: Not only to publish and store reports but also for its subscription functionality, which will be used to export the Power BI reports to PDF or JPG files and to send them to a predefined email inbox.
- Power Automate: To extract the PDF or JPG files from the email sent by the Power BI subscription, and then move them to a location from which they will be sent to users via WhatsApp.
- Azure Blob Storage: To store the PDF or JPG files in a Blob container, which provides a public URL (required by the API). This ensures that the files can be securely shared with users via WhatsApp by generating dynamic, temporary public URLs that guarantee data security.
- Azure Functions: This component will be used to dynamically validate if users agree to receive messages (opt-in validation), and to send reports to each recipient in the database. It leverages an API from a messaging platform provider (Twilio*). What’s more, Azure Functions keeps a record of sent files in a designated storage repository.
* Twilio is a cloud communications platform that enables developers to integrate various communication features (such as WhatsApp, amongst others) into their applications using APIs. This provider was selected because it offers the following advantages:
• Provides a pre-tested working API.
• Extensive documentation that facilitates the use of the platform.
• Test environment is available.
• Self-service system that makes integration with WhatsApp straightforward.
Considering the above, this high-level solution’s architecture is as follows:
Prerequisites
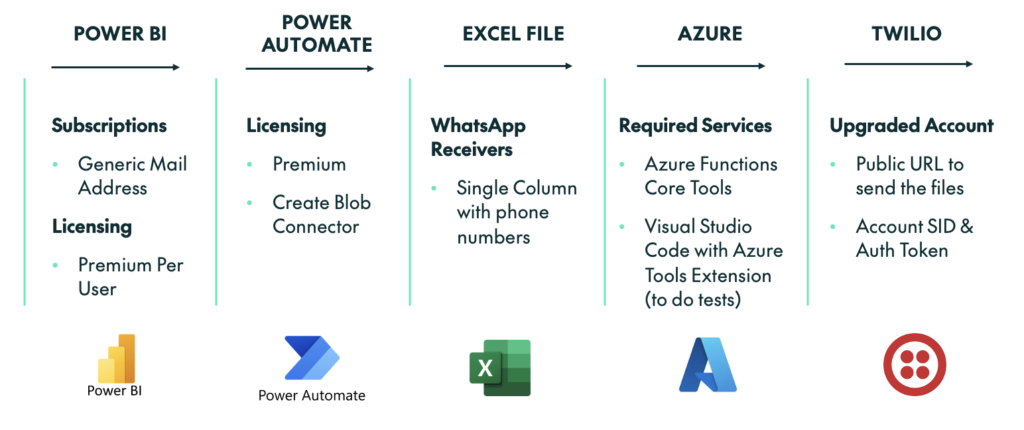
To build this solution you’ll need to meet the following prerequisites:
It is important to mention that the database can be of any type accessible via Python (3.11), including flat files or Excel files. For the purposes of this blog post, we’ll use an Excel file.
Parameters Configuration
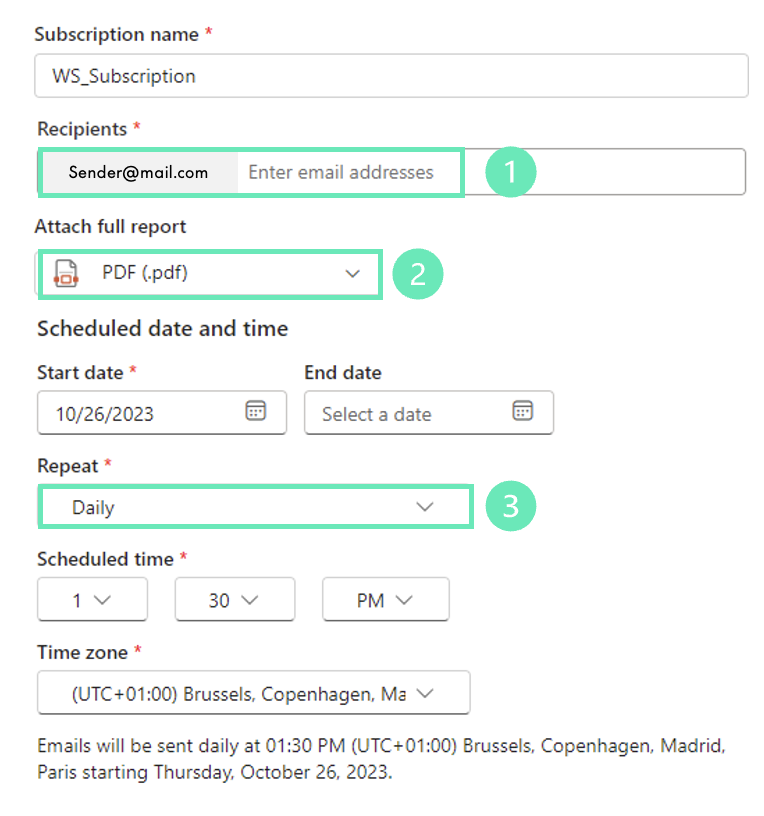
- In the Subscriptions pane of the Power BI report, set the Attach full report option to PDF (.pdf):
- Set up the list of recipients as the input of the Azure Function:
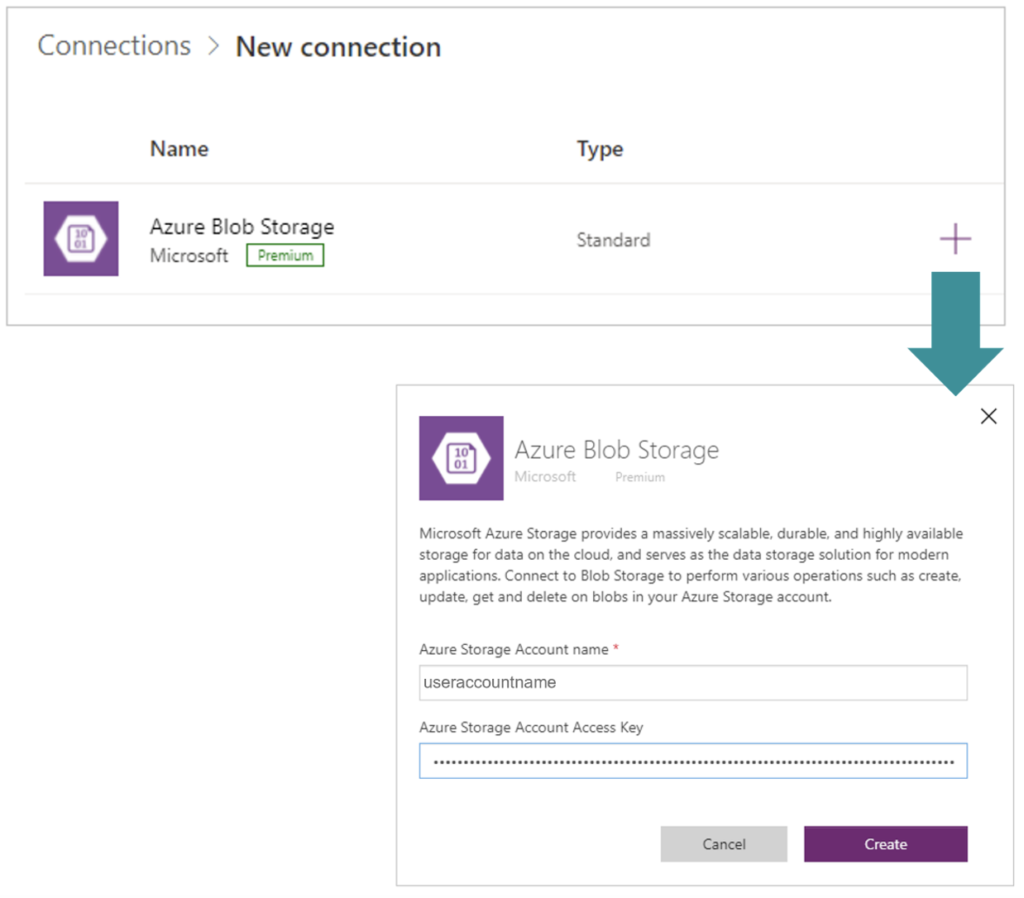
- Create an Azure Blob Storage connection in Power Automate:
- Configure the Blob folder path:
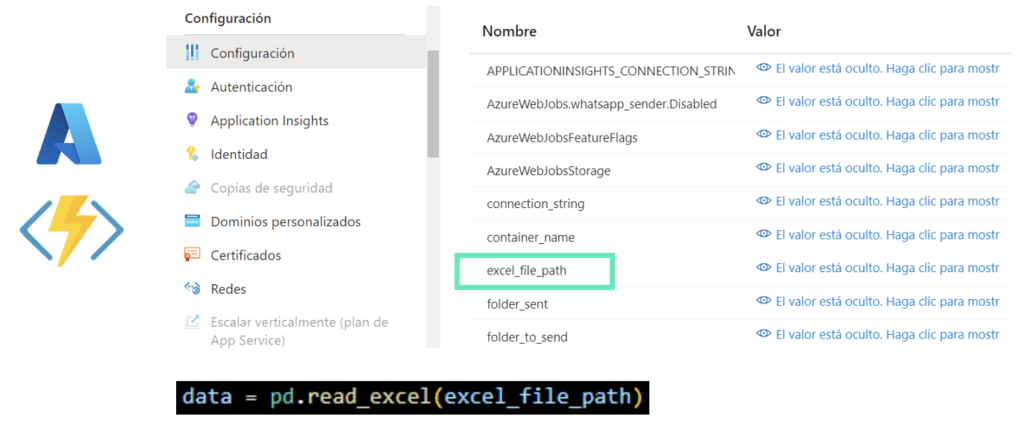
- Configure an environment variable in the Azure Function App to use in the Azure Function code to set up the connection string to the recipient database (in this example, an Excel file):
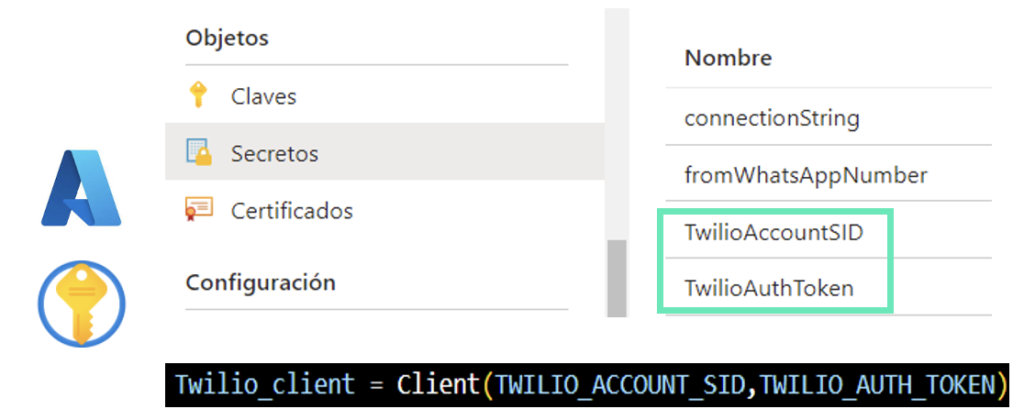
- Configure a secret stored in Azure Key Vault to be used in the Azure Function code for securely connecting to the messaging platform provider’s API:
Deployment Procedure
Now, let’s dive deeper into the specifics of the components that make up this solution:
Data Refreshing and Report Subscription
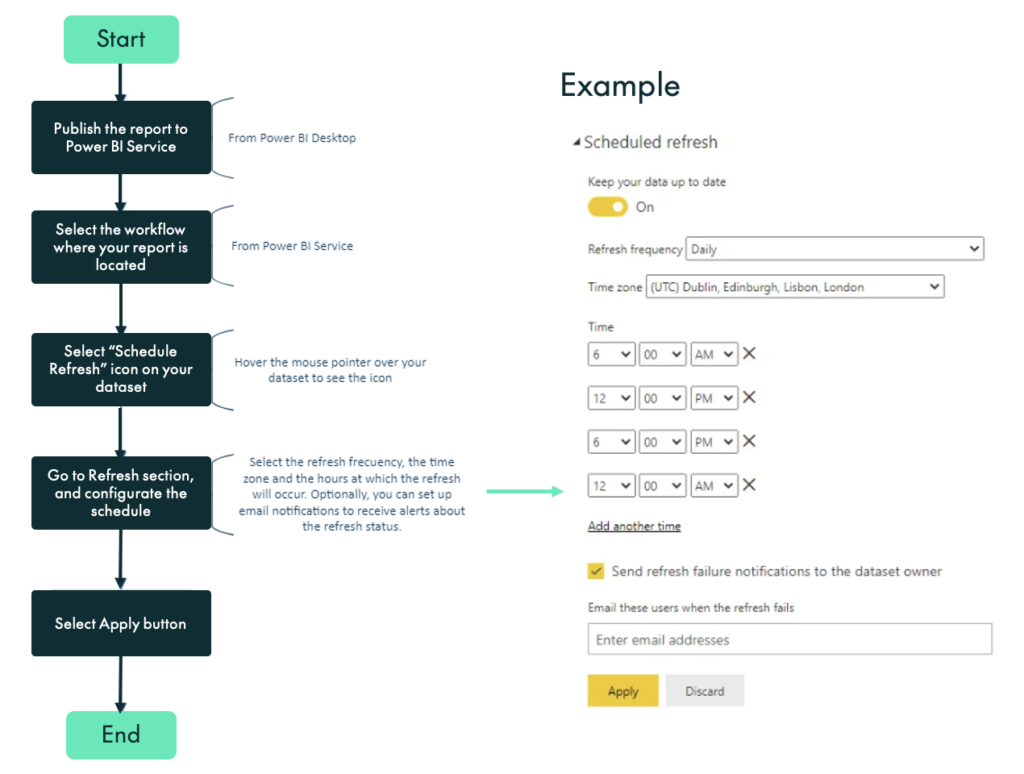
- Schedule as many data refresh tasks as needed within the Power BI semantic model for the reports you plan to send to users. For example, if you need to refresh the data four times a day, the following configuration could work:
- Configure a Subscription for the report, which means creating a dedicated email account (sender) that will be used to send all reports to the list of recipients:
- Set up an email account.
- Select PDF.
- Establish the subscription sending frequency based on your needs. This frequency will depend on how often the reports need to be sent. For example, if reports are required daily at a specific time, the subscription frequency should also be set to Daily, with the scheduled time occurring earlier than the report-sending time.
Document Extraction
- The reports (in PDF or JPG format) are emailed to the sender’s inbox through the subscription configured previously.
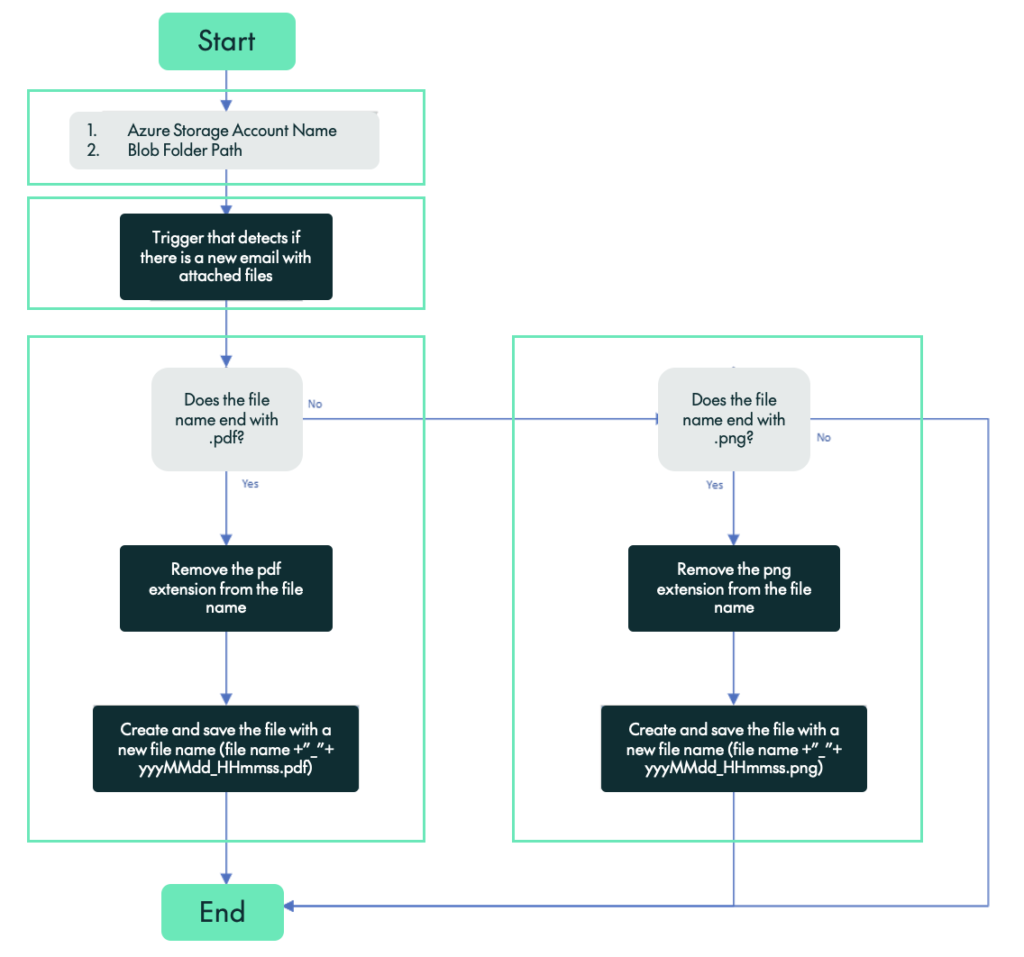
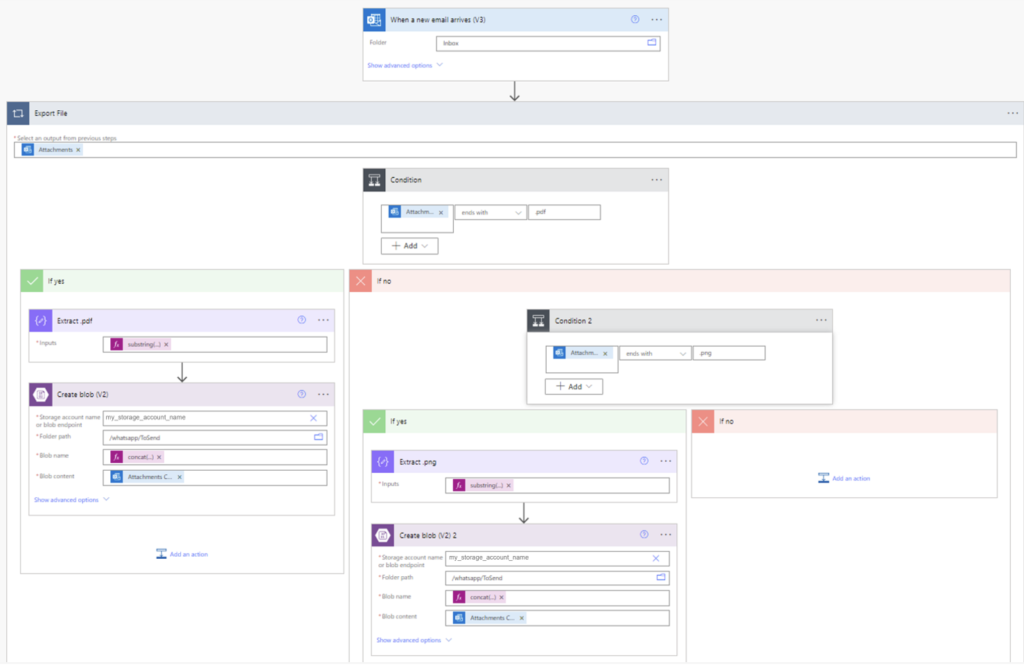
- The report files are extracted from the sender’s inbox and saved in Azure Blob Storage. To do so, you need to create a flow in Power Automate that follows the logic outlined below:
Based on the above, the flow should look like this:
As shown above, the When a new email arrives (V3) task should be configured as follows:
- To: Sender email address to receive the Power BI subscriptions.
- Include Attachments: Yes. To include the attachment information.
- Subject filter: Subscription For. To ensure the flow is triggered only by Power BI subscription emails.
- Only with Attachments: Yes. To trigger the flow only when emails contain attachments.
In addition, the following tasks should be configured like this:
To properly configure these fields, the following expressions should be used:
Field name | Expressions |
|---|---|
Input | substring(items(‘Export_File’)?[‘name’], 0, sub(length(items(‘Export_File’)?[‘name’]), 4)) |
Blob name | concat(outputs(‘Extract_.pdf’),’_’, formatDateTime(convertTimeZone(utcNow(), ’UTC’, ’Romance Standard Time’), ’yyyyMMdd_HHmmss’),’.pdf’) |
Blob content | items(‘Export_File’)?[‘contentBytes’] |
Document Storage
- To store the files that were previously extracted from the email inbox, the following components must be configured in Azure Blob Storage:
- A container, which in this example will be named «whatsapp».
- Two folders, one to store the files to be sent to users (ToSend), and another to store the files that have already been sent, maintaining a history (Sent).
Example:
- ReportName.pdf -> ReportName
- Folder Path: /whatsapp/ToSend
- Container: whatsapp
- Folder: ToSend
- pdf
- Historical
Document Sending with Azure Functions
This component will manage the execution of the following tasks using Azure Functions:
- Send Opt-In: This process involves sending an initial message to users to obtain explicit consent from recipients to receive communications via WhatsApp.
- Execute Azure Function & Send Reports: This is the most complex part of the solution, responsible for the following tasks:
- Generating dynamic URLs that expose the files to the messaging platform provider’s API by using a Blob creation trigger.
- Reading the recipient list from the database.
- Sending the files to each recipient via the provider’s API.
Based on the above, the following steps must be carried out to generate the dynamic URL:
- Creation of a Resource Group.
- Creation of a Storage Account: It is important to mention that Standard Performance, Locally Redundant Storage, and Hot Access Tier have been selected due to the minimal resources and data required.
- Creation of a Container.
- Creation of a Function App.
- Creation of Azure Functions.
- Creation of a Key Vault.
Additionally, before executing the function_app code, specifying the necessary packages in the Requirements.txt file is a must. This file contains a list of Python packages that are installed when the app is published to Azure. The following packages must be included:
- Pandas: To read the excel_file and to create a DataFrame.
- Twilio: To let the Twilio function connect to the WhatsApp API and send WhatsApp messages.
- Openpyxl: To open the Excel file.
- pytz: To ensure that we are working with UTC time zone.
- Azure-identity: To use the DefaultAzureCredential() function, which grants access to the Azure key vault.
- Azure-keyvault-secrets: To configure the client via the SecretClient function, introducing the Key Vault URL and the previously created credential.
- Azure-functions: Enables use of the FunctionApp() function, which creates an instance of a Function App object and is used to generate the Azure Function trigger automatically.
- Azure-storage-blob: Three functions have been used from this package:
- BlobServiceClient: Used to create a Blob service client with the provided connection string.
- BlobSasPermissions: Used to define the permissions for the SAS URL (read and list, in this case).
- Generate_blob_sas: To generate the token needed to create the SAS URL.
The following steps will be executed:
To read the list of recipients and send the corresponding files to each, the following tasks must also be carried out:
The structure of the table containing the list of recipients should include at least one column with the following format:
Note: The ’34’ prefix in the image above is for Spanish phone numbers.
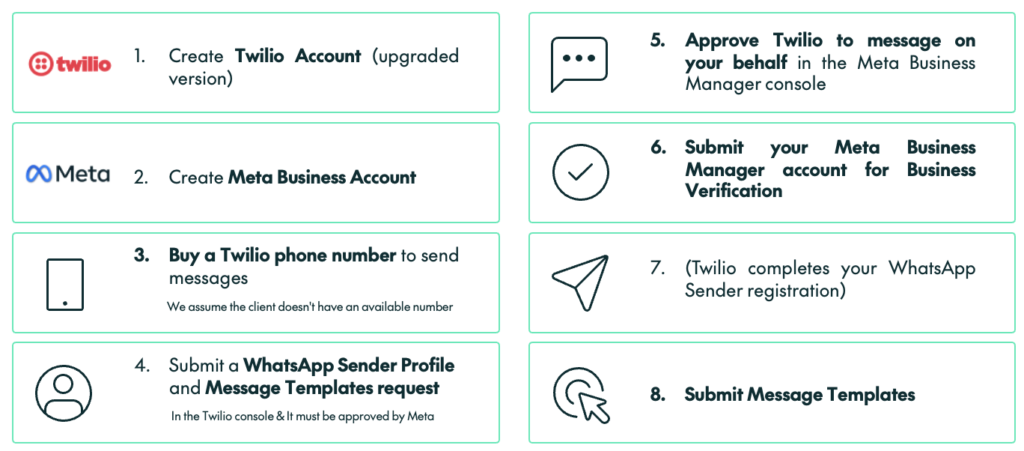
To use the messaging platform provider (Twilio) API, you must follow these steps:
Note: For detailed guidance on Twilio API configuration, visit the official Twilio website, where you’ll find comprehensive information.
In summary, to facilitate the sending of reports, the following considerations for the function_app.py code are essential:
To start, the process involves defining global variables and setting up functions specifically tailored for sending WhatsApp messages:
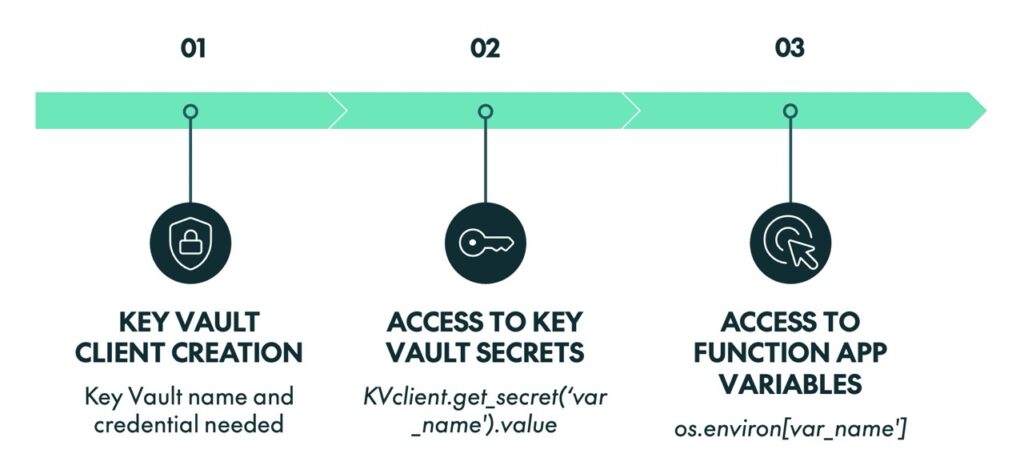
Global Variables and Clients
- Creation of the Key Vault Client to access the secrets stored there: KeyVault_client
- Access to Key Vault Secrets. Certain values are confidential and must be stored securely. To retrieve these values, use the following code structure:
KeyVault_client.get_secret(‘variable_name’).value
- To access environment variables in the function app, use this code:
os.environ[‘variable_name’]
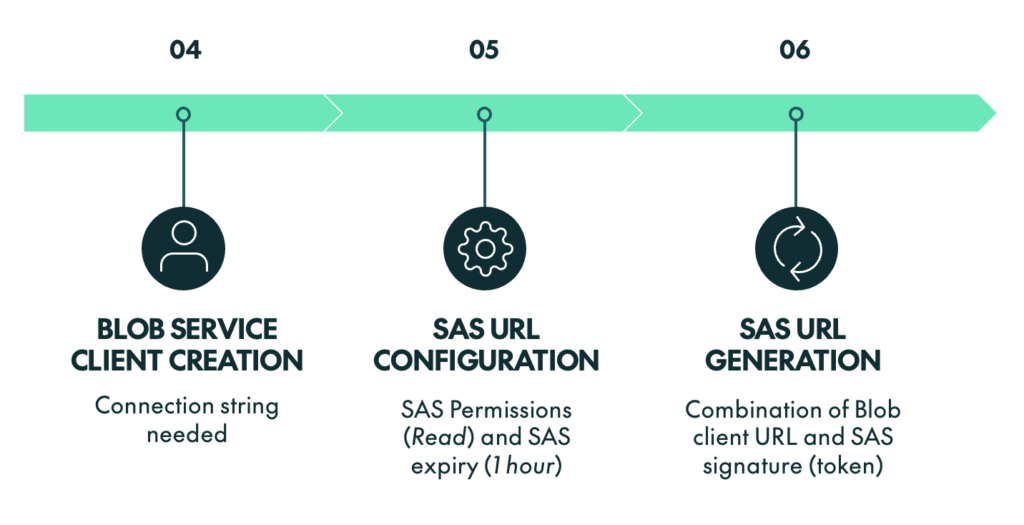
- To interact with a Blob service container, the connection string is required. The following code snippet demonstrates the creation of the Blob service client and access to a container:
blob_service_client = BlobServiceClient.from_connection_string(connection_string)
container_client = blob_service_client.get_container_client(container_name) - For Twilio Client Configuration, use Twilio Account SID and Twilio Auth Token as follows:
Twilio_client = Client(TWILIO_ACCOUNT_SID,TWILIO_AUTH_TOKEN)
WhatsApp Sending Functions
- send_initial_message: This function takes the recipient’s phone number as a parameter and sends an initial message using the following structure:
Twilio_client.messages.create(
body=»Hello there! *Do you want to receive the latest updates to various reports? If not, do not answer to this message*»,
from=from_whatsapp_number,
to=to_whatsapp_number) - send_mms: This function sends an MMS with the media file’s name and URL as parameters, alongside the recipient’s phone number. The structure is as follows:
Twilio_client.messages.create(
body=f’These are the new updates to the *_{blob_name}_* report’,
media_url=sas_url,
from_=from_whatsapp_number,
to=to_whatsapp_number )
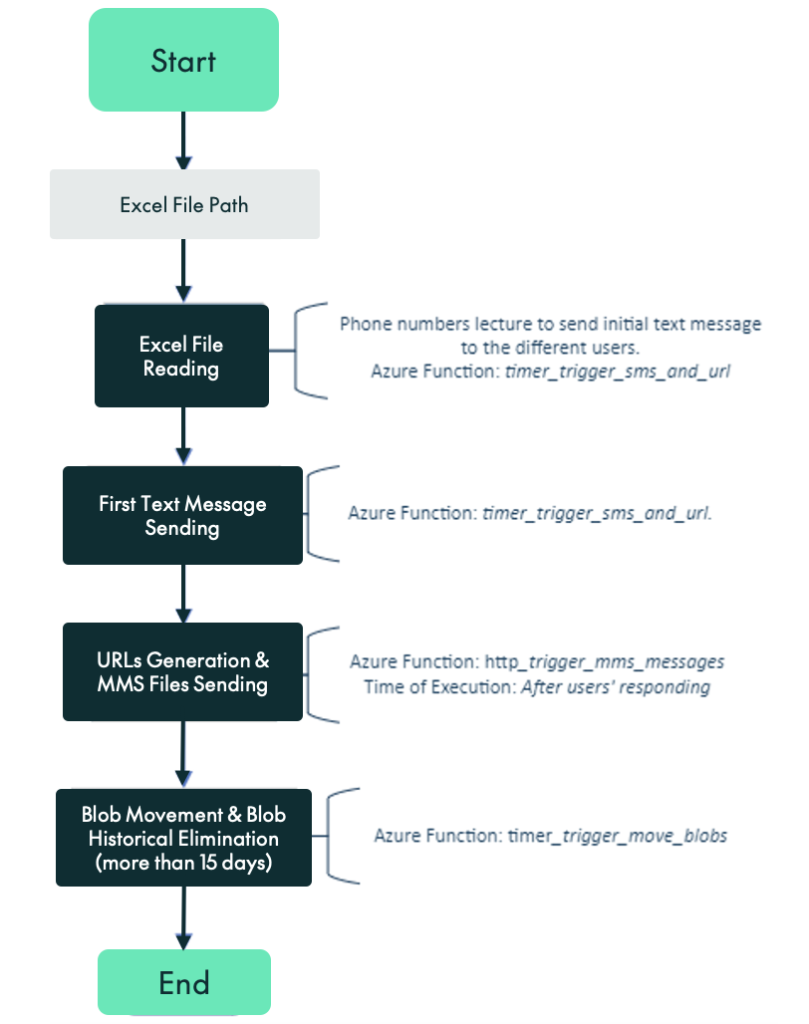
SMS Sending: timer_trigger_sms ()
- Excel file access: An excel_blob_client is created to access a specific Blob within a container. Its content is downloaded and read into a stream, which is then processed as an Excel file using the Pandas Python library.
- WhatsApp messages sending: An iteration through phone numbers is carried out, and the text messages are sent using the Twilio client configuration by calling the send_initial_message() function.
URLs Generation & MMS Sending: http_trigger_mms_messages()
- Reading request parameters: A key parameter is extracted from the HTTP request – the phone number of the user who responded to the initial text message, which will be used to specify the user to whom the reports should be sent. This parameter (in the request) is called From. If you want more information about request parameters, please visit this page. Additionally, to manage user responses, it is important to monitor the Body parameter in the request.
- SAS URL Configuration: This involves setting the duration, permissions, and expiry date for each Blob in the ToSend folder.
- SAS URL Generation: An SAS signature and URL are generated for each Blob in the ToSend folder using the Blob client. Due to the dynamic and wide range of IP addresses used by Twilio for making HTTP requests, it is not feasible to obtain a fixed IP address list. As a result, URLs Tokenisation is implemented as the security method to safeguard the media files being shared with users.
- MMS (Reports) WhatsApp Sending: The send_mms() function is called for each URL generated, and the reports are sent to the user who responded to the initial text message.
Keeping HTTP-triggered Function Alive: keep_alive()
Azure Functions, by design, tend to «sleep» after periods of inactivity to optimise resource usage, but on the downside this sleep mode causes the functions to take longer to start and, in consequence, to perform their tasks. Twilio, for instance, imposes a maximum response time of 15 seconds when accessing an application via an HTTP-triggered function, and if the function is in a sleeping state, this limited time window may not be sufficient for it to execute, causing the request to time out and fail.
To address this challenge, the keep_alive() function was created. This function runs every two minutes, as Azure typically sleeps functions after around five minutes of inactivity. This way we prevent the HTTP function from sleeping, ensuring that calls from Twilio can be made without delays, regardless of when users respond.
What’s more, this solution does not affect the cost structure, making it an interesting alternative to upgrading to the Azure Premium plan, which would otherwise be necessary to avoid this sleep mode.
- The final task of the solution involves moving files from the ToSend folder to the Sent folder in Azure Blob Storage. This process ensures that users do not receive duplicate information and that a historical log of sent files is maintained. Additionally, a mechanism is included to optimise storage by periodically deleting files older than 15 days:
Blob Movement: timer_trigger_move_blobs()
- List Blobs from Sent folder: The Blobs within a specific folder (Sent) in a container are listed using the list_blobs() method.
- Current Date Retrieval: This step retrieves the current date and time in UTC.
- Date Control and Blob Elimination (Retaining a 15-Day History): This iterates through the Blobs in the Sent folder, calculating how long each Blob has been there and deleting those that have been there for 15 days or more.
- List Blobs from ToSend folder: The Blobs within a specific folder (ToSend) in a container are listed using the list_blobs() method.
- Individual Blob Movement: For each Blob listed (excluding the first Blob, which does not correspond to a report), the Blob’s name is retrieved, and a new destination is generated by replacing the ToSend folder name with Sent. A copy of the original Blob is then initiated to the Sent folder, and the code continuously checks the copy status in a loop, waiting until the operation is marked as «success». Once the copy is successfully completed, the original Blob in the ToSend folder is deleted.
Conclusions
In conclusion, when more direct and immediate communication is required around Power BI reports, using WhatsApp as the communication channel can offer a more effective approach than traditional messaging methods. Our solution offers several key advantages, such as enhanced responsiveness, real-time communication, and seamless integration with existing systems, ensuring efficient and reliable information delivery.
If you would like to see this solution in action or gain more insights into how it works, please don’t hesitate to contact us. The ClearPeaks team is here to help you tailor this solution to your specific needs and to guide you through the implementation process.

